Forced rhubarb is highly prized for its unique characteristics and superior taste. Grown in the dark, this vibrant crop produces tender, pale stalks that are sweeter and less sour than traditional rhubarb.
Despite growing without natural light, forced rhubarb retains the same nutritional content as outdoor rhubarb, providing health benefits such as potassium, calcium, and polyphenols. With its fascinating cultivation process and exceptional flavor, forced rhubarb truly stands out as a remarkable English delicacy.
Whether it’s the mouth puckering sourness, ability to pair with the most unlikely of companions, or simply its millennial pink shade, the rhubarb has been enjoying a well earnt surge in popularity in recent years. So without further ado, here are 5 ideal ways to cook with forced rhubarb.
Roast Rhubarb
Ideal in a crumble…
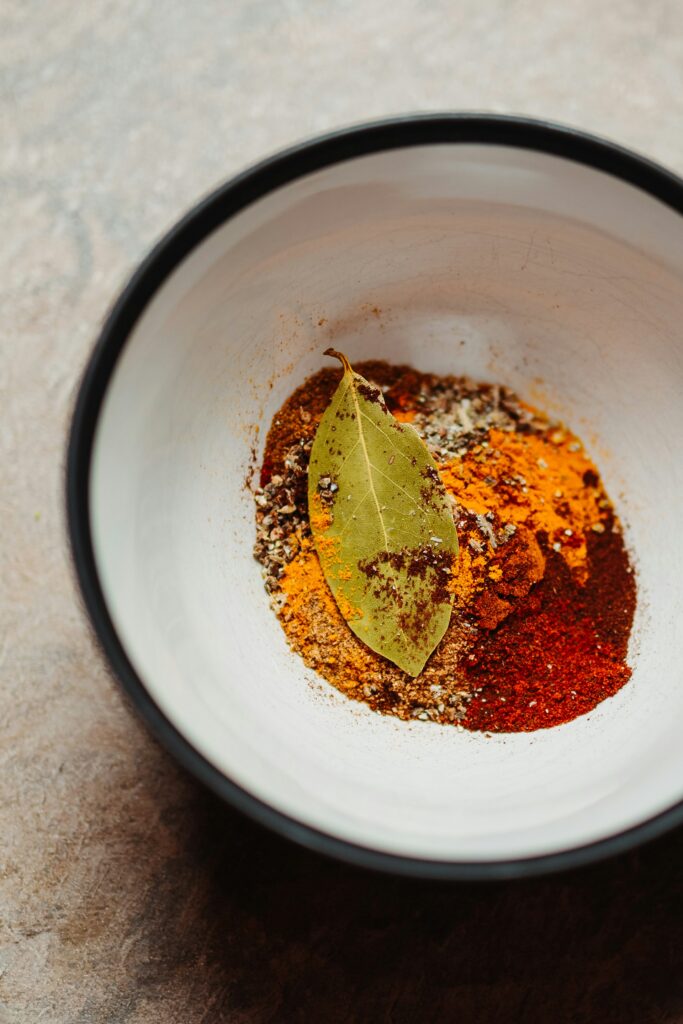
Design by IDEAL image by Dar1930 via Canva
It’s important to note before we get started the leaves of rhubarb are poisonous and should never be eaten. The good news is that forced, as opposed to main crop (in season in Spring), rhubarb doesn’t need to be peeled. Simply wash, then top and tale the stalks.
Who doesn’t love a rhubarb crumble? Whether it’s the headlining act or sharing the bill with apple, raspberries or blackberries, its sour tang and unique flavour bring so much to this British household favourite.
Traditionally, rhubarb would be stewed prior to being baked under a bed of butter, flour and sugar. But roasting the vegetable (yep, not a fruit) first gives it more complexity of flavour and helps retain its beautiful, much sought after pink hue perfectly.
Simply cut the rhubarb into batons, sprinkle with a few tablespoons of water and about double that amount in caster sugar, and roast in a medium to hot oven. The addition of ginger, vanilla extract or orange zest can really enliven things. 10 to 20 minutes in the oven, before adding the crumble, is about right.
Compote
Ideal with a white chocolate tart, on a scone, atop ice cream or custard, and even on your morning cereal…
Because of its astringent quality, rhubarb benefits from a lengthy sojourn in a pan with some sugar and water or orange juice.
Simply cut a few stalks into chunks, find a pan with a hefty bottom and combine the rhubarb with about half its weight in caster sugar and a splash or two of water. Bring to the boil, reduce to a simmer and let it do its thing for around 15 minutes. Check that the rhubarb is soft and giving before removing from the heat.
The addition of star anise, cloves, cinnamon or all three lifts this guy even further. Keep in the fridge with a sealed lid, but serve with the chill taken off.
Although its shocking pink appearance and its sour, sweet taste make it dessert-friendly, that tartness also means rhubarb is an excellent companion to fatty meats and oil-rich fish. The cooking method is the same as the compote above, but with a final flourish; a blitz in the food processor a pass through a mouli, sieve or chinois, resulting in a smooth, perhaps even glossy, end product. If you want to get ‘cheffy’, then you could use xanthan gum to give your puree better body, structure and shine.
Once you’ve got your puree, you could use it as a base for some delicious, Instagram baiting macaroons.
Pickled
Ideal alongside cheese or charcuterie…
Make use of February’s glut of the good stuff by pickling any excess to enjoy in the months when the pink powerhouse is out of action. You’ll want your pickle mix to err on the sweet side to counteract rhubarb’s inherent sourness.
The proportions should read roughly; 4:2:1, rhubarb to vinegar to caster sugar.
Bring your liquid and sugar to the boil so they make friends, allow to simmer for two minutes then cool. Put pieces of rhubarb in a sterilised Kilner jar and pour to cooled mixture over the top. Seal tightly and place in the fridge for a few days before enjoying. It’ll be good to eat for longer than you can resist finishing it off. Perfect.
If you’re feeling brave, why not try a lacto-ferment for a more complex cure?
Raw
Ideal for being simply dipped in sugar, salt and chilli…
On the streets of Thailand and Vietnam, a popular snack is any sour fruit or vegetable of the season simply dipped salt, sugar or a mix of the two, often combined with ground chilli. Heaven. Rhubarb can be pretty aggressive when eaten raw and unadorned but you might be surprised how moreish it is when given a sparring partner.
Is there anything better than a nice joint of roast beef, a full bodied Bordeaux with generous amounts of tannin, and some cracking yorkies? As the kids say, it would be rude not to.
February 2nd marks ‘National Yorkshire Pudding Day’ and no doubt, dinner tables across the country become lavished with gigantic Yorkshire puddings. With that in mind, here are 5 IDEAL steps to the perfect Yorkshire pudding.
BASIC BATTER CAN’T BE BETTERED
With a Yorkshire Pudding, there really is no need to get fancy with the recipe. The pleasure of the dish is in its versatility; a textural delight of crispy roof and chewy, squidgy base, and the perfect vehicle for gravy.
Once you start adding thyme, mustard powder, even black pepper, the quiet, no-nonsense majesty of the pudding is lost. Remain faithful to traditional batter recipes and you won’t go wrong; that’s matching your milk (and water, if you favour a crispier, drier texture) to your eggs in fluid ml, and about three quarters that amount in flour. Confused? 3 eggs (coming in at 175ml), 125ml of flour, 150ml of milk and 25ml water should do the trick. Of course, a little salt is needed.
REST & RELAXATION
It’s undisputed by chefs and scientists alike that the best yorkies have been made with batter well rested in the fridge before cooking. This leads to a far more significant rise, all round better texture – both exterior and interior – and more complex taste, make no mistake. If you have the foresight and time, making your batter the day before; letting it rest overnight will bring brilliant results and is definitely worth the extra effort.
Unsplash+
In collaboration with Luke Thornton
DRIPPING WITH DRIPPING
You’re going to need oil, so why not use a fat with heaps of flavour which will complement both the yorkie and the overall flavour of the dinner? Seeing as we’re talking roast beef, using beef dripping makes perfect sense; a teaspoon or two’s worth per individual tray compartment is grand. Dreamy.
SMOKIN’ HOT TIN, SMOKIN’ HOT FAT, SMOKIN’ HOT OVEN
You’ll want your oven preheated to 200°C well in advance, and your tray with the beef fat added also in the oven getting hot ahead of time too; ten minutes should be enough. By making sure that all elements are up to temperature, you’ll be getting energy into your batter as soon as it hits the pan, allowing for an even rise, and preventing your Yorkie mix from sticking to the pan.
Whether or not the batter is cold or warm isn’t as relevant as some recipes make out, with only minor differences in texture noticeable. What is important is not to burn yourself. Simply give your rested batter a final whisk, decant it into a pouring jug, slide the oven shelf holding your smoking hot tin gently out and pour in your batter to two-thirds height. This allows the Yorkshire pud’ room to rise.
GOOD GRAVY AND LOTS OF IT
A Yorkshire pudding without gravy is a tragic scene indeed. An incomplete, almost inedible eating experience. The risen bowl shape you’ve been working so hard to achieve is made for pouring gravy in to. Make sure, then, that there’s ample amounts of the good stuff.
Let’s get something out of the way before we begin. To suggest the existence of a ‘right’ way to cook risotto is a dangerous, contentious game to play. Italians with grandmothers may chastise and correct any sweeping claims about relative nuances in technique, with their passports settling the debate before a stove is even ignited.
Nonetheless, there are a few accepted truths regarding the best way to do things, and while this is not ‘case closed’ where risotto is concerned, these steps bring about a pretty delicious finished article. So, here’s how to make risotto in 7 easy steps.
Grains Of Truth
Risotto starts with the choice of rice, and you’ll want a short to medium grain, starchy variety for best results. Try making one with basmati, jasmine or brown rice and you’re going to have an embarrassing mush of weirdness as your reward.
Common wisdom suggests either arborio or carnaroli as the best grain for the job; their starch creating a creamy, unctuous texture if treated with respect. Bomba rice (commonly used for paella) works, at a push.
A Wide, Deep, Pan
Choosing your weapons, part 2. It’s essential you use the right pan, one which has a large surface area and high sides. The former is important as you don’t want rice piled on rice during the cooking process; a single, even coverage is better. The latter is necessary as when you’re beating, you don’t want your risotto making a bid for freedom.
Toast And Deglaze
You asked us how to make risotto in 7 easy steps. Well, now’s the serious part; it’s time to start cooking. Melt a little butter and olive oil over a medium heat and sweat off a diced shallot and halved (bitter green shoot removed) clove of garlic. You don’t want any colour here, just to gently cook.
Next, add your risotto rice and toast it. Although toast is the term, you don’t want deep brown colour, just to bring out the nutty characteristic already present in the grain. Once the requisite aroma fills the air and a gentle colouring is achieved, deglaze the pan with a good glug of something acidic; white wine is most common, but champagne, beer and even vinegar also serve a similar function. Wait for the liquid to evaporate while stirring.
Hot Stock, Added Gradually
A flavoursome stock is crucial to a great risotto, as all the rice will take on the flavour – whether good or bad – of the liquid used. You’ll want your stock nice and hot before you start cooking; if it hits the risotto pan cold, it’ll interrupt the cooking process and take a bit of time to heat back up, throwing things all out of kilter.
Next, when adding your stock to the pan, introduce it gradually (a ladle at a time is good), as you never want the grains to be in a soupy state. They need a little friction to release their starch and fully appreciate into something creamy; swimming will prevent this. Over a medium to high heat, let each ladleful largely disappear into the rice before adding the next.
The point of deepest dispute. While some ascertain that science can be used to prove constant stirring is completely unnecessary, we’re afraid we just can’t agree. The vast majority of great Italian chefs insist on consistent agitation to elicit the much sought-after texture, and experience has taught us to agree. The whole process should take roughly 17 and a half minutes.
Mantecatura Off The Heat
If the stock is risotto’s backbone, then the mantecatura is it’s beautiful posterior. Meaning to cook until creamy, it rounds everything off, at the end. After adding a final ladle of stock, take your pan off the heat and let it rest for a minute.
Then add diced, cubed butter and parmesan and beat in vigorously until you have a homogenised, lush mass. A little – and just a little – liquid should still be present.
Addition Ingredients
Simplicity is the watchword here, too many ingredients added will disrupt the textural pleasure you’ve worked so hard to achieve. You’ll want anything you add to be cooked already and simply warmed through in the risotto’s residual heat, with fresh herbs sliced and added just before serving to retain maximum freshness.
Common Risotto Mishaps To Avoid
The path to risotto perfection is littered with well-intentioned mistakes. First, using cold stock is a cardinal sin – it disrupts the crucial rhythm of cooking and starch release. Equally egregious is drowning your rice in stock; that “soupy” approach yields gluey results rather than the desired creamy texture.
Many cooks skip the toasting step, missing out on that essential nutty depth. Others, perhaps feeling ambitious, throw in raw vegetables at the end, leaving them crunchy and disrupting the carefully cultivated consistency. And speaking of consistency – abandoning your stirring duties is tempting but fatal to achieving that perfect “wave” texture Italians call all’onda.
Finally, rushing the mantecatura or skipping it entirely is like writing a novel without an ending. Those final moments off the heat, beating in the butter and cheese, transform a good risotto into a magnificent one. Take your time, respect the process, and remember: patience yields perfection.
Now it’s time to sit back and enjoy the fruits of your labours….care to share a bowl?
Owning and running a car can be expensive, not just in terms of the purchase cost and the ever-rising price of fuel. There are also maintenance fees to consider, with some drivers spending thousands of pounds over the life of their vehicle to keep it running smoothly.
Of course, the cost of maintaining your car depends on a wide range of factors, including its age, mileage, model and how you drive it. However, it’s a more universal truth that by doing as much simple maintenance work yourself and dealing with any minor issues as soon as they arise, you could save yourself money on car care over the lifespan of your vehicle.
If you’re eager to do as much car maintenance yourself as possible, then here are some essential pieces of car care equipment you need to invest in.
A Car Jack And Wrench Set
Changing a tyre is a simple piece of car maintenance, but a surprising number of drivers don’t know how to do it, or they don’t have the right tools on hand.
Let us explain in simple terms; to change a tyre on your car, you’ll need a spare as well as a car jack to raise the vehicle off the ground, a wrench for removing the wheel nuts and a wheel nut key if the nuts are locked into place. It would also help if you keep your car’s manual nearby in case you need to refer to it, at least for the first couple of wheel changes.
When you’re choosing a jack for your car, you need to find out the gross weight of the vehicle and then choose a jack that will be capable of raising and holding it. Investing in a high-quality car jack will pay off in the long run, so it’s worth taking the time to explore the options on the market and find one that’s best for your vehicle.
A Digital Tyre Pressure Gauge
Gone are the days of relying on manual tyre pressure gauges that can be difficult to read and often inaccurate. A quality digital tyre pressure gauge is an essential piece of kit for any motorist who wants to maintain their vehicle properly. Incorrect tyre pressure can lead to increased fuel consumption, uneven tyre wear, and potentially dangerous driving conditions.
When selecting a digital tyre pressure gauge, look for one with a backlit display that’s easy to read in low-light conditions. Many modern gauges come with additional features such as multiple pressure units (PSI, BAR, kPa) and the ability to store your vehicle’s recommended pressures. Some advanced models even include a built-in LED torch, which can be invaluable when checking your tyres in poor lighting conditions.
According to buycarparts.co.uk, regular tyre pressure checks are crucial for both safety and efficiency, whether you’re in a Land Rover or Fiat 500, and having your own digital gauge means you won’t need to rely on potentially inaccurate readings from petrol station air machines. Plus, being able to check your tyre pressures at home means you’re more likely to do it regularly, which can help extend the life of your tyres and improve your vehicle’s handling.
A Multimeter
A multimeter is perhaps one of the most versatile diagnostic tools you can own for car maintenance. This device can help you diagnose various electrical issues, from testing battery voltage to checking fuses and identifying faulty sensors. Modern vehicles are increasingly reliant on electrical systems, making a multimeter an invaluable tool for any DIY mechanic.
When choosing a multimeter for automotive use, opt for one that’s specifically designed for vehicle diagnostics. These typically have features such as a high voltage range for testing the charging system, and a low voltage range for testing sensors and other electronic components. Look for a model with auto-ranging capabilities, which eliminates the need to manually select the correct voltage range and reduces the risk of damaging the meter or the component being tested.
The ability to test continuity is another essential feature, as it allows you to check for breaks in wiring and verify the condition of various electrical components. While professional-grade automotive multimeters can be quite expensive, there are many affordable options available that will serve the needs of most DIY enthusiasts whilst still providing accurate readings and reliable performance.
An OBD Reader
Modern cars use error codes to show if there’s an issue and have an onboard computer that stores data with errors in it. When your car breaks down, you need to access this data, but most drivers simply take their vehicle to a mechanic to diagnose and deal with the issue.
Most mechanics use an OBD (on-board diagnostics) scanner, and since you can get one yourself, you could save a vital step in the process. Also, if you have the skills, you could fix the problem yourself. This means your car will spend less time in the garage, and you’ll be able to get instant access to all your car’s onboard diagnostics information.
A Car Battery Charger
Your car’s battery is essential for running its onboard systems and functions that make the vehicle easy and comfortable to drive. Therefore, it’s an important part of your vehicle. Sometimes, the battery can lose power for a number of reasons, in which case you need to recharge it.
Thanks to the cutting-edge electrical equipment and onboard computers on modern cars, it’s not advisable to jump start a car from another’s battery anymore. Instead, it would be best if you used an external charger.
A car battery charger is simple to use and can be kept in your garage or even in the boot of your car in case of emergencies while you’re on the road. When buying a car battery charger, make sure the unit comes with all the necessary cables needed to hook it up to your vehicle, and if not, then make sure you source them so that you have everything you need for when the time comes to jump start your car’s battery using your charger.
When you think of a stethoscope, you probably think of a doctor or nurse checking a patient’s heart rate. An automotive stethoscope uses the same principles, but instead of a person it can be used to listen to the internal workings of a car engine. So, the next time your car starts making a strange noise, you can use an automotive stethoscope to listen to the car and isolate where the sound is coming from. This will make it easier for you to identify the cause of the noise and fix the problem.
Automotive stethoscopes are incredibly sensitive and designed to pick up even the slightest vibration in the engine, so they are ideal for listening to even the smallest of sounds and dealing with even the slightest of issues in your car.
By using an automotive stethoscope, you can do preemptive maintenance as well as eliminating strange noises (getting your priorities right, of course) You can, for example, identify loose components in your car’s internal workings and tighten them before they come completely off and cause serious damage to your vehicle. Quality automotive stethoscopes aren’t expensive to buy, so they’re definitely worth the investment.
A Comprehensive Car Cleaning Kit
Driving a clean car is a great feeling, cosmetically, but it’s easy to get behind on your car cleaning when you’re busy. Getting your car completely detailed can be expensive, so it’s worth doing as much cleaning as you can yourself. While it’s easy to let your car cleaning get on top of you, it’s more important than you might think to keep your vehicle in pristine condition.
That’s because studies show that a cleaner car can use less petrol and generally run better than a dirty one. Also, a car that’s full of rubbish and other unneeded items will be heavier, which can affect fuel consumption and general driving performance. As such, you need to make sure that you’re on top of your car cleaning and that you don’t keep too much unneeded junk in your vehicle.
When you’re cleaning your car, you need to make sure that you have a quality vacuum cleaner to suck up dirt and debris. If you’ve got a driveway or garage, then you could use your home’s corded vacuum, but if you don’t, then you should consider buying a cordless vacuum.
These devices are easy to use, as they run on rechargeable batteries and don’t have a cord. So, they’re great for reaching the crevices in the back of large or awkwardly shaped vehicles. A good cordless vacuum can allow you to remove dirt from inside your car. For the outside, consider a pressure washer or high-powered hose to clear away any grime from your car’s bodywork.
The Bottom Line
The equipment on this list might seem expensive when you add it up, but this initial outlay is nothing compared to the cost of taking your vehicle to the garage every time it has an issue. So, you could potentially save hundreds of dollars, if not more, if you choose the right maintenance equipment and learn basic car care skills. This list should help you to identify the right equipment for any dedicated driver who’s eager to reduce their car’s trips to the mechanic.
The growing interest in seasonal and local food has sparked countless debates about health, environmental impact, and culinary quality. As farmers’ markets multiply and ‘locally sourced’ appears on more menus, it’s worth looking past the hype to understand what these food choices really mean for our diets, health and environment.
The Natural Rhythm Of Seasonal Food
The relationship between seasonality and nutrition is more profound than many people realise. When we eat produce in its natural growing season, we’re not just following tradition – we’re tapping into nature’s perfectly timed nutrition delivery system.
Research suggests that produce harvested in season can contain more vitamins and minerals than out-of-season alternatives. Why? Plants naturally accumulate nutrients based on their growing conditions, and seasonal growing allows them to develop according to their natural cycles.
Take spinach, for example. When grown in spring, it contains significantly higher levels of vitamin C and folate compared to winter-grown spinach cultivated in heated greenhouses. Similarly, winter vegetables like Brussels sprouts and parsnips develop higher concentrations of certain nutrients during cold weather exposure. This natural timing isn’t coincidental – it’s the result of millions of years of evolution, with plants adapting to provide optimal nutrition at specific times of the year.
The Cost Benefits Of Seasonal Eating
The economics of seasonal eating often surprise people who assume that better quality means higher prices. In reality, seasonal produce typically represents one of the best values in our food system, thanks to the basic principles of supply and demand combined with reduced production costs. When crops are grown and harvested in their natural season, they require fewer resources and interventions, which translates directly to lower prices at the market.
Seasonal produce typically costs less because:
Lower energy inputs are required for growing
Transport and storage costs are reduced
Supply tends to be abundant during peak seasons
A recent article published by Yahoo Finance suggested that buying seasonal produce could reduce your grocery bill by up to 50% compared to buying out-of-season alternatives. This significant saving reflects not just the abundance of seasonal produce, but also the reduced costs associated with growing food in its natural cycle.
The Environmental Advantage
The environmental benefits of seasonal eating extend far beyond what most consumers realise. When we choose seasonal produce, we’re essentially aligning our diet with nature’s own energy-efficient system. Growing food in its natural season works with the environment rather than against it, requiring significantly fewer artificial inputs and interventions. This natural approach creates a cascade of environmental benefits that extend from the farm to our tables.
Growing food in its natural season requires fewer artificial inputs:
Less artificial heating
Reduced need for pesticides
Lower water consumption
Minimal artificial lighting
The Local Connection
The relationship between food miles and nutritional value presents one of the most complex and frequently misunderstood aspects of our food system. While the concept of ‘fresh is best’ seems straightforward, the reality involves a fascinating interplay between time, distance, and modern storage technologies. The question of whether local food is more nutritious isn’t just about distance – it’s about understanding how fruits and vegetables live, breathe, and change after harvest.
Some key findings:
Certain nutrients, particularly vitamin C and folate, begin declining immediately after harvest
However, modern storage techniques can help preserve nutrients in properly transported non-local food
The Case For Frozen & Preserved Foods
When discussing local and seasonal eating, there’s an unexpected hero in the nutrition story: frozen produce. As any registered dietitian will tell you, while there’s often a perception that frozen foods are somehow inferior to fresh, the science tells a different story. The rapid freezing process used today essentially presses pause on the degradation of nutrients, often resulting in frozen produce that’s more nutritious than its ‘fresh’ counterparts that have spent days in transit and storage.
The Reading University research pointed to a surprising truth: frozen produce can actually retain more nutritional value than fresh produce that’s been sitting in supply chains or your fridge for several days. This is particularly true for vitamin C, folate, and other water-soluble vitamins that begin degrading immediately after harvest. For example, frozen peas can contain more nutrients than fresh peas that are several days old, and frozen spinach often retains more folate than fresh spinach that’s been transported long distances.
This has important implications for both seasonal and local eating:
During off-seasons, frozen local produce can be a more nutritious choice than fresh imports
Freezing allows us to extend the benefits of peak-season produce throughout the year
Local farmers and producers can freeze their produce at peak ripeness, maximizing both flavor and nutrition
It provides a practical solution for accessing local produce year-round
The key is to think of frozen fruit and vegetables not as a compromise, but as a smart strategy for maintaining good nutrition while supporting local food systems. Many local farmers now offer frozen versions of their seasonal produce, creating a win-win situation: consumers get high-quality, nutrient-rich food year-round, while farmers can extend their market reach beyond the growing season.
Time & Freshness
The concept of freshness in our food system deserves closer examination, as it represents one of the clearest advantages of local food sourcing. While modern supply chains have become remarkably efficient at moving produce across vast distances, they still can’t compete with the fundamental advantage of proximity when it comes to time from harvest to plate.
Local food’s primary advantage isn’t necessarily superior nutrition, but rather freshness. Produce sold at farmers’ markets is typically harvested within 24 hours of sale, compared to supermarket produce which may be 7-14 days post-harvest. This difference in freshness affects not just nutritional content, but also taste, texture, and overall eating quality.
Understanding Environmental Impact
The environmental impact of local food presents a more nuanced picture than the popular ‘food miles’ narrative might suggest. While intuition tells us that shorter transportation distances must be better for the environment, the reality involves a complex web of factors including growing methods, seasonal timing, and storage requirements. Understanding these complexities helps us make more informed decisions about when local truly means more sustainable.
The ‘food miles’ debate isn’t as straightforward as it might seem:
Growing methods often matter more than distance travelled
Some local food grown in heated greenhouses may have a larger carbon footprint than imported alternatives
Making Better Choices
Understanding both the seasonal and local aspects of our food system empowers us to make choices that maximise benefits for our health, wallet, and environment. These two approaches naturally complement each other – eating seasonally often makes it easier to source locally, while focusing on local produce typically guides us toward seasonal eating patterns. The key is to understand how to combine these approaches effectively in your daily life.
Here’s how to embrace both seasonal and local eating:
Start with what’s growing naturally in your region right now
Build relationships with local farmers and producers who follow seasonal growing patterns
Consider frozen alternatives from local producers for out-of-season produce
Learn about your area’s growing calendar to anticipate what produce will be available when
Remember that both ‘seasonal’ and ‘local’ exist on a spectrum. Making even small shifts towards more seasonal and local consumption can provide benefits without requiring a complete overhaul of your shopping habits.
The Verdict
The evidence suggests that combining seasonal and local eating habits offers the most comprehensive benefits. When we eat food that’s both in season and locally sourced, we’re likely getting the best of both worlds: optimal nutrition from seasonal growing patterns, maximum freshness from local sourcing, cost benefits from seasonal abundance, and environmental advantages from both approaches.
The ideal approach? Think of seasonal and local as complementary guides that work together to help you make better food choices. This mindful approach to eating connects us more deeply with our food system, supports local economies, and helps ensure we’re getting the most nutritious, sustainable food possible. Start with what’s practical for your situation, and gradually build more seasonal and local choices into your regular shopping habits.
So, you’ve just finished the third season of The Bear, and you still want to become a chef? Can we commend you on your bravery…
The one-two sucker punch of Brexit and a global pandemic has led to the hospitality industry being woefully understaffed. Though this has sadly left many restaurants struggling, if we’re doing our best to look on the bright side, then for those who have been considering entering the profession, finding a job has – arguably – never been easier.
Whilst the hours are notoriously long and the work physically and mentally demanding, being a chef is also a hugely rewarding job, with a clear career progression and the opportunity to learn on the job, each and every day.
Fortunately, the industry has been making moves to address its working conditions, with many top kitchens in recent years reducing hours and prioritising worker welfare. In many ways, there’s never been a better time to don that apron, and if you’re an aspiring chef, here’s how to land your first job in a professional kitchen.
Consider KP’ing
Enthusiasm and a thirst (or rather, hunger) for knowledge are generally more valued than a smattering of prior experience for aspiring chefs seeking their first role.
That said, if you’re keen to get your foot in the door and learn to love the ebb and flow of a professional kitchen, you could apply for a pot washer or kitchen porter role and wait patiently for that moment when the kitchen is low on numbers and some potatoes need peeling!
So many of the world’s top chefs started this way, taking first jobs within restaurants doing pot washing or bussing, and then transitioning into the kitchen proper. Some top names who followed this path include Ferran Adria, Samin Nosrat, Anthony Bourdain, Thomas Keller, Clare Smyth and Gordon Ramsay, to name but a few.
In the UK, there are numerous reputable cooking colleges and culinary institutions where you can hone your skills and gain the necessary qualifications. Some of the well-known institutions include:
Le Cordon Bleu London: Renowned for its comprehensive culinary arts programmes, Le Cordon Bleu offers a range of courses from diplomas to short courses, covering both cuisine and patisserie.
Westminster Kingsway College: This college has a long history of producing top chefs and offers a variety of courses in culinary arts, including professional chef diplomas and apprenticeships.
City of Glasgow College: Known for its excellent facilities and strong industry links, this college offers a range of culinary courses, from introductory to advanced levels.
In addition to traditional cooking colleges, there are also chef-led culinary arts programmes that provide an immersive and intensive learning experience. These programmes are often led by world-renowned chefs and offer a unique opportunity to learn from the best in the industry. Some notable examples include:
The Raymond Blanc Cookery School: Located at Le Manoir aux Quat’Saisons in Oxfordshire, this cookery school offers a variety of courses led by Raymond Blanc and his team. The courses range from one-day workshops to longer programmes, covering a wide array of culinary techniques and cuisines.
The Gordon Ramsay Academy: Based in Woking, Surrey, this academy offers a range of courses for aspiring chefs of all levels. Led by Gordon Ramsay and his team of expert chefs, the academy provides hands-on training in a professional kitchen environment.
École Ducasse: A Paris institution founded by the legendary chef Alain Ducasse, École Ducasse offers a range of programmes from short courses to full-time diplomas, focusing on both culinary arts and pastry arts. The school has campuses in France and is known for its rigorous training and emphasis on excellence.
Alternatively, if you feel you’ve got a decent foundational knowledge, or if you’ve recently finished catering college or completed a professional cooking course, then you can send emails and make calls to local restaurants asking if they have any commis chef positions that need filling.
This is the first rung on the ladder in a professional kitchen, after which you’ll work your way up the ranks.
Whilst you”ll see hundreds of job descriptions online and a whole load of terminology about different roles, in the UK a kitchen ‘brigade’ usually follows this hierarchy:
Commis chef – An apprentice chef, always learning, always peeling…
Demi Chef-de-Partie – An assistant chef, of sorts, to the Chef-de-Partie, but sometimes allowed to be in charge of their own section
Chef-de-Partie – This is when things get serious. As a CDP, you’ll be in charge of your own section, whether it’s larder, salads, fish, meat, cold starters, mains….
Junior Sous Chef – A Sous Chef in the making
Sous Chef – The kitchen’s second in command and the Head Chef’s right hand person. The Sous Chef will often run the pass, manage the team, and take care of the inventory and ingredients orders. A pivotal role
Head Chef – The Head Chef runs the kitchen, sets the menu and (in an ideal world!) makes the final call on all matters related to food. They are also responsible for managing the budget
Executive Chef – Some larger organisations also have an executive chef
Though most aspiring young chefs will nowadays enquire about potential commis chef roles via email or phone, there’s still much to be said for pitching up in person, knocking on the door and asking to speak to the chef in charge that day. It shows confidence and commitment, and will almost always be looked upon favourably.
As we mentioned earlier, previous experience is a benefit, and chef’s qualifications are a plus, too, but increasingly, professional kitchens value enthusiasm and discipline more than established skills and high profile names on the CV. Skills can be taught on the job, after all.
Whichever way you go about asking a restaurant for a commis chef position, if there’s one going, it’s almost certain you’ll be offered a trial shift so the head or sous chef can get a measure of the way you work. This is your chef’s interview, and unfortunately, this is usually unpaid.
Though the chef in charge will, of course, be looking at your skillset, your trial shift will be as much about assessing your attitude, your willingness to learn and how you fit in with the rest of the team. This is also your chance to test the waters of a new workplace, to see if it feels right for you.
A trial shift will generally last for a single kitchen shift – morning prep and lunch service, or afternoon prep and dinner service. Though you certainly won’t be expected to run a station during service, you will be expected to muck in and help the Chef-de-Partie to whom you’ve been assigned – this is your chance to show enthusiasm and inquisitiveness, so ask plenty of questions, roll your sleeves up and get stuck in.
Don’t treat your trial shift as if simply surviving it is a success. Instead, make a fine first impression with your eagerness to get involved. That said, you should be honest with the chef you’re working under about your limitations, too; if you’re asked to cook something you’re not confident in, or you’re handling an ingredient you’ve never seen before, it’s always best to be honest about it.
Alternatively, to get a feel for what it’s like to work in a professional kitchen, you can contact local restaurants and see if they have a stagiaire program in place. Staging refers to unpaid interns positions that see a chef work for a short period in a new kitchen, with the view to learning new techniques and understanding a different style of cuisine to what they’re familiar with.
Even for experienced chefs, this is a popular thing to do, as it gives cooks a chance to step out of their comfort zone, learn new skills and network. High end, Michelin starred kitchens regularly run stagiaire programs accordingly.
For aspiring chefs, a stage is a good opportunity to see if working in a professional kitchen is right for them. What’s more, a successful stage period – whether it’s for a day, a week, or a fortnight – often results in a job offer.
When you turn up for your trial shift or stage session, it’s essential that you’re prompt, giving yourself enough time to get changed for the day and meet everyone in advance of your shift starting.
The restaurant will expect you to bring your own chef’s whites (short sleeved is fine unless otherwise stated), chef trousers made for professional chefs specifically (black is best), chef’s shoes and a set of knives and sharpener. The restaurant will provide you with an apron and any other specialist kitchen equipment required for your role that day.
That said, it should be noted that some establishments are now a little more informal in their attire, and may only require you to wear a white or black t-shirt instead of chef’s whites. Ask the head chef about this in your correspondence prior to your trial or stage beginning.
Whilst many facets of an aspiring chef’s role have become somewhat more relaxed in recent years, having a good set of clean, sharp knives is absolutely non-negotiable in any self-respecting professional kitchen.
You should, at the very least, have a set of three in your knife roll; a chef’s knife, a serrated bread knife and a paring knife. With these to hand, there will be nothing you can’t handle when it comes to chopping.
Other useful additions to your block or roll would be a filleting knife for precision fish prep and a boning knife for making light work of butchery. Almost as essential is a proper implement for sharpening; chefs tend to favour a wet stone, but a steel also works well. Put simply, your output (and job prospects) will be greatly improved with a few simple investments.
For many home cooks turning their hand to the wok for the first, achieving that elusive restaurant-quality stir-fry – where vegetables remain vibrant yet tender, and proteins are perfectly seared – feels like chasing a culinary unicorn.
The secret lies in understanding not just the technique, but the science and philosophy behind proper stir-frying. With that in mind, here’s something of a beginner’s guide, aiming to unlock the mysteries of wok hei, that coveted breath of the wok that elevates a good stir-fry (or even a sludgy, stodgy stir-fry) to a magnificent one.
The Foundation: Your Equipment
Before we even consider proper professional technique, we must address the cornerstone of stir-frying: the wok itself.
Traditional carbon steel woks, measuring 14 inches in diameter, offer the ideal combination of heat retention and responsiveness. Contrary to popular belief, flat-bottomed woks can work brilliantly on Western hobs, though round-bottomed versions paired with a wok ring remain the gold standard for gas cookers.
A properly seasoned wok is non-negotiable. Much like a cast-iron pan, your wok should develop a naturally non-stick patina over time. This isn’t merely about preventing food from sticking – it’s about developing those complex flavours that only come from a well-seasoned vessel.
To properly season a wok:
Scrub your new wok thoroughly with hot water and washing-up liquid to remove the factory coating. Dry completely.
Open your windows and turn on your extractor fan—this process creates smoke.
Heat your wok until it begins to change colour (it may develop yellowish or brownish spots—this is normal).
Remove from heat and add two tablespoons of high-smoke-point oil (groundnut or rapeseed work well). Using a wadded kitchen roll held with tongs, spread the oil in a thin layer across all surfaces.
Return to high heat and watch the oil begin to smoke. Keep spreading the oil around as it smokes, paying special attention to the sides of the wok.
Once the smoking subsides, wipe out any excess oil. The surface should now appear patchy and darker.
Repeat the oiling and heating process 2-3 more times until your wok develops a dark, semi-glossy finish.
For the final step, stir-fry aromatic vegetables like spring onions and ginger scraps in oil. This adds flavour to the patina and tests your seasoning.
The Secret Of Silky Protein: Velveting
Professional Chinese kitchens rarely add raw meat directly to the wok. Instead, they employ a crucial technique called velveting – a process that transforms ordinary cuts into supremely tender, silky morsels. This method involves marinating protein (be it chicken, beef, pork, or seafood) in a mixture of egg white, cornflour, rice wine, and a touch of baking soda.
The science behind velveting is fascinating: the egg white creates a protective coating, while the alkaline baking soda changes the protein’s pH level, preventing it from tightening too much during cooking. The result? Meat that remains tender and juicy even when subjected to intense wok heat.
Traditional velveting involves briefly blanching the marinated meat in oil or water before stir-frying. While oil-blanching produces superior results, water-blanching is more practical for home kitchens and still yields excellent outcomes. Either way, this extra step makes the difference between good and restaurant-quality stir-fries.
The Heat Factor: Understanding Temperature Control
Professional-level stir-frying demands fierce heat—the kind that makes your oil shimmer and creates that distinctive ‘wok aroma’ before you’ve even added any ingredients. Most domestic hobs struggle to match the 100,000 BTU output of commercial, jet engine-style wok burners, but we can compensate through technique.
Pre-heat your wok until it’s smoking slightly. When a drop of water instantly vaporises with a sizzle, you’re ready to begin. This extreme heat serves multiple purposes: it prevents ingredients from stewing, ensures proper caramelisation, and most importantly, creates the conditions necessary for wok hei.
Mise En Place
Perhaps the most crucial yet overlooked aspect of successful stir-frying is thorough preparation. Everything must be cut uniformly, dried thoroughly, and arranged within arm’s reach. Professional chefs aren’t being precious when they insist on mise en place — they understand that once the wok hits the heat, there’s no time to hunt for ingredients or finish chopping that last carrot.
A Flick Of The Wrist
Now we arrive at the actual technique. Professional stir-frying is a choreographed dance of movement and timing. Begin by heating your oil until it’s just smoking, then add aromatics – ginger, garlic, spring onions—but keep them moving constantly to prevent burning. The wok should never sit still; maintain a constant rocking motion while using your wok spatula (wok hei) to toss and turn ingredients.
For proteins, the ‘sear and slide’ technique is essential. Spread your meat in a single layer, allow it to sear for 30 seconds without touching it, then use your spatula to fold and flip in one fluid motion. The meat should slide up the sides of the wok while you toss, maximising surface contact and ensuring even cooking.
Understanding Wok Hei
Wok hei, often translated as ‘the breath of the wok’, is that magical combination of caramelisation, smokiness, and umami that defines truly exceptional stir-frying. It occurs when oils vaporise and foods briefly catch the flame’s essence, creating complex flavour compounds through the Maillard reaction.
To achieve wok hei at home, master the technique of ‘tossing the wok’ – literally lifting and flipping ingredients to catch the rising heat. This isn’t just for show; it exposes food to the intense heat zone just above the wok’s surface, where temperatures can exceed 200°C.
Layering Flavours Like A Professional
Professional stir-frying isn’t just about technique—it’s about understanding how flavours build and combine. Start with aromatic ingredients that infuse the oil, then add proteins, followed by harder vegetables, and finally more delicate ingredients. Each addition should be intentional, with spaces between to allow the wok to recover its heat.
Sauces should be added last and in moderation. The goal is to coat ingredients lightly, not create a soup. Many home cooks err on the side of too much sauce, which can turn a crisp stir-fry into a soggy mess. Remember: the sauce should enhance, not dominate. This is about celebrating the essence of the main ingredients, after all, in all their vitality.
Common Pitfalls & Professional Solutions
The most frequent mistake in home stir-frying is overcrowding the wok. Professional chefs understand that each ingredient needs space to cook properly. If necessary, cook in batches and combine at the end. Yes, it takes longer, but the results are worth it.
Another professional secret is temperature recovery time. After adding ingredients, wait for the wok to regain its heat before the next addition. You’ll know you’re ready when you hear that distinctive sizzle return.
Mastering professional-level stir-frying isn’t about following recipes—it’s about understanding principles and developing intuition. Listen to your wok; it will tell you when it’s hot enough, when to add ingredients, and when to make adjustments. The signature sound of a proper stir-fry—that loud, consistent sizzle—should become your kitchen’s soundtrack.
Remember that every professional chef started somewhere. Practice these techniques with simple dishes before attempting more complex combinations. Focus on mastering heat control, timing, and movement. With patience and practice, that elusive restaurant-quality stir-fry will become part of your regular repertoire, complete with the coveted breath of the wok.
From the familiar comfort of your morning brew to obscure preparations steeped in centuries of tradition, coffee speaks a universal language through wildly different dialects. In crowded Turkish coffee houses, fortune-tellers still interpret patterns in grounds, while in Hanoi’s humid streets, coffee drips slowly through single-serving filters onto beds of sweetened condensed milk, encouraging the city’s frenetic, kinetic energy to pause.
Italian baristas perfect the art of the 30-second espresso, as Ethiopian families maintain age-old ceremonies of roasting fresh beans by hand. These 10 remarkable preparations reveal coffee’s extraordinary range – from simple pleasures to complex rituals, each with its own story to tell and secrets to master.
Note: We’ve included general tasting profiles for each coffee which profile represent the characteristics of a properly prepared traditional serving, though individual preparations may vary based on specific beans, roasts, and regional preferences.
Ethiopian Buna
Ideal for sensory journeys through coffee’s birthplace…
In its birthplace, coffee remains a social ceremony. The traditional preparation involves roasting green beans fresh before brewing, creating an experience that engages all senses. This ceremony can last for hours, with multiple rounds of brewing and conversation, embodying the Ethiopian principle of coffee as a means of connection rather than mere refreshment.
Photo by Zeynep Sümer on UnsplashBy Stoica Adrian’s Images via Canva
How to brew: Roast green beans in a pan until medium-dark. Grind coarsely and add to a jebena (clay pot) with water. Bring to a boil three times, strain, and serve in small cups called cini.
Best coffee: Ethiopian Yirgacheffe or Sidamo green beans, freshly roasted and coarsely ground. These regions produce beans with distinctive floral and citrus notes that shine in this traditional preparation.
Popular brands: Tomoca and Yirgacheffe Farmers Cooperative Union (YFCU). Tomoca, Ethiopia’s oldest coffee roaster, is cherished for its authentic dark-roasted beans perfect for traditional ceremonies. YFCU, a collective of local farmers, produces premium single-origin beans that capture the region’s distinctive floral notes.
Full, general tasting profile: Begins with profound blueberry and jasmine aromas from the fresh roasting process. First sip reveals wild honey sweetness, followed by bergamot and dark chocolate undertones. Final notes dance between blackcurrant and subtle wine-like fermented fruits. The successive brews (traditionally three) evolve from bright and intense to deeper, more contemplative flavours.
Japanese Pour-Over
Ideal for crystal-clear flavours and clean finishes…
The Japanese have elevated the simple pour-over into an exercise in mindfulness and precision, producing a remarkably clean cup that highlights subtle flavour notes. This method emphasises the importance of technique, timing, and attention to detail, resulting in a brew that captures the most delicate characteristics of the beans.
How to brew: Using a V60 dripper, pour hot water (92°C) in concentric circles over 22g of medium-fine ground coffee. Total brew time: 2:30-3:00 minutes for 350ml water.
Best coffee: Light to medium roast single-origin beans, medium-fine grind. Central American or Ethiopian beans with bright, complex flavour profiles work exceptionally well with this precise extraction method. It’s often enjoyed over ice.
Popular brands: % Arabica and Hario. % Arabica, founded in Kyoto, is renowned for its meticulously sourced single-origin beans specifically roasted for pour-over preparation. Hario, whilst known for equipment, also produces specially curated coffee beans that complement their iconic V60 dripper.
Full, general tasting profile: : Opens with pristine clarity – think freshly sliced green apple and white peach. The mid-palate presents delicate jasmine tea characteristics with hints of toasted rice. Clean mineral finish with lingering notes of brown sugar and mandarin. When served over ice, develops additional layers of honeydew melon and cucumber freshness.
Greek Frappé
Ideal for long, cooling refreshment with serious caffeine…
A happy accident born in the 1957 Thessaloniki International Fair has become Greece’s national summer drink—a foam-topped iced coffee that’s refreshingly different from modern frappuccinos. This simple yet satisfying drink has become synonymous with leisurely Mediterranean afternoons and casual café culture. Check out, too, the viral Freddo Cappucino, and offshoot of the Greek Frappé.
How to brew: Blend 2 teaspoons of instant coffee, sugar, and a splash of cold water until incredibly frothy. Pour into a tall glass with ice and cold water, add milk if desired.
Best coffee: Classic spray-dried instant coffee works best—tradition calls for Nescafé Classic, though any quality instant coffee will do. The key is using a coffee that produces rich, stable foam.
Popular brands: Loumidis and Bravo. Loumidis produces the iconic Papagalos brand, considered the authentic choice for Greek frappé. Bravo, another household name, offers a classic instant coffee blend that creates the characteristic thick foam essential for a proper frappé.
Full, general tasting profile: The dense foam offers a creamy, almost marshmallow-like introduction. Body presents robust malty notes with hints of toasted cereals. When properly shaken, develops a distinctive toffee-like sweetness balanced by pleasant bitter cocoa notes. The finish is refreshingly clean with subtle caramel undertones.
Turkish Coffee
Ideal for rich, unfiltered intensity with grounds that tell fortunes…
This centuries-old brewing method produces an intensely flavoured, unfiltered coffee that’s more of a ritual than a mere drink. Dating back to the Ottoman Empire, Turkish coffee represents one of the oldest preparation methods still widely enjoyed today. The resulting cup is rich, full-bodied, and often served alongside Turkish delight or other sweet treats. The grounds left in the cup are traditionally used for fortune telling, adding an element of mysticism to the experience.
How to brew: Add one heaped teaspoon of extra-fine coffee and sugar (if desired) per demitasse cup of cold water to your ibrik. Heat slowly, removing from heat just as the foam rises. Repeat this process three times before serving.
Best coffee: Dark to medium-dark roast beans ground to powder-like consistency. Brazilian Santos or Ethiopian Yirgacheffe beans work particularly well, offering chocolate and spice notes that complement the brewing method.
Popular brands: Kurukahveci Mehmet Efendi and Selamlique. Kurukahveci Mehmet Efendi, established in 1871, remains the most trusted name in Turkish coffee, known for their perfectly ground beans. Selamlique offers premium traditional blends with varying degrees of roast specifically for Turkish preparation.
Full, general tasting profile: Intense aromatics of fresh leather and dark cocoa lead into a remarkably full-bodied experience. The unfiltered brew presents deep molasses sweetness balanced by warm baking spices. Distinctive notes of black cardamom and roasted hazelnuts emerge mid-palate. Finishes with a lingering complexity of dark forest fruits and bitter chocolate.
Vietnamese Cà Phê Nâu Đá
Ideal for sweet, silky hits in subtropical climes…
A bold marriage of dark-roasted Robusta coffee and sweetened condensed milk, this Vietnamese staple offers a perfect balance of intensity and indulgence. Known as Sữa Đá in the South and Nâu Đá in the North, this refreshing, sweet-as-you-like drop was born during the French colonial period when fresh milk was scarce, this preparation method has evolved into a beloved daily ritual in Vietnam’s humid climate.
The slow drip through the phin filter creates anticipation, while the final product offers a luxurious mouthfeel and deep coffee flavour that cuts through the sweetness.
How to brew: Place 2-3 tablespoons of ground coffee in a traditional phin filter atop a glass containing 2-3 tablespoons of sweetened condensed milk. Pour hot water and watch as the coffee slowly drips. Stir and pour over ice.
Best coffee: Traditional Vietnamese Robusta beans, coarse-medium grind. Look for beans with chocolate and nutty undertones that can stand up to the sweetened condensed milk.
Popular brands: Trung Nguyen and Highlands Coffee.Trung Nguyen’s Premium Blend combines four bean varieties (Arabica, Robusta, Excelsa, and Catimor) for authentic Vietnamese coffee. Highlands Coffee, a major chain, represents the traditional phin filter brewing method, offering beans specifically roasted for this preparation.
Full, general tasting profile: Bold start with intense dark chocolate and chicory notes from the Robusta beans. The sweetened condensed milk adds layers of butterscotch and vanilla cream. As ice melts, reveals subtle notes of toasted almonds and toffee. Finishes with a pleasant bitter-sweet tension and hints of burnt caramel.
Italian Espresso
Ideal for pure coffee intensity in two perfect sips….
The foundation of café culture worldwide, a proper Italian espresso delivers a complex shot topped with crema—that golden layer of emulsified oils. In Italy, espresso isn’t just coffee; it’s a way of life. Whether enjoyed as a quick morning pick-me-up or an after-dinner digestivo, the perfect espresso represents the pinnacle of coffee extraction science.
How to brew: Using an espresso machine, tamp 18-21 grams of finely ground coffee with 30 pounds of pressure. Extract 25-30ml over 25-30 seconds at 93°C.
Best coffee: Medium-dark roast beans with a blend of Arabica and Robusta. Traditional Italian blends often include beans from Brazil, Guatemala, and India, creating a balanced profile with notes of chocolate, nuts, and a subtle sweetness.
Popular brands: Illy and Lavazza. Illy’s signature blend, composed of nine different Arabica beans, is crafted specifically for espresso preparation. Lavazza’s Qualità Oro, a favourite among Italian cafés, delivers the perfect crema and balanced flavour profile expected in authentic Italian espresso.
Full, general tasting profile: Initial hit of sweet tobacco and dark cocoa, followed by a velvety mouthfeel carrying notes of roasted chestnuts. The crema contributes subtle red berry brightness. Mid-palate reveals marzipan sweetness balanced by gentle spice. Finishes with lingering notes of bitter amaretti biscuits and dark maple syrup.
This aromatic brew, spiced with cardamom and sometimes saffron or cloves, represents the pinnacle of Arabic hospitality. The ceremony of preparing and serving qahwa is an integral part of social gatherings, with specific etiquette governing everything from the order of serving to the number of cups offered.
By Santhosh Varghese from Getty Images via Canva
How to brew: Lightly roast green coffee beans with cardamom pods. Coarsely grind and simmer in a dallah (traditional coffee pot) for 10-15 minutes. Strain and serve in small handleless cups called finjans.
Best coffee: Arabica beans from Yemen or Ethiopia, light roast and coarsely ground. These regions produce beans with complex spice notes that complement the added cardamom and optional saffron.
Popular brands: Yatooq and Al-Ameed. Yatooq specialises in ready-blended Arabian coffee with cardamom, offering convenient yet authentic preparation. Al-Ameed, a heritage brand, produces light-roasted beans specifically for qahwa, with varying spice blends to suit regional preferences.
Full, general tasting profile: Opens with aromatic green cardamom and subtle saffron notes. Light-bodied with distinctive grassy freshness from the light roast. Mid-palate reveals delicate rose water and pistachio notes. When prepared with additional spices, develops complex layers of clove and ginger. Finishes with subtle date sweetness and soft herbaceous notes.
Australian Flat White
Ideal for velvet-smooth milk coffee without the foam…
While its origins are contested between Australia and New Zealand, the flat white has revolutionised milk coffee worldwide. It’s the kind you’ll find in just about any coffee subscription today – and for good reason. With its velvety microfoam and perfect coffee-milk ratio, it’s the pinnacle of milk coffee craftsmanship, offering a more robust coffee flavour than a latte while maintaining incredible smoothness.
How to brew: Pull a double shot of espresso into a 165ml cup. Steam milk to create microfoam (not frothy), and pour with a slight wiggle to create a smooth, integrated drink with minimal foam on top.
Best coffee: Medium to medium-dark roast espresso blend, finely ground. Look for beans with chocolate and caramel notes that complement the milk’s natural sweetness.
Popular brands: Campos and Five Senses. Campos Coffee’s Superior Blend is specifically crafted to cut through milk whilst maintaining complexity. Five Senses’ Dark Horse Blend is favoured by many Australian cafés for its chocolate notes that complement the microfoamed milk.
Full, general tasting profile: Initial silky mouthfeel carries notes of malted milk and warm honey. The microfoamed milk creates layers of shortbread and crème brûlée sweetness. Mid-palate reveals toasted macadamia notes balanced by subtle citrus brightness. Finishes with lingering chocolate-covered espresso beans and buttery caramel.
Indonesian Kopi Tubruk
Ideal for bold, gritty strength that pulls no punches…
This ‘collision coffee’ represents Indonesian coffee culture at its most authentic. Unlike filtered methods, Kopi Tubruk involves brewing ground coffee directly in the cup with boiling water, creating a powerful, sediment-rich experience. It’s a bold, uncompromising brew that perfectly captures the raw energy of Indonesian coffee culture.
How to brew: Add two tablespoons of ground coffee and sugar (if desired) to a cup. Pour boiling water, stir, and wait four minutes for the grounds to settle.
Best coffee: Single-origin Indonesian beans (Sumatra Mandheling or Java Estate), medium-coarse grind. Look for beans with earthy, spicy notes and low acidity that can withstand the intense brewing method.
Popular brands: Kapal Api and Torabika Kapal Api’s Special Mixed blend is specifically formulated for traditional Indonesian brewing methods. Torabika’s Premium Choice offers a robust flavour profile that stands up to the direct brewing method of Kopi Tubruk.
Full, general tasting profile: Powerful earthiness dominates the initial taste, followed by deep forest floor umami. The unfiltered method produces intense notes of dark cacao and wet tobacco. Mid-palate reveals complex spice notes reminiscent of black pepper and cedar. Finishes with lingering Indonesian hardwood smokiness and raw sugar cane.
Mexican Café de Olla
Ideal for cinnamon-sweet comfort in earthenware…
Traditionally prepared in a clay pot (olla), this cinnamon-infused coffee embodies Mexican hospitality. The earthenware pot imparts subtle mineral notes, while piloncillo (unrefined cane sugar) and cinnamon create a warming, aromatic brew that’s particularly popular in Mexico’s highland regions. This preparation method dates back generations and remains a cornerstone of Mexican coffee culture.
How to brew: In a clay pot, bring water to boil with cinnamon sticks and piloncillo. Add coarsely ground coffee, remove from heat, steep for 5 minutes, then strain.
Best coffee: Medium roast Mexican Altura or Oaxacan beans, coarse grind. Choose beans with chocolate and nutty notes that complement the spices. The natural processing method common in Mexico adds subtle fruit notes that work well in this preparation.
Popular brands:Café El Marino and Tierra Mia. Café El Marino’s Gourmet Altura blend is specifically roasted to complement the traditional spices used in Café de Olla. Tierra Mia produces beans from Oaxaca that are medium-roasted to allow the cinnamon and piloncillo flavours to shine through.
Full, general tasting profile: Opening aromatics of Ceylon cinnamon and raw sugar lead into a warming, spice-forward experience. The clay pot adds mineral complexity while developing notes of Mexican chocolate and star anise. Mid-palate reveals piloncillo’s complex molasses character. Finishes with hints of roasted agave and toasted corn, reminiscent of traditional Mexican sweets.
The Bottom Line
Whether you’re an adventurous coffee enthusiast or simply curious about global coffee cultures, these ten preparations showcase the remarkable versatility of our favourite bean. Each cup offers more than just caffeine—it’s a passport to understanding different cultures, traditions, and the universal language of hospitality.
Steam rises from the surface of a perfectly brewed cup of Sencha, carrying with it the promise of tranquility.
For centuries, this distinctive Japanese green tea has captivated tea masters and casual drinkers alike with its bright, grassy notes and refreshing astringency. Yet achieving that perfect cup requires both art and science—a delicate balance of precise temperatures, careful timing, and quality ingredients that transform these precious leaves into liquid jade.
The Foundation: Understanding Water Quality
The journey begins with water, that humble yet crucial foundation. The finest tea houses in Kyoto understand that exceptional Sencha starts with water containing the right mineral balance—ideally with a neutral pH between 6.5 and 7.5. Common filtration options include sediment filter, reverse osmosis systems, ceramic filters, or activated carbon blocks, though many tea enthusiasts find that simple carbon filtration creates an excellent foundation.
The Japanese tea masters of old would collect natural spring water from mountain sources, understanding that water heavy with minerals would muddy Sencha’s delicate character, while water too soft would create a flat, lifeless brew.
Today’s tea enthusiasts can achieve similar results by using filtered water with a Total Dissolved Solids (TDS) content between 150-200 ppm. Never use water from the hot tap or previously boiled water—both contain reduced oxygen levels and concentrated minerals that can dull Sencha’s characteristically fresh, oceanic notes.
Your choice of Sencha will profoundly influence the final cup. Premium leaves should shimmer with their characteristic needle-like shape, bright green and uniformly sized.
First-flush Sencha (harvested in early spring and known as Shincha or Ichibancha) offers the most refined flavour profile—sweet, highly aromatic, and rich in umami. Second-flush (Nibancha) provides deeper, more robust characters ideal for daily drinking, while third-flush (Sanbancha) offers a more straightforward, robust brew perfect for cold summer days.
The highest grade, Gyokuro-style Sencha, comes from shade-grown leaves that spend their final weeks under traditional reed mats, concentrating their chlorophyll and amino acids. These precious leaves demand the most careful handling but reward the brewer with extraordinary depth of flavour. For precise measurement, aim for 3 grams of leaves per 200ml of water for standard Sencha, reducing to 2.5 grams for Gyokuro-style, and increasing to 4 grams for later-harvest varieties.
The Art Of Temperature: Precision Brewing
Sencha demands exacting temperature control. At 70-75°C, the water draws out the tea’s sweet umami notes while preserving its delicate amino acids. Higher temperatures risk releasing harsh tannins that overwhelm Sencha’s subtle complexity. First-flush and Gyokuro-style Sencha prefer even cooler water, around 65°C, while hardier late-harvest varieties can handle up to 80°C.
Professional tea masters use special thermometers, but home brewers can achieve good results by pouring boiled water into a cooling vessel and waiting 2-3 minutes, or by adding precisely 10% room temperature water to their teapot before adding freshly boiled water. Modern variable-temperature kettles can be invaluable tools for the serious Sencha enthusiast.
Traditional Japanese Kyusu teapots, with their fine-mesh internal filters, remain the gold standard for Sencha brewing. These side-handled pots, ideally sized between 200-300ml, allow the leaves to unfurl fully while ensuring a clean pour. The best Kyusu feature special grooves that direct water flow and prevent leaf compression.
Porcelain offers elegant simplicity with excellent heat retention, while well-seasoned Tokoname clay vessels can enhance the tea’s umami qualities through their unique mineral content and slight porosity. Glass teapots, while less traditional, allow you to observe the leaves’ dance during steeping—an important visual indicator of brewing progress.
Always pre-warm your chosen vessel with hot water before brewing, emptying it just before adding leaves. This practice, called Yureishi, ensures consistent temperature throughout the steeping process and prevents thermal shock to both leaves and vessel.
Sencha reaches its peak between 60 and 90 seconds, but this window varies significantly based on grade and processing method.
First-flush Sencha needs just 60 seconds—any longer risks overwhelming its delicate character. Standard second-flush benefits from 75 seconds, while heartier late-harvest varieties develop their full body over 90 seconds. The liquor should be a brilliant jade green, the aroma reminiscent of fresh grass after rain, with subtle notes of nori and sweet chestnuts.
Temperature and timing work in concert: on unusually hot days, reduce steeping time by 10-15 seconds. In winter, when tea leaves and vessels are naturally cooler, add 5-10 seconds to compensate. Watch the leaves carefully—they should dance and swirl initially, then slowly sink as they become saturated. If they drop immediately, your water is likely too hot.
The Art Of Multiple Infusions: Beyond The First Cup
Sencha truly reveals its character through multiple infusions, each steep offering a different facet of its personality. The first infusion (Ichiban-dashi) presents the tea’s primary character—bright, grassy, and complex. The second steep (Niban-dashi) requires only 30 seconds but demands water 5-10°C hotter than the first. This brewing yields a rounder, sweeter liquor with enhanced umami notes.
The third infusion (Sanban-dashi) might seem counter-intuitive: increase the temperature to 85°C and steep for 60 seconds. While weaker in classic Sencha notes, this brewing often reveals subtle aromatics and mineral qualities hidden in earlier steeps. Some tea masters even prepare a fourth infusion by briefly steeping with nearly boiling water, producing a final cup that’s delicate but surprisingly sweet.
Traditional Japanese tea culture recognizes the profound impact of seasons on Sencha brewing. Summer calls for two specialized techniques: Mizudashi (cold brewing) and Kabuse-Sencha (shadow-steeped tea). For Mizudashi, use 5 grams of leaves per 500ml of cold water, steep in the refrigerator for 6-8 hours. This method yields a remarkably sweet, refined tea with minimal astringency.
Winter brewing benefits from slightly longer steeping times and marginally higher temperatures—add 5-10 seconds and 2-3°C to your usual parameters. Humidity affects tea storage and brewing significantly: in humid conditions, reduce storage quantities and consider slightly shorter steeping times, as leaves absorb ambient moisture.
The Science Of Storage: Preserving Perfection
Store your Sencha in airtight, opaque containers away from light, heat, and moisture. Quality Sencha leaves maintain their vibrancy for about three months if properly stored—considerably less than Chinese green teas. This shorter shelf life reflects Sencha’s more delicate processing method and higher amino acid content.
For serious enthusiasts, consider investing in a special tea refrigerator or using oxygen-absorbing packets designed specifically for green tea storage. Never store Sencha near strong-smelling foods or spices, as the leaves readily absorb external aromas. When removing tea from cold storage, allow the container to reach room temperature before opening to prevent condensation from forming on the leaves.
Essential Equipment For The Devoted Sencha Enthusiast
Quality Kyusu (200-300ml)
Variable temperature kettle
Digital scale (0.1g precision)
Traditional cooling vessel (Yuzamashi)
Tea thermometer
Timer
Multiple tasting cups for comparing steeps
This comprehensive approach to Sencha preparation might seem exacting, but each element contributes to the final experience. Through careful attention to these details, you’ll discover why this particular tea has captivated Japanese tea masters for centuries, and why it continues to reward those who approach it with patience and precision.
A new nationwide study of coffee drinkers by De’Longhi has revealed that your chosen drink may say more about you than you might have previously thought.
Ever wondered why that friend who drinks black coffee is always so serious? Or why your latte-loving colleague is always buried in a book? Well, it turns out your coffee order might just be spilling the beans on your personality.
The coffee experts at De’Longhi found that those whose go-to drink was a double espresso were the most likely to describe themselves as well travelled, good in bed and sophisticated. So, if you’re sipping on a double espresso right now, congratulations! You’re basically James Bond with a coffee cup.
They also found that those who enjoyed a flavoured coffee, such as a hazelnut or caramel latte, were by far the most likely to describe themselves as funny and people pleasers. So, if you’re the one always cracking jokes at the office, it might be time to thank your caramel latte for that comedic edge.
Mocha drinkers emerged as having the most sex appeal, while cappuccino fans are – apparently – the most likely to be well read. Yep, if you’re looking for a date who’s both hot and literate, you might want to start hanging out at the mocha and cappuccino section of your local café.
The most health and environmentally conscious Brits, perhaps unsurprisingly, drink a dairy free choice like an oat milk latte while the self-styled “life and soul of the party” is the most inclined to favour a cold brew. Other characters to appear from the survey were straight-talking filter coffee drinkers (served black, naturally), romantic iced coffee fans, optimistic black Americano drinkers, popular cortado fans, and quiet macchiato lovers.
There’s more… 84 percent think they make a good cup of coffee, which is lucky as two thirds (64 percent) believe being a good home barista is an attractive quality in a person. So, if you’re single and ready to mingle, it might be time to brush up on your latte art skills. In fact, 37 percent think it is such an important quality that they have, or would be prepared to, end a relationship if someone was making a bad brew.
So, if your partner’s coffee-making skills are subpar, it might be time to have a serious talk. That, or read our article on 6 tips for making your coffee taste great at home. Anyway, let’s get to the nitty gritty…
What Your Coffee Of Choice Says About You
Latte
Most likely to have a degree and to be a bookworm. Latte drinkers often enjoy the comfort of routine and the warmth of familiarity. They are usually seen as approachable and friendly, making them great companions for a chat over coffee. Plus, they probably have a secret stash of bookmarks and can quote Jane Austen at the drop of a hat.
Cappuccino
Most likely to be well-read. Cappuccino lovers often have a refined taste and appreciate the finer things in life. They are likely to enjoy a good book and a cozy café atmosphere, making them the intellectuals of the coffee world. Just don’t be surprised if they start a conversation with, “Have you read the latest bestseller?”
Flat White
Most likely to be a culture vulture. Flat white drinkers are often seen as trendy and in-the-know about the latest cultural happenings. They appreciate art, music, and good conversation, making them the go-to friends for a night out at a gallery or concert. They’re the ones who can tell you the difference between modernism and postmodernism without breaking a sweat.
Double Espresso
Most likely to be well-travelled, sophisticated and a good lover. Double espresso drinkers are often seen as confident and decisive, with a taste for adventure. They are likely to have interesting stories from their travels and a keen sense of style. If you need travel tips or a lesson in sophistication, just ask your double espresso friend – they’ve got you covered.
Iced Coffee
Most likely to be romantic and enjoy simple pleasures. Iced coffee fans often have a laid-back and easygoing personality. They appreciate the little things in life and are often seen as thoughtful and considerate partners. They’re the ones who will surprise you with a picnic in the park or a handwritten love note.
Mocha
Most likely to be fiery and have sex appeal. Mocha drinkers are often seen as passionate and full of energy. They have a zest for life and are not afraid to stand out from the crowd, making them the life of any party. If you’re looking for someone who can dance all night and still have energy for brunch the next day, find a mocha lover.
White Americano
Most likely to be green fingered. White americano drinkers are often practical and down-to-earth. They enjoy spending time in nature and have a knack for gardening, making them the perfect friends for a weekend hike or a day in the garden. They’re the ones who can turn any patch of dirt into a blooming paradise.
Flavoured Coffee
Most likely to be funny and a people pleaser. Those who enjoy flavoured coffee are often seen as the comedians of their social circles. They have a great sense of humor and love to make others laugh, making them the life of any gathering. If you need a good laugh or a pick-me-up, your flavoured coffee friend is just a call away.
Most likely to be optimistic. Black americano drinkers are often seen as straightforward and no-nonsense. They have a positive outlook on life and are always ready to tackle challenges head-on, making them reliable and trustworthy friends. They’re the ones who will always find the silver lining, even on the cloudiest days.
Oat Milk Latte
Most likely to be environmentally conscious. Oat milk latte drinkers are often seen as mindful and caring about the planet. They make conscious choices in their daily lives to reduce their environmental impact, making them great advocates for sustainability. They’re the ones who will remind you to bring your reusable bags and turn off the lights when you leave a room.
Macchiato
Most likely to be quiet. Macchiato lovers are often seen as introspective and thoughtful. They enjoy their own company and are often deep thinkers, making them great listeners and loyal friends. They’re the ones who will sit with you in comfortable silence and offer profound insights when you least expect it.
Black Filter Coffee
Most likely to be a straight talker. Black filter coffee drinkers are often seen as honest and direct. They value simplicity and clarity, making them dependable and straightforward in their interactions. If you need the truth, no sugar-coating, just ask your black filter coffee friend – they’ll give it to you straight.
Cold Brew
Most likely to be the life and soul of the party. Cold brew fans are often seen as energetic and fun-loving. They enjoy socializing and are always up for a good time, making them the perfect companions for any event. They’re the ones who will keep the party going and make sure everyone is having a blast.
Cortado
Most likely to be popular. Cortado drinkers are often seen as charismatic and well-liked. They have a natural charm and are great at making connections, making them the social butterflies of their groups. They’re the ones who know everyone’s name and can always introduce you to someone new and interesting.
The Bottom Line
Believe this research? Well, you’ll be with two thirds of those in the study who think that the type of coffee someone drinks says a lot about their personality, with 38% admitting they have judged someone on what they order. We wonder what kind if coffee the latter people drink…
That jar of ground coriander that’s been lurking in your cupboard since 2019 – is it still good? And why does your curry never taste quite as vibrant as the takeaway version? If you’ve ever wondered about the mysteries of your spice rack, you’re not alone. Here are the answers to your most pressing spice questions.
Do Spices Actually Expire?
The short answer: no, they won’t make you ill, but they will lose their potency.
Whole spices are the champions of longevity, keeping their flavour for 3-4 years when stored properly. Ground spices, however, are more delicate souls – they’ll give you their best performance within 6 months to a year of opening. After that, they’re like a band playing with the volume turned down – still there, just not hitting the high notes.
How Should I Store My Spices?
Think of spices as vampires – they hate light, heat, and moisture. Keep them in airtight containers away from direct sunlight and your hob. That decorative spice rack above the cooker might look lovely, but it’s essentially a retirement home for your seasonings.
Why Are Whole Spices Better Than Ground?
It’s like comparing freshly ground coffee to instant. Whole spices retain their aromatic oils (where all the flavour lives) until the moment you grind them. Once crushed, these oils begin to evaporate. That’s why professional chefs often toast and grind their spices just before cooking.
Help! How Can I Tell If My Spices Are Past It?
Try this three-step test:
LOOK: Has the colour faded? Vibrant paprika turning beige is a bad sign
SMELL: Give it a sniff – if it doesn’t make your nose tingle, it won’t wake up your food
TASTE: Sprinkle a little on your tongue. No tingle? Time to replace
What’s The Deal With ‘Blooming’ Spices?
Blooming (cooking spices in oil at the start of cooking) isn’t just cheffy showing off – it’s science. Many flavour compounds in spices are fat-soluble, meaning they need oil to release their full potential. It’s the difference between a curry that tastes like it came from a jar and one that tastes like it came from a proper Indian kitchen.
What’s The Most Useful Spice To Keep In My Cupboard?
Cumin is the dark horse of the spice world. It’s essential in Mexican, Indian, Middle Eastern and North African cooking, works with meat and vegetables alike, and has a lovely earthy warmth that adds instant depth to any dish.
That said, for instant heat and complexity without multiple spice jars, craft hot sauces that incorporate whole spices like cumin, garlic, and peppers deliver layered flavour in a single bottle.
Why Are My Spices Clumping Together?
If your spices are forming little clumps, moisture has crashed the party. This is particularly common with salt-heavy spice blends. Once this happens, unfortunately, the flavour will never be quite the same. Store them with a few grains of raw rice to absorb excess moisture, and always use a dry spoon to measure them out.
Should I Buy Organic Spices?
The organic versus conventional spice debate is interesting. While organic spices might be grown without synthetic pesticides, what you’re really after is freshness and quality. A fresh conventional spice will always trump an old organic one. The key is finding a supplier with high turnover – whether organic or not – to ensure you’re getting the freshest product possible.
Why Do Recipes Always Say To Toast Whole Spices?
Toasting whole spices is like giving them a wake-up call. The heat releases essential oils and creates new flavour compounds through something called the Maillard reaction (the same thing that makes toast taste toasty or seared steak so damn delicious). Just 30-60 seconds in a dry pan can transform your spices from wallflowers to the life of the party – just keep a close eye on them, as they can burn quickly.
10 Smart Ways To Make Your Spices Last
Buy little and often rather than bulk-buying ground spices
Invest in a spice grinder for whole spices (or use a coffee grinder dedicated to spices)
Label your spices with purchase dates
Store in dark glass or metal containers rather than plastic
Shop at international supermarkets or an online spices supplier for better value and fresher stock
Never shake spices directly over a steaming pot – the moisture will get into your jar
Toast whole spices before grinding for maximum flavour impact
Create your own spice blends in small batches – they’ll be fresher and you can customise to taste
Keep a separate set of measuring spoons for spices to avoid cross-contamination
Consider freezing rarely-used whole spices to extend their life
Remember, spices are the backbone of good cooking, but they’re not immortal. Treat them well, and they’ll reward you with food that sings rather than mumbles.
It’s a peculiarly modern predicament: the forgotten bag of chillies lurking in the bottom of your fridge’s vegetable drawer, purchased with ambitious plans for a homemade curry, or perhaps delivered unexpectedly in your weekly veg box. Maybe you’ve been overzealous at the greengrocer’s, seduced by those vibrant reds and greens, or your homegrown plants have proved surprisingly prolific.
Whatever the cause, there’s no need to let these fiery fruits go to waste. Here’s our favourite ways to preserve and transform your chilli abundance; our 8 ideal solutions for using up that glut of chillies.
Chilli Oil
Perhaps the most versatile way to preserve your chilli bounty is in oil form, creating a condiment that’s equally at home drizzled over pizza as it is enriching a bowl of ramen or jazzing up your brunch eggs. The technique couldn’t be simpler, though there are a few crucial steps to ensure both safety and the best possible flavour.
First, thoroughly dry your chillies (a mix of varieties works wonderfully here) in a low oven – around 120°C – for about an hour until they’re completely moisture-free but not burnt. Roughly chop them, including the seeds if you’re feeling brave, and combine with neutral oil (groundnut or sunflower work perfectly) in a pan.
Warm gently for around 20 minutes, never letting the oil get too hot – it should barely shimmer. Remove from the heat and allow to cool completely before storing in sterilised bottles. For extra complexity, add Szechuan peppercorns, star anise, or garlic to the mix.
Fermented Hot Sauce
If you’re looking to create something with a bit more complexity – think artisanal hot sauce rather than straight-up heat – fermenting your chillies is the way forward. The process not only preserves your chillis but creates layers of funky, complex flavour that simply can’t be replicated any other way.
For a basic fermented hot sauce, roughly chop your chillies (about 500g), add 2% of their weight in fine sea salt, and pack into a sterilised jar. Cover with a 2% salt brine solution, ensuring everything stays submerged (a small zip-lock bag filled with water makes an excellent weight). Leave at room temperature for at least a week, ‘burping’ daily to release any built-up gases.
Once the fermentation has reached your desired level of funkiness, blend the lot with a splash of vinegar, strain if you prefer a smoother sauce, and bottle. The result is a gorgeously complex condiment that will keep practically indefinitely in the fridge. Alternatively, a set of these bottles makes gorgeous, thoughtful chilli gifts.
Chilli Honey
This simple infusion has become something of a cult condiment in recent years, and with good reason. It’s brilliant drizzled over pizza (particularly if there’s some good nduja involved), magnificent with fried chicken, and even works wonderfully in cocktails – a spicy margarita, anyone?
Simply slice fresh chillies (red varieties work best visually, but use whatever you have) and pack them into a jar of runny honey. The natural preservative qualities of honey mean there’s no need to worry about sterilisation here. Leave for at least a week before using, though the heat will continue to develop over time. A sprig of thyme makes a wonderful addition if you’re feeling fancy.
Chilli Jam
Ideal for slathering on cheeses and charcuterie, glazing meats, or even adding a fiery kick to your morning eggs on toast. To make a batch of chilli jam, start by blitzing 500g of fresh chillies (red chillies work best for their vibrant colour) in a food processor until finely chopped. Combine the chillies with 1kg of jam sugar, 500ml of cider vinegar, and a couple of finely chopped red peppers in a large, heavy-bottomed pan.
Heat gently to dissolve the sugar, then bring to a rolling boil and cook for around 10-15 minutes, stirring regularly, until the mixture reaches a jam-like consistency. Spoon a little onto a cold plate to test – if it wrinkles slightly when pushed with your finger, it’s ready. Transfer the hot jam into sterilised jars, seal, and leave to cool.
Dried Chilli Flakes
Perhaps the most straightforward preservation method, but one that yields incredibly useful results. Your home-dried chilli flakes will put shop-bought versions to shame, and you can create different blends using various chilli varieties for different heat levels and flavour profiles.
Thread your chillis onto string, ensuring they don’t touch each other, and hang in a warm, dry, well-ventilated spot until completely dessicated – this usually takes about two weeks. Alternatively, dry them in a low oven (around 100°C) for several hours until completely crisp.
Once dried, grind them to your preferred consistency in a spice grinder or pestle and mortar. Store in an airtight jar away from direct sunlight, and you’ll have punchy chilli flakes on hand whenever you need them.
Pickled Chillies
A jar of pickled chillies in the fridge is culinary gold dust – perfect for adding heat and acidity to sandwiches, tacos, or any dish that needs a bit of punch. The pickling process mellows the chillis’ raw heat while adding a beautiful tang that works particularly well with fatty or rich dishes.
Slice your chillies into rings (wear gloves for this job – trust us), pack into sterilised jars, and cover with a pickling liquid made from equal parts white wine vinegar and water, plus a tablespoon of salt and sugar per cup of liquid. Add whole spices like coriander seeds, black peppercorns, and perhaps a bay leaf for extra flavour. Bring the pickling liquid to a boil, pour over the chillies, seal, and leave to cool.
These will keep in the fridge for months, though they’re at their crisp best within the first few weeks.
Freeze-Dried Powder
For those lucky enough to own a dehydrator (or willing to experiment with their oven’s lowest setting), creating your own chilli powder opens up a world of possibility. Unlike shop-bought versions, your homemade powder will have vivid flavour notes specific to the varieties you’ve used, making it perfect for creating your own spice blends.
Remove the stalks from your chillies and slice them lengthways. Arrange on dehydrator trays (or oven racks lined with parchment) and dry at 50°C for 12-24 hours until completely brittle. Grind to a fine powder in a spice grinder, working in small batches to ensure an even consistency.
Store in an airtight container away from light and moisture. This powder is brilliant in dry rubs, marinades, or anywhere you’d use regular chilli powder – just remember it’s likely to be significantly more potent than commercial versions.
Chilli Paste
A concentrated chilli paste is perhaps the most versatile preservation method of all, sitting somewhere between a sauce and a powder in terms of consistency. It’s perfect for adding to stir-fries, marinades, or any dish where you want intense chilli flavour without additional liquid.
Roughly chop about 500g of chillies and blitz in a food processor with a generous pinch of salt until finely chopped. Heat a couple of tablespoons of neutral oil in a wide pan, add the chilli mixture and cook over medium-low heat, stirring regularly, until most of the moisture has evaporated and the paste is thick and glossy – this usually takes about 30 minutes. Cool completely before transferring to sterilised jars and covering with a thin layer of oil. This will keep in the fridge for several months, developing more complexity over time.
With these preservation methods in your arsenal, you’ll never need to let another chilli go to waste. And who knows? You might find yourself deliberately over-buying just to make these condiments. We certainly won’t judge.
Love is perhaps humanity’s most universal language, yet its expression varies brilliantly across cultures and continents. As February 14th approaches each year, communities worldwide prepare for celebrations that reflect centuries of tradition, social customs, and evolving expressions of affection.
While some might associate Valentine’s Day solely with hearts, roses and romantic dinners, these global traditions reveal a richer tapestry – one woven with community spirit, artistic expression, and celebrations that often extend far beyond a single day. Here are 7 of the world’s most fascinating Valentine’s Day traditions, each telling its own unique story of how love can be shown, shared, and celebrated.
The Sweet Symphony Of Japanese Gift-Giving
In Japan, Valentine’s Day orchestrates a delicate dance of chocolate-giving that reveals the subtleties of social relationships. Women present honmei-choco (true feeling chocolate) to romantic partners, often crafting exquisite homemade treats like silky nama chocolate or delicate chocolate-dipped strawberries.
In the eyes of those who do celebrate, the tradition extends beyond simple gift-giving or an act of obligation. Many Japanese women spend weeks perfecting their chocolate-making techniques, attending special classes or workshops to learn professional tempering methods and decorative skills. Department stores transform entire floors into chocolate wonderlands, showcasing both local and international brands in elaborate displays. Some even offer chocolate-making stations where customers can create their own unique confections.
The celebration finds its echo in White Day on March 14th, when men reciprocate with white chocolate or marshmallow gifts, completing this choreographed expression of affection.
South Korea’s Year-Round Romance
South Korean romantics have transformed their calendar into a year-round celebration of love. Each 14th of the month carries its own story: February brings traditional Valentine’s chocolates, March ushers in White Day’s sweet returns, while April’s Black Day sees singles gathering over steaming bowls of jjajangmyeon (black bean noodles), finding solidarity in their solo status. This monthly rhythm creates a community bound by shared celebrations of love in all its forms.
The fun doesn’t stop there in South Korea. Here, ouples often celebrate Valentine’s Day by wearing coordinated outfits, a phenomenon known as “커플룩” (couple look). This charming tradition sees couples carefully planning complementary outfits, from subtle colour coordination to fully matching ensembles.
The practice has become such an integral part of modern Korean dating culture that many fashion retailers now create special couple collections for Valentine’s Day. Some couples take particular pride in crafting their Valentine’s Day couple look, choosing everything from matching overcoats in winter to coordinated accessories that subtly declare their connection.
It’s a trend that’s catching on in the UK and the States, too, with whole families getting kitted out in Valentine’s Day clothes to celebrate the occasion!
The Welsh tradition of lovespoons speaks to both heart and hand, with roots reaching back to the 17th century. Young men would spend winter evenings carving these intricate wooden tokens, each symbol telling part of their love story: hearts for pure affection, wheels promising lifelong support, and locks declaring eternal loyalty.
Today, this tradition has evolved into a vibrant art form and cultural touchstone. Master carvers create increasingly elaborate designs, incorporating modern symbols alongside traditional motifs. Some spoons feature intricate celtic knotwork, while others include contemporary elements like mobile phones or musical notes. Local museums proudly display historical collections of lovespoons, some dating back centuries, while gift shops offer both traditional and contemporary interpretations.
Many Welsh families maintain the tradition by teaching their children the art of simple spoon carving using softer woods or even modelling clay, passing down both skills and stories through generations. Annual lovespoon competitions at cultural festivals showcase the finest (and sometimes just the funniest!) examples of this craft.
Filipino Community Celebrations
The Philippines transforms Valentine’s Day into a magnificent community celebration through Kasalang Bayan – mass weddings that unite hundreds of couples simultaneously. These government-sponsored ceremonies democratize marriage celebrations, allowing couples to share their joy with entire communities. Local governments often provide everything from decorations to wedding attire, creating a festive atmosphere that brings entire neighborhoods together.
The celebrations begin at dawn, with couples and their families arriving early to prepare. Traditional Filipino wedding customs are incorporated throughout the day, including the ritual of the cord and veil, symbolizing eternal unity. The air fills with the sweet scents of traditional Filipino wedding delicacies like purple yam-flavoured ube puto and delicate rice cakes called bibingka.
Many communities extend the celebration into the evening with street parties featuring traditional dance performances and modern love songs, creating a joyous blend of old and new traditions that celebrates both romance and community spirit.
Mexican Serenades of Love
In Mexico, February 14th is known as Día del Amor y la Amistad (Day of Love and Friendship), where the celebration extends far beyond romantic love. Streets and plazas burst with color as vendors sell balloons, flowers, and stuffed animals. Musicians called “mariachis” roam the streets, ready to deliver serenades ordered by romantic souls for their beloved.
The tradition of serenading, or ‘serenata’, is particularly special. Lovers carefully select songs that express their feelings, often working with mariachi bands to arrange personalized performances. These musical declarations of love can range from intimate serenades beneath a beloved’s window to grand gestures in public squares. Some cities organise massive serenata festivals where hundreds of musicians perform simultaneously, filling the night air with a symphony of love songs.
Families and friends also exchange small gifts and cards, emphasising the celebration’s broader focus on all forms of love and friendship. Local restaurants and cafes create special ‘amor y amistad’ menus featuring heart-shaped tortillas and rose-flavored desserts, adding a romantic twist to traditional Mexican cuisine.
Italian lovers exchange Baci chocolates, each one a masterpiece of taste and sentiment. Created by Perugina in 1922, these dark chocolate kisses cradle a whole hazelnut atop velvety chocolate-hazelnut cream. Each sweet arrives wrapped with a multilingual love note, transforming a simple chocolate into a messenger of affection. The name itself – ‘baci’, meaning ‘kisses’ – adds another layer of romance to this beloved tradition.
The tradition has grown beyond simple chocolate exchange. Many Italian cities organise special Baci-themed events during Valentine’s week. Chocolate-making workshops teach participants to create their own versions of these iconic treats, while some restaurants incorporate Baci chocolates into special Valentine’s Day desserts. The love notes inside have become collectors’ items, with some enthusiasts maintaining albums of their favorite messages.
Some couples even create their own personal traditions around these chocolates, saving the notes to create romantic scrapbooks or using them as inspiration for their own love letters.
The Perugina factory in Perugia opens its doors for special Valentine’s Day tours, allowing visitors to witness the careful crafting of these beloved confections and learn about their romantic history.
The Bottom Line
These diverse celebrations remind us that while love may be universal, its expressions are wonderfully unique to each culture. From the precision of Japanese chocolate-giving to the communal joy of Filipino weddings, each tradition adds its own verse to love’s endless song. Whether carved in wood, wrapped in chocolate, or expressed through matching outfits, these customs continue to evolve while keeping their cultural hearts intact, showing us that the language of love knows no bounds.
The eCommerce industry is one of the fastest-growing in the world. In 2026, it’s predicted that retail e-commerce sales will for the first time exceed $7 trillion worldwide, and this number is only expected to grow as time goes on and the world becomes ever more digitised.
So how do you make sure that your company is still profitable amidst all these new competitors? And, that your ecommerce business is breaking ground and making strides as the post pandemic world points to even more companies moving their operations online?
You need to be constantly thinking of ways to increase your sales, which can be difficult when you’re already busy trying not to drown. Whilst we’ve got no armbands to throw you for the latter, we can help with the former; here are 8 effective ways to increase your ecommerce sales.
Run Promotions
Promotions are a great way to increase your sales if you know what types of promotions work best for the specific needs of your company. This can be done in multiple ways; you can have seasonal promotions, special deals for specific holidays or events, newly-released products at reduced prices…hell, you can even invent a special company day just for an excuse to run a promotion.
If you’re unsure about what type of promotion will work best for your company, a good way to find out is by simply asking your customers. You can do this in a few ways, such as surveys or polls.
Another important thing you should keep in mind when it comes to promotions is timing. It’s crucial that you time your sales well; if you run a promotion too close to a holiday, your customers might not be looking to purchase goods online. An effective way to ensure you’re timing your promotions correctly is by simply paying attention to the dates and seasons of big holidays and major trends throughout the year.
Explore Social Media & Targeted Online Advertising
Social media platforms are a goldmine for eCommerce businesses looking to increase their sales. With billions of users worldwide, platforms like Facebook, Instagram, Twitter, and LinkedIn offer unparalleled opportunities to reach potential customers. The key is to understand where your target audience spends their time and tailor your content to engage them effectively.
Start by creating a strong social media presence. Post regularly and ensure your content is visually appealing and relevant to your audience. Use high-quality images, engaging videos, and compelling captions to capture attention. Additionally, leverage the power of social media advertising. Platforms like Facebook and Instagram offer highly targeted advertising options that allow you to reach specific demographics, interests, and behaviours. This ensures your ads are seen by the people most likely to be interested in your products.
Influencers
Another effective strategy is to collaborate with influencers. Influencers have established trust with their followers, and a recommendation from them can significantly boost your brand’s credibility and reach. Choose influencers whose audience aligns with your target market for the best results, ideally found via reliable platforms like Kolsquare, who can verify the genuine reach of such influencers, not just via numbers (which can so often be fabricated) but the more difficult-to-define ‘clout’.
Don’t forget to track your social media performance. Use analytics tools to measure engagement, click-through rates, and conversions. This data will help you refine your strategy and maximise your return on investment.
Optimise Your Website For Quicker Hosting
A fast-loading website is crucial for retaining customers and improving your eCommerce sales. In the always-online age, users expect websites to load quickly, and any delay can lead to a significant drop in engagement and conversions. To ensure your website performs optimally, invest in a reliable hosting service that can handle high traffic volumes without compromising speed.
Additionally, optimise your website’s images and use content delivery networks (CDNs) to reduce load times. Regularly monitor your site’s performance using tools like Google PageSpeed Insights and make necessary adjustments to maintain a seamless user experience. By prioritising speed, you not only enhance customer satisfaction but also improve your search engine rankings, driving more organic traffic to your site.
Simplify Your Checkout Process
One of the biggest things that will help boost your online sales is by making it easy for customers to purchase items. You can do this by providing all of the information they need before they checkout; if you make them hunt for the information they need, it’s more than likely going to drive them away from your website and towards a competitor site.
Another way to make it easier for customers is by providing payment options that they actually want to use, such as PayPal or mobile payments. It’s important to note that not all customers are looking for the same information, which is why you should be sure to cater your website specifically towards your target audience.
Build Email Lists & Use Email Marketing To Stay Engaged With Your Customers
Email marketing is a great way to market your business because it gives you the ability to stay engaged with your customers, and it’s a really easy and cost-effective method of marketing. What many companies don’t realize is that email marketing isn’t just sending out one banner ad or promotion… You can actually send out promotional ads in the form of an email. This is a great way to reach your customers and gain brand loyalty and it’s also a great way to promote new offerings.
Some simple ways to get started with email marketing are by building your mailing list, cultivating relationships with readers, and sending them relevant content that genuinely interests them. Platforms like GetaNewsletter make this straightforward for eCommerce businesses. You can build signup forms, design branded newsletters, segment your contact list, and track open and click rates all in one place, without needing any technical background. If you make your subscribers feel like they’re getting real value, they’ll be far more likely to stay engaged with the emails you send them and come back to buy again.
Another way you can increase your sales is by diversifying your offering. This means branching out into new product lines, but still keeping in mind your target audience. It allows you to achieve so many different things, such as increasing your revenue while also reaching out to a new customer base.
This is a great way to increase online sales because it not only helps you sell your company as a whole but each product separately as well. There are so many different things you can do to increase your eCommerce sales, but these should help get you started. You should also aim to carry complementary products that are related to your main product line; this ensures that people will be more likely to make purchases on your website because they already trust you.
Implement Both Up-Sells & Cross-Sells
One of the best ways to increase eCommerce sales is by implementing upsells and cross-sells. It’s especially important to implement this tactic if you carry more than one product line/brand, because it will help customers discover different products that they would have otherwise never heard about. Let’s say that you sell shoes online, but you also sell sunglasses for your company.
If someone buys a pair of shoes, they might not purchase sunglasses because it has nothing to do with their initial purchase. However, if you implemented an upsell, they would see the option of purchasing the sunglasses at checkout; this is known as an upsell, and it’s a great way to increase sales. Another tactic you could use is cross-selling; this is where you encourage customers to purchase other items that are similar or related to what they just bought. You can do this by offering discounts for purchasing different lines/products at the same time, which will entice them even more.
The Bottom Line
There you go, then; seven highly effective ways to increase your eCommerce sales. We hope that by reading this post and following the tips given in it, you were able to learn more about how these principles can be applied to your own business strategy. Good luck!
When water starts dripping through your ceiling on a rainy afternoon, the immediate response might be to reach for buckets and call for an emergency repair. Yet this moment often signals a more significant decision point: should you patch the problem or invest in a complete roof replacement?
For many homeowners, this decision becomes increasingly complex as they weigh up the immediate cost savings of repairs against the long-term benefits of replacement. It’s a choice that often has thousands of pounds – and years of peace of mind – hanging in the balance.
Reading The Signs
Your roof provides clear signals when it needs attention. Beyond the obvious signs of water stains and missing tiles, pay attention to the subtler warnings: granules from asphalt shingles collecting in your gutters, daylight peeking through your attic boards, or that slight sag that makes you wonder if it’s always been there.
Though you can of course check for roof damage yourself, professional annual inspections are a good idea, particularly after severe weather events, to catch issues while they’re still manageable. Many problems develop gradually over months or even years before becoming visible inside your home, making regular professional assessment a worthwhile investment.
Understanding The Lifespan Of A Roof
As Prairie Exteriors, who offer roof replacement in Madison, explain, the age of your roof is one of the most crucial factors in deciding between repair and replacement. Different materials have vastly different lifespans:
Asphalt shingles typically last 15-20 years
Metal roofing remains protective for 40-70 years
Slate roofing can last a century with proper maintenance
Clay tiles typically protect for 50+ years
But these are just averages. Local climate plays a crucial role – a roof in coastal Cornwall faces very different challenges from one in the Scottish Highlands. Regular maintenance, quality of installation, and local weather patterns all influence how long your roof will last.
The Economics Overhead
According to Checkatrade, when considering repair versus replacement, it’s crucial to understand the costs involved. A typical repair for a pitched clay tile roof costs between £110 and £160 per square metre, while concrete tiles are slightly less expensive at £90 to £120 per square metre. For flat roofs, repairs typically range from £100 to £180 per square metre, depending on the material used.
A complete roof replacement represents a more substantial investment, with the national average currently sitting at £7,000. However, costs can range significantly based on your roof type – from £2,800 for a basic flat roof to £18,000 for a complex hip roof design. These figures exclude VAT and additional costs such as scaffolding, which typically adds around £625 per week for a standard 10-metre height, as Checkatrade again report.
Modern roofing materials offer significant energy efficiency improvements over those from even a decade ago. The initial investment in a new roof often pays dividends in reduced energy bills, particularly with the UK’s rising energy costs. Additionally, a well-installed, energy-efficient roof can significantly improve a home’s EPC rating – an increasingly important factor in property valuation.
Looking To The Future
The decision between repair and replacement often comes down to your long-term plans. Are you planning to sell? Looking to improve your home’s energy efficiency? Or perhaps considering solar panel installation?
With the UK government’s push toward renewable energy and net-zero targets, more homeowners are considering their roof’s potential for solar panel installation. In such cases, it often makes more sense to replace an aging roof before installing panels, rather than facing the additional expense of removing and reinstalling panels when the roof eventually needs replacement.
Local council planning requirements and conservation area restrictions may also influence your decision, particularly in historic areas or listed buildings. It’s worth checking these regulations early in your decision-making process.
Making the Call: A Practical Guide to Your Decision
The decision between repair and replacement often feels overwhelming, particularly when faced with unexpected roofing issues. While each situation is unique, there are clear indicators that can guide your choice. The key is to balance immediate needs with long-term value.
Several key criteria can help you evaluate your situation:
For repairs, look for these favourable conditions:
Your roof is well within its expected lifespan (less than 10 years old for most materials)
The damage affects only a small, isolated area
Recent inspection shows the rest of the roof is structurally sound
Your budget constraints require spreading costs over time
The underlying roof structure remains solid and dry
Replacement becomes more advisable when:
You’re experiencing multiple leaks or recurring issues
The damage extends across more than 30% of the roof surface
Your energy costs show consistent increases year over year
You’re planning other major home improvements
The roof structure shows signs of sagging or water damage
Repair costs would exceed 35% of replacement costs
Remember that these guidelines should be considered alongside professional assessment. A thorough inspection can reveal underlying issues that might not be visible from ground level or even your attic space.
Beyond the Basics
Modern roofing isn’t just about protection—it’s about possibility. Today’s options include cool roofs that reflect sunlight, integrated solar tiles that generate power, and recycled materials that reduce environmental impact. Some municipalities even offer incentives for eco-friendly roofing choices.
The Bottom Line
Your roof is more than just the top layer of your home—it’s a crucial investment in your property’s future. While the decision between repair and replacement is rarely simple, understanding your options is the first step toward making a choice you won’t regret.
Ultimately, the decision between repair and replacement comes down to balancing immediate costs against long-term security. While the upfront investment in a new roof might seem daunting, the peace of mind that comes with knowing your home is protected for decades to come often proves invaluable.
Always consult with licensed contractors and check local building codes before making major home improvements.


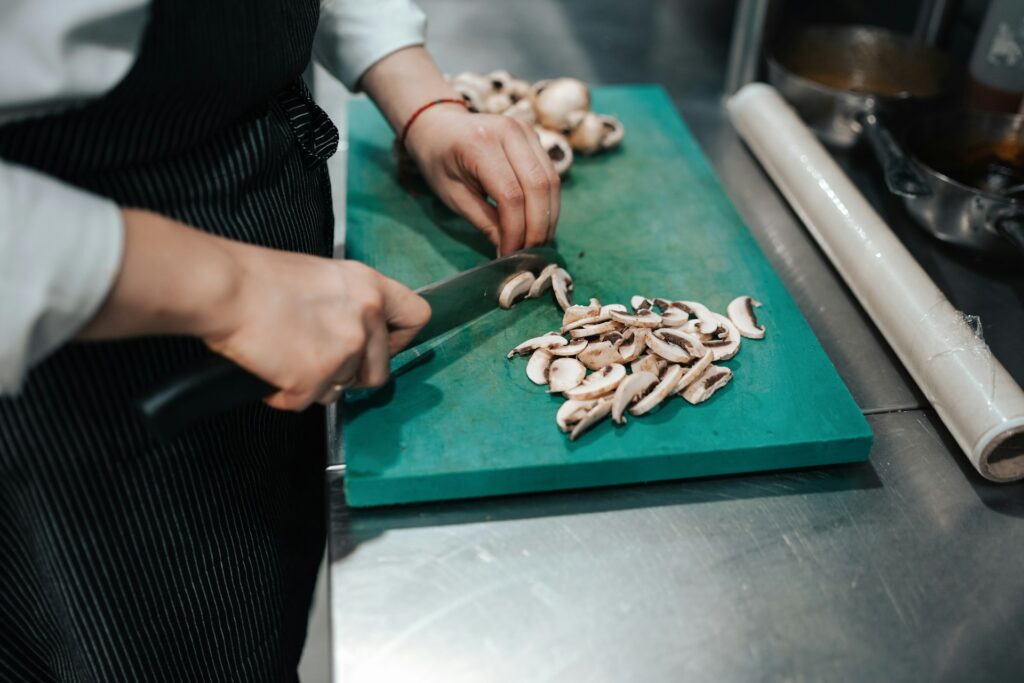


")