Can something that never truly disappeared make a comeback? The trench coat has always had the ability to reappear, not because fashion demands it, but because life does. Familiar, sophisticated, and subtly comforting, it’s the piece that works when nothing else feels seems to fit.
Every few years, we call it a “return,” but the truth is it never really left. Despite changing silhouettes and moods, the trench coat remains in style, adapting to the times without ever losing its unique character. It isn’t about nostalgia or trend. It’s about the comfort of something proven – a shape and sensibility that still feel perfectly modern.
A History Woven Into Contemporary Life: From Tradition To Habit
Created out of necessity, the trench coat has always been characterised by functionality: protection against the rain, movement without restriction, and structure without rigidity. However, those practical beginnings evolved into a deeper concept: a cultural code. What began as military outerwear became a representation of self-assurance, discretion, and authority.
Its strength lies in the ease with which it transitioned from uniform to daily companion. The trench coat, which never lost its essence despite adapting to the rhythms of modern life, became a common sight in both city streets and movie frames in the decades that followed.
Every generation has found a unique way to wear it, whether it’s oversized, open, belted, or buttoned up, demonstrating that purpose-built style never fades. Even today, that sense of continuity feels reassuring. The trench coat offers something special: the elegance of consistency, even in a time when fashion seems to change suddenly.
Beyond Trends: Why The Trench Coat Remains A True Classic
Trends come and go, but trench coats stay. They move through decades of shifting preferences, never needing to reinvent themselves. Their strength lies in simplicity: well-balanced proportions, clean lines and precise details that are both refined and functional.
Such a coat doesn’t need to shout to be noticed. Its confidence stems from restraint, from the way it moulds movement instead of dictating it. It fits in perfectly with all situations and moods, whether you’re at work, in the city, or on a late evening walk.
That’s the key to timeless design: it doesn’t demand relevance. It simply fits into lifestyles that value class and style over excess.
The Modern Interpretation: New Shapes, New Sensibilities
Today’s trench coats are still evolving while keeping their basic features. Designers play with volume, proportion, and fabrics, but the goal is always the same: to create outerwear that feels effortless. Slightly wider sleeves, a softer drape, or a more fluid belt give the silhouette a quiet freshness.
The modern trench doesn’t seek to replace tradition, but to perfect it. Each reinterpretation reveals how this classic shape can express individuality without losing balance, proving that timeless design is not static but alive.
Why We Always Return To The Trench Coat
Some trends become a part of our everyday lives, while others are ephemeral. The trench coat belongs to the first kind. It’s the piece we reach for instinctively, when the weather is uncertain or when nothing else feels quite right. Its appeal lies in familiarity – in the comfort of knowing it will always deliver.
Perhaps that’s why we never really move on from it. The trench coat guarantees what few garments can: quiet confidence, enduring elegance, and the feeling of being perfectly put together, every time.
Italian Precision & Contemporary Grace: The Max Mara Vision
Since its beginnings in Reggio Emilia, Max Mara has built a legacy defined by clarity, structure and refinement. Every creation reflects the brand’s belief that true beauty emerges from discipline – from the precise intersection of design, proportion and movement. This philosophy continues to guide Max Mara’s evolution, translating Italian precision into a modern expression of grace.
At the heart of this vision stands the Max Mara woman: independent, confident and cosmopolitan. She knows the value of authenticity and seeks garments that complement her rhythm, not dictate it.
She represents a generation that values quality over quantity, form over embellishment, and design that adapts to the many roles of contemporary life. For her, elegance is not a gesture but a natural extension of confidence – something that can move effortlessly from morning to evening, from work to leisure, across seasons and cities.
Each Max Mara collection captures this harmony between technical mastery and emotional subtlety. The brand’s outerwear, in particular, exemplifies this dialogue. Coats and jackets are conceived with architectural precision and constructed from the finest materials to ensure durability and fluidity in equal measure.
The trench coat, one of Max Mara’s most iconic designs, perfectly encapsulates this balance. Its clean lines, tactile fabrics and adaptable silhouette express the essence of Italian expertise elevated through innovation and design intelligence.
In the world of Max Mara, modern grace is measured by consistency – by garments that retain their relevance as time passes. Every piece becomes part of a living wardrobe, designed to evolve alongside the women who wear it. It is this union of precision and poise that defines the Max Mara vision: contemporary elegance shaped by Italian excellence.
Picture this: you’ve just landed after a long flight and all you want is to soak in a hot bath with a glass of bubbly or sink into a bed so comfy it feels like a cloud. You walk into your hotel room only to find … it’s a bit of a shoebox. How good would it be to get that desired upgrade without breaking the bank? Or, even having to dip your hands in your pockets at all.
Well, fear not; we’ve got a bit of the ol’ inside scoop to share. Here’s our top 9 insider tips on how to score a hotel room upgrade with no additional charges.
Loyalty Pays Off
You’ve heard it a lot, haven’t you? It’s not just your nan’s mantra; being a frequent guest or loyal member of a hotel’s rewards programme carries a lot of weight. Simply put, loyalty earns you brownie points. Hotels tend to dish out upgrades to loyal customers more readily – so the more often you stay, the greater the chance of lounging in luxury.
Accordingly, if you stay in major hotel chains regularly, then it may well be worth staying loyal to just one when you’re travelling. Your devoted allegiance will soon be noticed, mark our words.
Timing Is Everything
If you’re keen to increase your chances of an upgrade (you are, that’s why you’re here), then try to visit hotels during the off-peak season or midweek when hotels are less busy. The chances of landing a free upgrade are much higher then.
Also, try to check in after most guests, typically late afternoon to early evening. By this time, the hotel has a better idea of occupancy and might be more willing to spoil you with an upgrade.
Here’s a tip that requires patience but can pay dividends: hotels, just like high street retailers, have their sale seasons. Black Friday has become a bonafide booking bonanza, with major chains slashing rates on future stays – we’re talking discounts of up to 50% on rooms you can book months in advance.
According to barcelo.com, Spain’s second largest hotel group, their Black Friday deals often include perks like complimentary room upgrades and flexible cancellation, effectively combining two tips into one. Beyond the November rush, keep your eyes peeled for January sales (when hotels are keen to fill spring and summer gaps), end-of-season clearances in September, and flash sales around bank holidays.
Sign up for email alerts from your favourite chains, set a calendar reminder for the last week of November, and watch your inbox like a hawk. The upgrade you’ve been eyeing might just land in your lap at a fraction of the price.
Special Occasion? Don’t Be Shy About It
Celebrating a special occasion? Don’t hold back, spill it out! If you’re celebrating a big anniversary or it’s your honeymoon, let the hotel know when you book. There’s no guarantee, but they might just take the opportunity to sprinkle a bit more magic onto your special occasion with a free upgrade.
And whilst we’re not suggesting making up a birthday, anniversary or other special occasion, you could theoretically do so…
Feedback Is Valued & Sometimes Even Rewarded
Providing feedback to hotels fosters mutual benefit by improving their service and highlighting your engagement as a guest. Detailed feedback assists hotels in recognising their strengths and identifying improvement areas.
So, if you found the commercial grade security cameras for hotels a little intrusive or if you got an especially good night’s sleep during your stay, your active feedback might prompt hotels to prioritise you for room upgrades during future stays as a token of appreciation – or, of course, seeking further praise or invaluable advice!
Room For Improvement
Here’s the cheeky tip you’ve been waiting for. Booking the least expensive room? That leaves room for improvement, doesn’t it? The logic is simple: the only way is up! An upgrade from the bottom deck is more likely than one from a more expensive room.
Of course, you might just be left in a box room, windowless and alone, which is not quite what you bargained for, but, on the flipside, you might just earn a promotion to a hotel room with kitchenette facilities or a penthouse with expansive views of the city, if you take the gamble. It’s a risk, sure, but one that some decide is worth taking.
A Polite Request
Just as insiders always extol the merits of remembering your Ps and Qs when looking for flight upgrades, so the same truths apply to hotel room upgrades. Sometimes, the simplest approach can be the most effective. Being polite, friendly, and forthright can work wonders. Without wishing to sound like your parents, do remember to say “please” and “thank you”, and don’t be afraid to ask – the worst they can do is say no!
Independence Day
Consider booking with independent or boutique hotels. These chaps have much more flexibility compared to the big chains, in terms of their procedures, and can often offer upgrades without having to wade through red tape or corporate policies. Not only that, but it’s important to support local, independent hospitality venues above the chains, too.
Pay With Plastic
Using a credit card that has a partnership with the hotel? You might be sitting on an upgrade and not even know about it! Many credit cards offer points, travel rewards or benefits including room upgrades. It’s always wise to read the fine print or give your bank a buzz to see if you’re eligible.
In the United Kingdom, the Marriott Bonvoy American Express Credit Card is a notable credit card that has a partnership with hotels and offers potential room upgrades. Cardholders of this credit card can enjoy numerous benefits including complimentary Marriott Silver Elite status, which can be upgraded to Marriott Gold Elite status by spending £15,000 on the card in a year. This status may provide opportunities for room upgrades at Marriott properties.
While Hilton and IHG do not offer co-branded credit cards in the UK, points towards room upgrades can still be earned by transferring rewards from American Express Membership Rewards and Virgin Atlantic Flying Club directly to a Hilton Honors account, or via credit card spend with Virgin Atlantic and HSBC UK for IHG points.
However, it’s important to note that the actual realisation of these benefits, such as room upgrades, may depend on factors like availability and the specific terms and conditions of each card.
The Bottom Line
There you have it, folks; eight savvy insider tips to nudge the odds in your favour for a smashing hotel room upgrade. So, the next time you’re booking a stay, remember these tips and you might just find yourself sipping that champagne in a sumptuous suite. Happy travels!
Hey, let’s not mince our words here; solo cooking can be a challenge. It’s all too easy to just eat beans on marmite toast ad infinitum (just us?) or to grab a takeaway when the mood takes you, which, let’s face it, is every night. Why bother doing more, right?
Let’s strike that negativity from the record and start over. Not only is there joy to be had in cooking for one, but it also brings other benefits, both mental and physical.
Domestic goddess Nigella Lawson is an advocate of cooking for one, and who’s to argue with her? Except over her pronunciation of microwave, perhaps. Anyway, she tells the Evening Standard of how much she enjoys cooking for herself, and has always been a believer in cooking for one.
Indeed, she reveals that she finds it “such a wonderful way of cooking without stress, because there’s no anxiety about whether it’s going to find favour”. Moreover, she posits that cooking for yourself is a great way to gain confidence in the kitchen, behind closed doors before your newly learned skills are unleashed on the hungry world.
We couldn’t agree more. That said, cooking for yourself does involve a fair amount of planning and preparation, in order to avoid wasting food, over shopping or underfeeding. With that in mind, here are 10 tips on meal prepping and cooking if you live alone.
Plan Meals Ahead Of Time
Planning your meals ahead can save you time, money and effort, and will give you something to look forward to during the working day, too! Knowing that you’ve got a delicious bowl of spaghetti pomodoro or Hanoi style beef noodle soup waiting at home could get you through even the darkest of days, don’t you think?
Planning meals ahead of time also means that you’re less likely to impulse buy at the supermarket on the way home from work, or snack unnecessarily during the day.
Your meal plan is the blueprint for your shopping list, so consider investing in an A4 sized whiteboard that you can stick to your fridge with the days of the week and intended meals listed on it. Doing so will help you stay disciplined and focused as the week progresses, and will help you lessen your food waste, too!
Speaking of shopping, when you’re cooking for one, it is, conversely, essential that you don’t shopfor one. Buying solo portions and single pieces of fruit, vegetables, meat and fish isn’t the most economically efficient thing to do. Neither is it all that good for the environment, considering all of the single use plastic involved.
Instead, consult that meal plan of yours and shop smartly for the week, buying in bulk and deploying the same ingredients in several dishes throughout the week.
Expand Your Repertoire
Having some regular, go-to recipes is a wonderful, reassuring thing. Hey, you might even call your homemade Thai green curry your ‘signature dish’. And there’s certainly nothing wrong with taking pride in your cooking.
However, cooking the same old dishes night after night can sometimes make cooking for one a little uninspiring. By diversifying your dishes and expanding your repertoire, you can keep mealtimes interesting each and every night of the week. For inspiration, get a food encyclopedia and look up food that starts with N, for instance, then build a dinner from that random reference point. Or, invest in a recipe book from a country you’ve never visited or a cuisine cooked from.
For inspiration, there are lots of cookbooks out there aimed at and celebrating solo cooking. Take “Solo: A Modern Cookbook for a Party of One” by Chef Ania Lo or “Solo” by Signe Johansen, both whose recipes are tailored to feed one.
Experiment With New Ingredients
Living alone presents a unique opportunity to experiment with your cooking by incorporating new ingredients that can transform the ordinary into the extraordinary.
MSG, often misunderstood, is a pantry staple that can add an umami depth to dishes that might otherwise taste bland; just a pinch can elevate a simple stir-fry or a batch of roasted vegetables.
Don’t overlook the versatility of nutritional yeast, either, which can be sprinkled over pasta or popcorn for a cheesy flavour without the dairy, or the complexity that a dash of smoked paprika can bring, giving a smoky edge to your favourite egg or potato dishes.
By keeping these ingredients at hand, you can easily add a twist to your meals and keep your solo dining experience both exciting and delicious.
Cook With Food Waste In Mind
Cooking for one whilst causing zero waste is a tough ask. According to WRAP’s research, single-occupancy households generate more waste per person than larger households, primarily from not using food before it goes off or passes its date label. With the average UK household wasting £1,000 worth of food annually, solo living makes mindful meal prep even more essential. Blimey.
It’s widely known that each forkful of food we throw away contributes to greenhouse gas emissions. As reported by the BBC, “if food waste was a country, it would be the third highest emitter of greenhouse gases after the US and China, according to the Food and Agriculture Organization (FAO) of the United Nations.”
So, even though you’re cooking for one, it still pays to be mindful of how you’re doing so to mitigate the implications of food waste. Cooking with thoughtfulness where waste is concerned will not only save you money, but your conscience, too.
Leftovers can often lead to exciting, delicious meals in their own right. So, start repurposing your leftovers and eat like a king, queen or monarch for longer.
Today’s risotto could be tomorrow’s arancini balls. Your beef ragu can be turned into a lasagna, a cottage pie, chilli con carne or taco topping. That massive bag of carrots you had to buy can be redeployed as a dip for hummus, a carrot soup or even made into a quick pickle to liven up your next salad. Leftover mash can be turned into croquettes or potato cakes. Hey, the list goes on and on and on…
But we won’t do.
Portion Meals & Use The Freezer
The freezer is a solo cook’s best friend. Use it to prolong the life of your leftovers:
Portion Food: Unless you’re going to a butcher, it’s pretty impossible to get the exact right amount of meat for a solo diner. As such, it’s a good idea to freeze meal size portions. The same goes for if you’re cooking pasta or rice. Get some scales and measure out single portions each time, to ensure you’re not unnecessarily overfilling your plate. Having the best containers for meal prep makes this far easier; look for stackable, airtight options in various sizes that can go from freezer to microwave without fuss.
Batch Cook and Freeze: On a rainy day, put on a podcast and get cooking. When you’re in the kitchen alone, sometimes the silence can feel oppressive and make cooking feel like a chore. Welcome some company into the kitchen and luxuriate in the experience!
Make Extra and Freeze it: Let’s face it, batch cooking at the weekend for your meals during the week can get pretty boring. If this is an activity you don’t enjoy, there is another way; simply make double of what you’re cooking for dinner each night and freeze the additional portion, ready for the most delicious, healthiest ready meal when you’re feeling too tired to cook from scratch.
Buy Quality Cuts In Smaller Quantities: As the experts at The Organic Butchery recommend, buying smaller, quality cuts of meat rather than bulk-packaged supermarket offerings is a smarter approach for solo cooks. Not only does it mean less waste, but the flavour difference between a single, well-sourced pork chop and a shrink-wrapped multipack of four is night and day. A good butcher will also cut to your exact requirements, so you’re not left trying to freeze three chicken breasts you didn’t need in the first place.
Hey, we’re not done yet! Stock your freezer up with frozen vegetables. This means that you can have healthy produce on hand, eliminating the worry of sourcing direct from the increasingly empty-shelved supermarket.
Frozen berries are your best friends, especially when you are not in the mood to open the stove. Aside from fresh berries being expensive, frozen berries are cheaper and last longer. Shop for frozen grapes, sweet cherries, and berries – they are absolutely fantastic snacks, and you can also make them into a smoothie!
Soup is one of the simplest, most affordable and healthiest meals available, too. It’s also a great one to freeze, portion by portion.
If your food is badly organised and scattered across your cupboards, kitchen and fridge, it can be hard to make economical decisions about what to eat next. Box items up in leftover takeaway containers (from those days when you used to eat too many) and label them up.
Keep your spice rack neatly organised and where fresh food is concerned, operate a FIFO (first in, first out) policy in your fridge to ensure you’re eating ingredients before they go off. All of this will make cooking a joy, not a chore.
We don’t mean to hamper the progress you’ve made since reading this article on cooking solo. However, as reported by the Independent “research is revealing the negative impacts of eating alone, which has been found to be linked to a variety of mental and physical health conditions, from depression and diabetes to high blood pressure”.
Indeed, while solo cooking can be fun, it would be remiss of us not to admit that cooking for two, three or even a group of people is far more fun. So why not join forces with your friends and take it in turns to throw a dinner party every other week? Doing so will keep you inspired about new recipes and cooking techniques, and give you a fresh impetus to keep cooking on those solo nights.
Scale Recipes With Confidence
Most recipes are written for four people, which can be daunting when you’re cooking solo. Learning to scale recipes down (or strategically up for batch cooking) is a skill worth developing. Invest in a decent set of digital scales and get comfortable halving or quartering quantities.
Some things scale easily (pasta, rice, most soups), whilst others need a bit more care (baking, anything with eggs). There are plenty of online recipe calculators that can do the maths for you, and once you’ve got the hang of it, you’ll never feel beholden to a recipe written for a family of four again.
The Bottom Line
Cooking for one is a tender, gentle act of self love that shouldn’t be underestimated. Good for the body, soul and bank balance, we hope you’ve found some inspiration above on how to do it efficiently, economically, but even more so, joyfully.
Lake Como has become one of the most sought-after wedding destinations in Europe, and if you’ve been invited to celebrate by the water, congratulations – you’re in for a spectacular weekend. But weddings rarely fill an entire trip. Between the rehearsal dinner, the ceremony itself, and the morning-after brunch, you’ll likely have a little downtime to explore this corner of northern Italy. The good news? You don’t need to blow your budget on Clooney-adjacent villas to make the most of your visit.
Take The Ferry Between Towns
The most affordable way to see Lake Como is also the most scenic. Rejoice! The public ferry service, operated by Navigazione Laghi, connects all the major towns around the lake, with day passes allowing unlimited travel within designated zones. A day pass for the central lake area costs €15, covering the Bellagio-Varenna-Menaggio triangle, while a full-lake pass extending from Como town to the northern basin costs €23.30.
You’ll get the same views as those private water taxis charging hundreds of Euros, just with a few more stops along the way. The regular ferries take around two hours from Como to Bellagio, whilst the faster hydrofoil service completes the journey in about 45 minutes but costs an extra €4.40.
During summer, ferries run roughly every 30 to 60 minutes. Services reduce significantly in winter, and timetables vary by route, so check the Navigazione Laghi website before finalising your plans.
If you’re travelling during peak season, arrive at the ticket office early, as queues at major stops like Varenna and Bellagio can stretch to several hours. If your hosts have hired a wedding planner in Lake Como, they’ll likely have warned you about this and may have arranged group transport to avoid the ferry chaos.
Wander Bellagio’s Salita Serbelloni
This steep, narrow street climbs from Bellagio’s waterfront up through the old town, lined with stone houses, gelaterie, and small shops selling locally-made silk scarves. It’s free to explore, and the higher you climb, the better the views across the lake become.
Near the top, you’ll find the Basilica di San Giacomo, a 12th-century Romanesque church with original frescoes still visible on the interior walls. The climb takes about 15 minutes at a steady pace, considerably longer if you stop for photos or to catch your breath – and you will want to stop, both for the views and because the incline is genuinely challenging.
Early morning or late afternoon are the best times to make this walk. Midday sun makes the climb uncomfortable, and the narrow street offers little shade.
Hike To Castello di Vezio
Above Varenna sits this ruined medieval castle, reached by a 20-minute uphill walk through olive groves and the tiny hamlet of Vezio. Entry costs €6 for adults, with reductions to €3 for over-65s, groups of more than 12 people, and students aged 7-18. You’ll have panoramic views over the central lake and surrounding mountains – many visitors rate this as the single best vantage point accessible without serious hiking equipment.
The castle dates back to the 11th century, though much of what remains is from later medieval periods. The tower contains a permanent exhibition about the Lariosaurus, a prehistoric reptile whose fossils have been found around Lake Como. The surrounding gardens include one of the northernmost olive groves in the world, though the trees here produce fruit rather than commercial quantities of oil.
Wear proper shoes – the path from Varenna is steep, paved with uneven stones, and can be treacherously slippery after rain. There are parking spaces near the village of Vezio if you’re driving, costing €2 per hour, though most visitors make the walk from Varenna’s waterfront.
The restaurants right on the lake promenades charge a premium for those views. Walk two streets back from the water and you’ll find trattorias serving the same regional dishes – pizzoccheri (buckwheat pasta with cabbage and cheese), risotto al pesce persico (with local perch), polenta concia – for half the price.
In Como town, the area around Piazza Volta has several good options where locals actually eat. In Varenna, head up into the residential streets behind Via XX Settembre. In Bellagio, anything away from Piazza della Chiesa will be more reasonable. A full lunch with wine shouldn’t cost more than €25-30 per person at these places, compared to €45-60 at waterfront establishments.
Many restaurants offer a fixed-price pranzo that includes a primo, secondo, and quarter-litre of house wine for €18-22. It’s aimed at Italian workers rather than tourists, so portions are substantial and the cooking tends to be straightforward and honest.
In Varenna, the botanical gardens of Villa Monastero stretch for almost two kilometres along the lakeshore. Entry to the gardens costs €8, whilst a combined ticket for the gardens and the House Museum costs €10. Reduced admission of €7 or €5 applies to visitors over 65, groups of more than 20 people, and students, with free entry for children under 14.
The gardens were established in the 19th century and contain plants from around the world – citrus trees, magnolias, cypresses, and exotic species from Asia, Africa, and the Americas that thrive in Como’s mild microclimate. The walking path offers continuous lake views and several shaded benches if you need a rest.
The villa itself, once a Cistercian convent, now serves as an academic conference centre. The House Museum displays 14 rooms of period decoration and furniture from the late 1800s. Last admission is 45 minutes before closing, so don’t arrive too late if you want to see the full extent of the gardens.
Explore Como’s Centro Storico
Como town at the southern end of the lake often gets overlooked by tourists rushing to Bellagio, but the historic centre deserves an afternoon. The Duomo, completed in 1770 after centuries of construction, is free to enter and combines Gothic and Renaissance architecture. Behind it, narrow medieval streets lead to Piazza San Fedele, the old market square, where local life continues largely unbothered by tourism.
Como was a major silk production centre, and you can still find shops selling silk goods, though prices have crept up as the industry has declined and production moved elsewhere.
The funicular to Brunate costs €6.10 for a return ticket, or €3.30 for a single journey. The journey takes seven minutes and operates every 15 minutes throughout the day, climbing 496 metres. At the top, you’ll have views over the entire southern basin of Lake Como. There’s a bar and restaurant at the summit, and several walking trails lead to further viewpoints including the Volta Lighthouse, about 30 minutes’ walk from the funicular station. Queues can be substantial during peak season, particularly by midday.
Swim At A Lido
If you’re visiting in summer, the local lidos offer lake access with changing facilities and sunbeds. These are popular with Italian families rather than tourists, giving them a more authentic atmosphere than you might expect. Be aware that several major lidos around the lake are currently closed for renovation, so it’s worth checking ahead.
Lido di Bellagio, positioned near Villa Melzi, charges around €50 for two people including sunbeds and umbrellas, with gazebos available and direct lake access. For a more affordable option, Lido di Argegno offers a grassy beach with pool, sunbeds, and a bar at lower rates. There are also free public beaches in several towns – Bellagio’s San Giovanni beach is about 15 minutes’ walk south of the ferry docks, whilst Bellano has a sandy public beach next to its lido.
The water temperature peaks around 24°C in July and August – refreshing rather than warm, but perfectly swimmable. Early morning is the best time for swimming if you want calm water and fewer people. Most lidos open around 10:00 and operate from May or June through to September.
Do remember that many restaurants close on Mondays, particularly in smaller towns, and that August sees many Italian businesses shut for annual holidays. Public ferry timetables change seasonally, so check the Navigazione Laghi website before planning your day trips. If you’re visiting for a wedding, ask the couple about any group transportation they’ve arranged – it’s often easier to coordinate with otherwedding guests than navigate the area independently, particularly if the wedding venue is in a more remote location.
Tired of waiting for your hair to grow? You’re not alone. In today’s fast-paced world where celebrities seem to switch from bobs to waist-length waves overnight, the secret to dramatic hair transformations isn’t miracle growth serums – it’s expertly crafted hair enhancements.
From clip-in extensions that add instant volume to sophisticated lace front wigs that create the illusion of hair growing directly from your scalp, the world of faux hair has evolved dramatically. Gone are the days of obvious, plastic-looking additions. Today’s options are virtually undetectable, offering everyone the opportunity to experiment with length, volume and style without commitment.
Whether you’re recovering from a regrettable haircut, dealing with thinning hair, or simply craving versatility, this guide will walk you through the most popular hair enhancement options, helping you find the perfect solution for your lifestyle and budget.
Clip-In Extensions: The Gateway Enhancement
For newcomers to the world of hair additions, clip-ins remain the most accessible option. These temporary wefts attach to your natural hair with small pressure clips, allowing for transformation that lasts from morning until bedtime.
Modern clip-in extensions come in various weights and lengths, from subtle pieces that add volume at the crown to full sets offering up to 20 inches of additional length. Application involves sectioning your natural hair horizontally and attaching the wefts close to the roots, with placement varying depending on your desired effect.
The advantage of your clip-in application technique lies in its versatility – they can be removed before sleeping and reapplied the next day, making them perfect for special occasions or weekend experimentation. They’re also the most budget-friendly enhancement option, with prices typically ranging from £80 for synthetic versions to £300 for premium human hair.
For best results, limit wear to 8-10 hours at a time, as the weight can cause tension on the scalp when worn for extended periods. Proper application is crucial – visible clips are the most common giveaway of amateur installation.
Perhaps no hair enhancement has experienced such a dramatic surge in popularity as the humble ponytail extension. These ready-made pieces transform thin, short hair into a voluminous, swinging ponytail in under five minutes.
The modern fake ponytail typically features a small comb at the base that slides into your secured natural ponytail, with additional hair wrapping around to conceal the attachment point. Some include a velcro strip or drawstring mechanism for additional security.
Celebrities like Ariana Grande have been refreshingly forthcoming about their use of ponytail extensions to create their signature looks. Grande’s trademark high ponytail – which appears to be nearly twice the length of her natural hair – has spawned countless imitations and dedicated enhancement pieces.
Zendaya, despite her seemingly effortless style transformations, is another celebrity who frequently uses ponytail extensions to create dramatic red carpet moments. The actress and fashion icon has been spotted switching from her natural curls to sleek, waist-length ponytails overnight. Many of Zendaya’s most iconic looks combine her natural hair with expertly placed ponytail extensions, allowing her to protect her natural curls while still delivering headline-grabbing transformations.
Application involves securing your natural hair into a ponytail, inserting the comb of the hairpiece, then wrapping the concealing section around the base and securing with pins. More advanced designs feature heat-resistant fibre or human hair that can be styled to match your preferred texture.
Prices range from £25 for synthetic versions to over £200 for premium human hair alternatives, with the distinction in quality being particularly noticeable in movement and shine.
Lace Front Wigs: The Ultimate Transformation
Lace front wigs represent the most significant technological advancement in hair enhancement in recent decades. Unlike traditional wigs with visible hairlines, lace fronts feature individual hairs hand-tied to a sheer lace base, creating the illusion of hair growing directly from your scalp.
The construction involves thousands of hairs individually knotted to a transparent mesh made from Swiss or French lace. This lace section is applied to the hairline using specialised adhesives, while the remainder of the wig covers the rest of the head.
Many don’t realize is that Keira Knightley has been a longtime fan of wigs and has been wearing them since 2011 and is “the greatest thing to have happened” to her hair. She revealed how her hair became damaged from frequent dyeing for various roles, leading her to rely on wigs to maintain the appearance of thick, healthy hair while allowing her natural locks to recover. Her subtle use of extensions during red carpet appearances demonstrates how undetectable wigs be when properly matched and installed.
Katy Perry is perhaps one of the most prolific yet under-recognized wig users in Hollywood. While her constant hair color changes from blue to pink to black might suggest frequent dyeing, Perry has confirmed in multiple interviews that she maintains an extensive collection of high-quality lace front wigs. This allows her to preserve her natural hair’s health while still delivering the dramatic color and style changes that have become her signature. Her stylist has revealed that for major appearances, Perry often has custom lace fronts created to perfectly match her vision, with each wig requiring up to 40 hours of handcrafting to achieve the most natural-looking result.
The versatility of lace fronts has made them particularly popular for dramatic transformations without damaging natural hair. The ability to part the hair anywhere within the lace section creates a realistic appearance that previous generations of wigs simply couldn’t achieve.
Beyond cosmetic appeal, lace fronts have become vital solutions for those experiencing hair loss from conditions like alopecia or as a side effect of medical treatments. The natural appearance provides not only aesthetic benefits but often significant psychological comfort.
Quality lace front wigs require substantial investment, with prices typically starting at £200 for synthetic options and extending well into the thousands for premium human hair versions.
Halo Extensions: The Best Hair Extensions For Balayage
If you’re looking for a non-damaging, instant solution that works perfectly with balayage and dimensional color, halo extensions deserve special attention. Unlike traditional clip-ins or tape-ins, halo extensions consist of a single weft of hair attached to an invisible wire that sits on your head like a crown or “halo.”
The unique design places the extension underneath your natural hair, with a thin, transparent wire that rests around the crown of your head. Your own hair is then pulled over the top to conceal the wire, creating a seamless blend that requires no clips, tapes, or adhesives making direct contact with your scalp.
What makes halo extensions particularly ideal for balayage is their single-piece construction. The uninterrupted weft maintains the natural flow of color graduation that defines balayage, allowing the carefully painted highlights to transition naturally from darker roots to lighter ends. With traditional extensions that use multiple pieces, maintaining the continuity of balayage’s subtle color transitions can be challenging.
Celebrities like Blake Lively, known for her signature honey-blonde balayage, have reportedly incorporated halo extensions for added volume and length while maintaining the dimensional color that made her hair famous. The technique allows her to preserve the natural color flow while adding significant volume for red carpet appearances. Halo-shaped extensions are also favoured by the Kardashians.
Application is remarkably straightforward: section your natural hair at the crown, place the wire over the top of your head like a headband, pull your natural hair over to conceal the wire, and blend with your fingers or a wide-tooth comb. The entire process takes less than five minutes once you’ve mastered it, making it one of the quickest enhancement options available.
Prices typically range from £80-£250 depending on length, thickness, and hair quality, with human hair options offering the best match for balayage’s dimensional color. Since halo extensions experience less friction than clip-ins (as they don’t attach directly to your natural hair), they often maintain their quality longer with proper care.
Semi-Permanent Options: Tape-Ins & Micro-Links
For those seeking longer-term solutions, tape-in extensions and micro-link methods offer weeks or months of wear without daily application.
Tape-in extensions sandwich small sections of natural hair between two adhesive-backed extension wefts, creating a flat bond that lies close to the scalp. The flatness makes them particularly suitable for finer hair types, as they’re less likely to create visible bumps.
Micro-link (also called nano-ring) extensions attach small bundles of extension hair to tiny sections of natural hair using almost imperceptible metal rings. This method involves no heat or adhesives, making it ideal for those with sensitive scalps or concerns about chemical exposure.
Zendaya has been known to alternate between various extension methods depending on the demands of her shooting schedule and red carpet appearances. Her hairstylist has shared that for long-term projects requiring consistent looks, micro-link extensions provide the versatility needed for daily styling while maintaining the health of her natural hair. This semi-permanent approach allows her to seamlessly transition between her natural curls and straight styles without the daily application time required for temporary options.
Both options require professional application and regular maintenance appointments every 6-8 weeks to adjust as your natural hair grows. Initial investment ranges from £150-£500 for tape-ins and £300-£800 for micro-links, with maintenance sessions costing approximately half the initial application price.
Human Hair vs Synthetic: Making The Choice
The most fundamental decision when selecting hair enhancements is between human and synthetic hair.
Human hair offers unparalleled natural appearance and versatility, allowing for heat styling and colour customisation. Premium ‘Remy’ hair (where cuticles remain aligned in the same direction) prevents tangling and preserves natural shine but comes with a significantly higher price tag and greater maintenance requirements.
Modern synthetic options have improved dramatically, with advanced fibres designed to mimic the weight and movement of human hair. The primary advantages include lower cost, reduced maintenance, and the ability to maintain a preset style even in humid conditions. Limitations include a shorter lifespan (typically 2-6 months versus 1-2 years for human hair) and limited styling options.
Investment in premium human hair extensions can ultimately prove more economical than constantly replacing lower-quality options that failed to blend seamlessly with your natural texture after prolonged use
Maintenance Essentials
Regardless of which enhancement you choose, proper care extends longevity:
Use sulphate-free, extension-specific shampoos that clean without stripping moisture
Brush with extension-specific tools featuring looped bristles that prevent pulling
For overnight care, braid extensions loosely or secure in a low ponytail to prevent tangling
Use heat protection products before styling, with human hair tolerating up to 180°C and heat-resistant synthetics limited to 120°C.
The Natural-Looking Result
The distinction between obvious enhancements and those that appear as natural growth often lies in application technique:
Ensure strategic placement that reflects natural growth patterns, avoiding placing extensions too close to the hairline
Match or complement your natural texture for seamless blending
Look for options with graduated density that thins towards the ends, mimicking natural hair
Zendaya’s approach to wigs and extensions exemplifies these principles perfectly. Her hairstylist has shared that before any major appearance, they carefully color-match and texture-blend all hair pieces to ensure seamless integration with her natural hair. For her more dramatic transformations, they focus on creating dimension through subtle highlighting and texturizing rather than solid blocks of color. This attention to detail explains why even her most dramatic hair changes – from short crops to waist-length styles – appear remarkably natural and have many wondering if they’re witnessing actual hair growth rather than expert enhancement.
Whether you’re seeking a temporary transformation for a special occasion or a longer-term solution, today’s enhancement options offer unprecedented realism. With proper selection and care, the only giveaway to your instant length might be how quickly you achieved it – leaving everyone else wondering about your secret to overnight growth.
The city of Brighton and the wide-eyed wonder of Thai food feel almost custom made for each other, with both boasting bright, vivacious flavours, the broadest spectrum of influences and inclusivity, and plenty of sass and spice.
No wonder there’s an active Thai community in the city, with an annual ‘Magic Of Thailand’ festival drawing the crowds both Brightonian and Bangkokian, and a dedicated Thai supermarket acting as a defacto community hub and purveyor of all the imported goods you need to make a proper curry paste. Hell, the current Thai king, H.M. King Maha Vajiralongkorn Phra Vajiraklaochaoyuhua, even went to school in East Sussex in his teenage years.
We wouldn’t blame you, then, for assuming that Brighton would be awash with superb Thai restaurants doing robust, regional food from The Kingdom using only the freshest ingredients and not dialling back even a seed on the spice levels. Reader; you’d be wrong.
Though there are certainly a lot of places covering the Thai culinary canon in Brighton, it can be hard to find a truly great Thai meal here. All that said, here we detail our favourites, in this guide on where to eat Thai food in Brighton.
Namo
Bookie Mitchell has been one of Brighton’s most respected Thai chefs for over a decade, and in September 2025 she opened her first standalone restaurant: Namo, on Ship Street in the Lanes. The original Namo Eat at The Eagle Pub continues to serve the modern Thai street food that built her reputation, so you now have two ways to experience her cooking.
The journey began during lockdown, when Mitchell started a delivery service from her home kitchen. That evolved into the hugely successful residency at The Eagle Pub in North Laine, where her cooking earned a spot in Brighton’s top 30 restaurants and a nod from BBC Good Food as one of the city’s best places to eat. Ship Street represents something new: a full-service restaurant where Mitchell can push deeper into the food of her native Northern Thailand, with a more refined setting and an expanded menu.
Images via Namo Eats Instagram
Born in Lampang, near Chiang Mai, Mitchell learned to cook at her grandmother’s side before moving to the UK in 2003. She made her name in Brighton through Street Thai in the early 2010s, Thai cookery classes and charity fundraisers at Brighton Community Kitchen, and a string of pub residencies at The Hare and Hounds, Sidewinder, and of course The Eagle. Now, with two sites to her name, she’s offering Brighton both the laid-back pub experience and something altogether more ambitious.
At Ship Street, the menu ditches the expected pad Thai and green curry in favour of dishes rooted in Mitchell’s memories and travels. Expect miang bites served on bitter chicory in place of betel leaf, gai golae (southern-style grilled chicken), Mekhong-marinated beef, and vibrant Laotian salads. The cooking is skilled and thoughtful rather than heat-forward, with prices landing around £25-50 per head.
At The Eagle, you’ll find the street food classics done properly: gaeng garee goong (a fragrant, coconut-sweet prawn curry), spicy soft shell crab salad, and the all-conquering pad grapao moo with holy basil and a runny fried egg. Pair it with a pint from the pub’s craft beer selection – the local Hopinator, redolent of pineapple and lime, goes particularly well with the spice.
Reviews from the Good Food Guide have praised the cooking, and early feedback on Ship Street suggests Namo has only raised the bar. For anyone looking beyond the usual Thai crowd-pleasers, these are now Brighton’s most interesting options.
Address: The Eagle Pub, 125 Gloucester Rd, Brighton BN1 4AF, United Kingdom
Sitting on Church Road, where Brighton merges effortlessly into Hove, UniThai Oriental Market is a hidden gem that offers an incredible selection of Thai dishes at unbeatable prices. This small, unassuming grocery store doubles as a casual eatery, serving up delicious home-style cooking in a no-frills setting.
Walk through a narrow pathway that’s lined with the promise of esoteric dried goods and – rejoice – fresh rarities shipped in from the Kingdom every Wednesday. Pause to admire packages of holy basil, fresh grachai and makrut lime leaves. And, as the clatter of woks intensifies, know that you’re in for a bowl that sings with the freshness of those ingredients. If you can snag a table that is; it’s certainly cosy in the back of this supermarket.
Dish out your finest sawadee (ka/krap), and occupy yourself by listening to the soundtrack of kitchen clatter and the roar of the wok burner. Within minutes, you’ll have a freshly prepared plate of Thai deliciousness, cooked with love.
Perhaps it’s that sense of ‘authenticity’, as you luxuriate in the reassuring sound of Thai chatter and the unmistakable pok pok pok of the pestle and mortar. Or, maybe it’s the excellent boat noodle soup (kway teow rua) with bouncy pork balls, freshly made, punchy af pad grapao (a runny egg is mandatory) or fish cakes that boast that all important ‘factory bounce’. Either way, or perhaps because of all those things, we’re definitely sold.
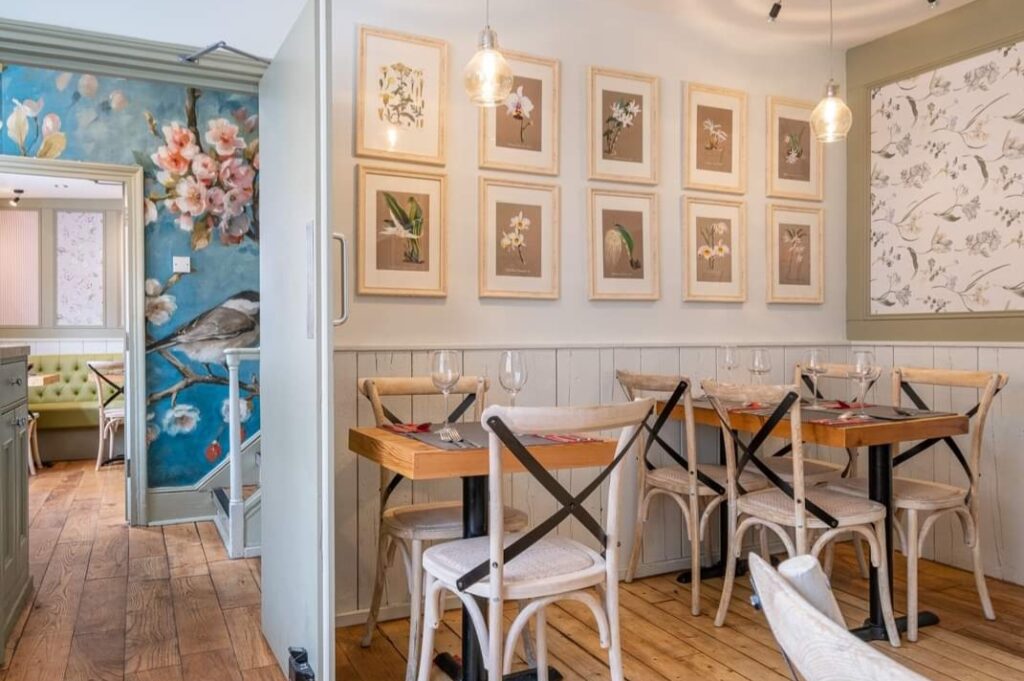
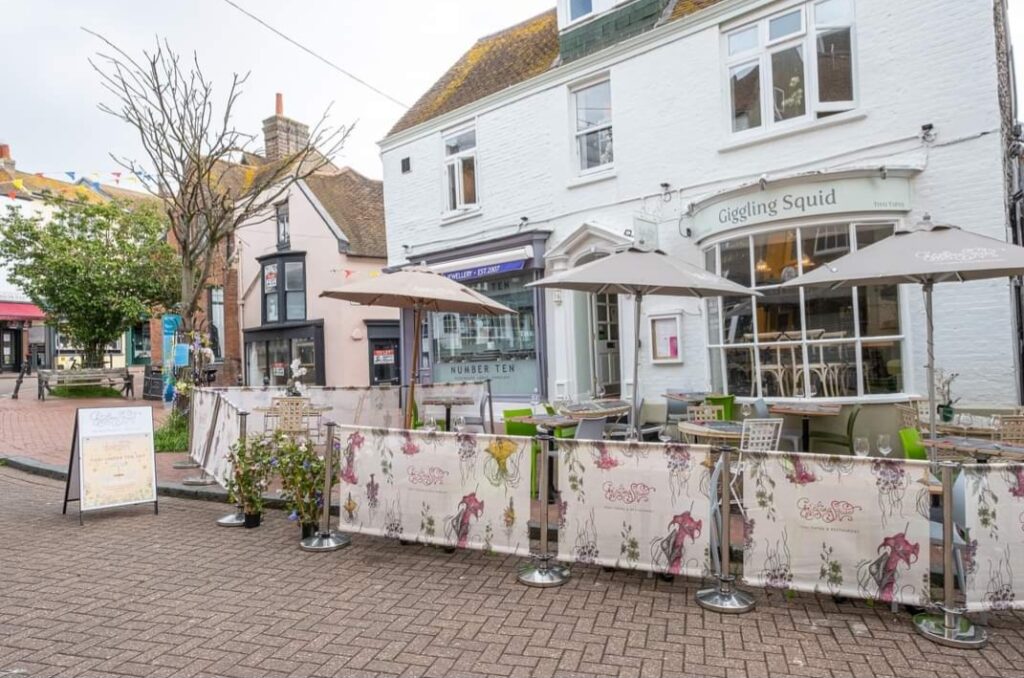
The Giggling Squid is a popular chain of Thai restaurants known for their stylish interiors, attentive service, and expansive menu of well-cooked Thai dishes.
The restaurant, a UK-based chain, was founded by husband and wife duo Andy and Pranee Laurillard in Brighton in 2002. The unique name has an interesting origin story; the ‘giggling squid’ was originally a nickname given to one of their three children, and how this particular metaphorical baby has grown under the couple’s stewardship, with a whopping 46 locations now in operation across the country.
The Brighton location (there’s a second in Hove, incidentally) is situated in the heart of the Lanes, making it an ideal spot for a leisurely lunch or dinner after exploring the city’s most famous backstreets. With an extensive menu that caters to vegetarians, vegans, and gluten-free diners, there’s something for everyone here.
Images via Giggling Squid Facebook
The restaurant itself is housed in a charming old fisherman’s cottage, with some of the dining happening outfront and alfresco, surrounded by the quirky shops that define this particular corner of Brighton, and just minutes away from the town’s iconic attractions such as the Brighton Palace Pier, the BA Viewing Tower, and the Royal Pavilion.
When the weather is warm, that open-air seating and its prime people-watching vantage point make for a memorable dining experience indeed, even before you tuck into the famous salt and pepper squid, chilli-forward som tam salad, and the signature Giggling Pad Thai. For us, this is food best enjoyed as a few snacks, with an ice cold Singha in the sun. There’s nowhere we’d rather be (except Thailand, of course!).
Address: 11 Market St, Brighton BN1 1HH, United Kingdom
Kanok Thai
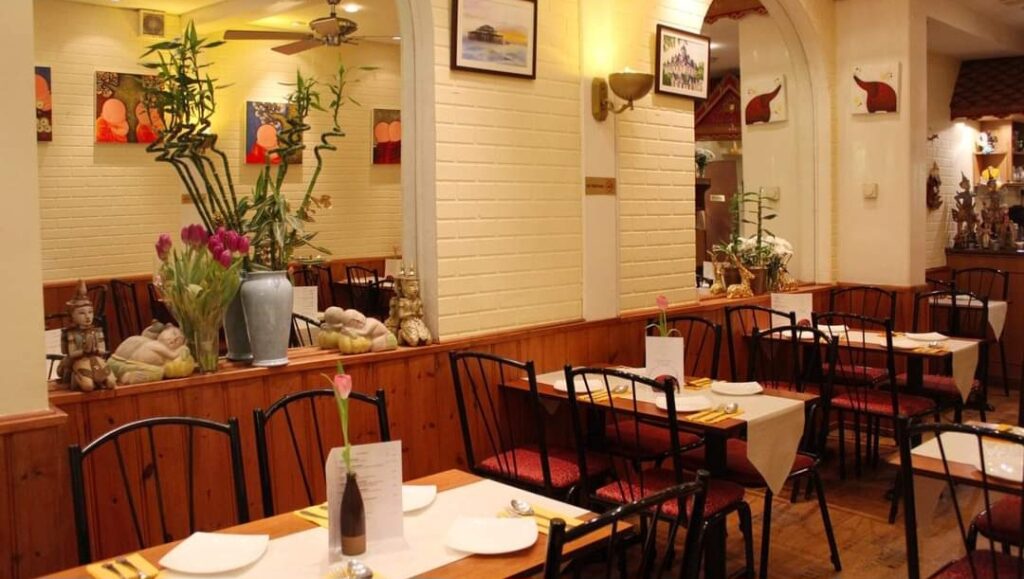
Kanok Thai is a family-run restaurant that prides itself on offering a colourful, convivial atmosphere in keeping with both the Land Of Smiles’ famous welcome and the similarly amiable reputation of the restaurant’s adopted home in Brighton, all exemplified by the statue in the window delivering Thailand’s familiar genial gesture, the wai.
Located on Preston Street, known locally as ‘restaurant street’ for, erm, obvious reasons, it’s a wonderful place to spill in to after a day at the beach, either for a quick snack on the great satay sticks sold here, or for a longer, more leisurely meal – beers, bowls of rice, the works.
Images Via Kanook Thai Facebook
It’s also an eminently affordable place to dine, with soups and salads particularly good value, including the restaurant’s decent version of Thailand’s famous tom yum, which clocks in at just £6.95 (for the prawn version). When you’re done slurping, head opposite for a cocktail at Gung Ho, one of the best cocktail bars in Brighton.
Though the street is replete with places to eat, you won’t be able to mistake Kanook Thai for another with its two toned lime green frontage which wouldn’t look out of place on the colourful streets of Phuket Old Town.
Address: 65 Preston St, Brighton BN1 2HE, United Kingdom
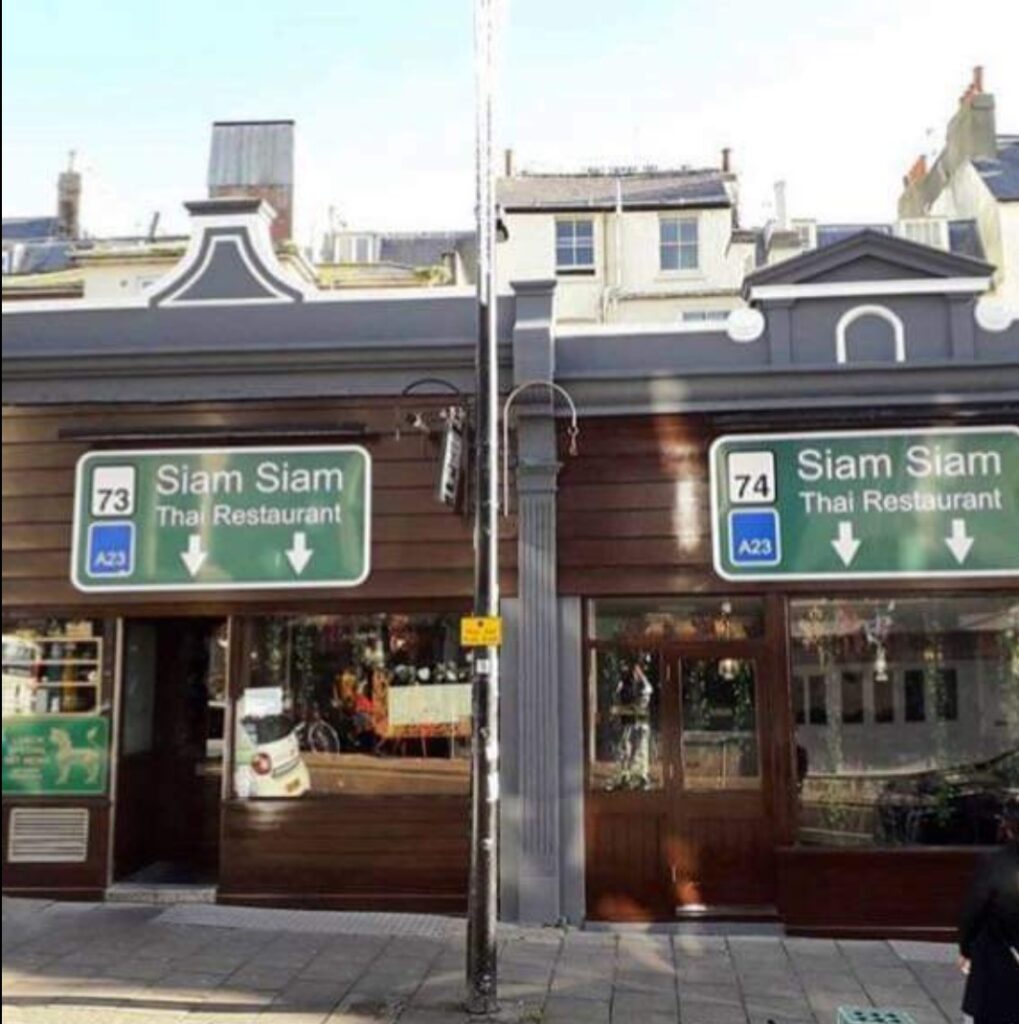
Another agreeable place for Thai food in Brighton happens to be on the same road as Kanok, a little further down towards the beach. Siam Siam Thai feels very much suited to a romantic dinner, with its twinkling fairy lights and intimate corners perfect for an undisturbed evening of eating.
A family run affair, the owners and their adult children, who run the floor, hail from Thailand’s north-east, and it’s sensible to go with the food of the country’s Isaan region accordingly which is where the restaurant excels. So, that’s a host of spicy salads – laap, som tam, nam dtok – alongside, of course, a basket of steaming sticky rice.
Should you be keen to branch out and traverse the length and breadth of Thailand, then Siam Siam’s ‘The Travel’ set menu – featuring satay and dumplings from the south, spring rolls from Bangkok’s Chinatown, and jungle curry from Thailand’s north – is a great way to sample the vast array of tastes and textures that define the country’s cuisine. All yours for £55.95 (for two) – doggie bags are actively encouraged!
Address: 74 Preston St, Brighton BN1 2HG, United Kingdom
For some properly brilliant Thai food in East Sussex, you might actually have to leave Brighton and head an hour east to St. Leonards On Sea, where the superb Bangkok Delivery Boy often pops up for residencies.
Here, chef Neil Eakapong, who built a sterling reputation for his uncompromising Thai flavours at various private events and supper clubs in London, does all the good things right and faithfully, from hand pounded curry pastes, freshly squeezed coconut cream, and heaps and heaps of flavour. Chef Eakapong does a seriously good, traditional Thai dessert, too. What’s not to love?
Keep an eye on their Instagram for updates on where Bangkok Delivery Boy will be popping up next.
In an era of increasing concern about sustainability and affordability, faux flowers have well and truly shaken off their naff reputation. Once the preserve of dentist waiting rooms and budget B&Bs, the fake stuff has come a long way, and there are plenty of good reasons to consider it.
Maybe you’re tired of watching £15 bouquets wilt within a week. Maybe you’ve got a cat who treats fresh stems like an all-you-can-eat buffet, or hay fever that flares up every time lilies enter the building. Perhaps you’ve clocked that those ‘fresh’ supermarket roses have been flown halfway around the world, and the environmental maths doesn’t quite add up. Or you simply want flowers in that dark hallway where nothing real would survive.
Whatever your reason, faux flowers only work if they look convincing, and too often, they don’t. We asked florists what separates the obviously plastic from the genuinely fooling-your-guests good, and how to style artificial stems so they actually look the part.
Buy Better, Not More
The single biggest factor in whether fake flowers look fake is quality, and you can usually tell within seconds of picking something up. High-quality silk flowers tend to have a matte finish rather than a shiny one, and they won’t include obviously fake details like plastic water droplets or attached sprays of baby’s breath.
Look for petals with colour variation. In nature, individual blooms are not solely one colour, so higher-quality flowers are usually hand painted to allow for subtle shading and differences. If every petal is exactly the same shade of uniform pink, that’s your first red flag.
As the experts at the Faux Flower Company so helpfully explain, the term ‘silk flower’ is slightly misleading these days, since most are actually made from polyester or similar synthetics. The real game-changer has been the emergence of ‘real touch’ flowers, made from a latex and foam mix. They feel cool and slightly waxy to the touch, mimicking the texture of fresh petals in a way that traditional fabric flowers can’t match.
Real touch flowers work particularly well for blooms that naturally have thick, velvety, or waxy petals, such as roses, tulips, and peonies. For more delicate flowers that need movement and lightness, traditional silk or high-grade polyester remains the better choice.
Unpack Them Properly
Here’s something most people skip: flowers arrive squashed. They’ve spent weeks in a warehouse, been shoved in a box, posted across the country and then squeezed through the letterbox. They need attention before they go anywhere near a vase.
Use your fingers to gently spread and lift each petal away from the centre of the flower, working around the bloom and pulling petals into a more open, natural position. For leaves that have been folded or creased, gently press them to make them look more believable.
If petals are particularly stubborn, a hairdryer on the lowest heat setting can help, gently blowing warm air over the flattened parts while lightly reshaping them with your fingers. This softens the materials enough to encourage them back into shape without damaging the fabric.
Bend The Stems
Real flowers don’t stand to attention like soldiers on parade. They droop, lean, and curve towards light sources. Your artificial ones should do the same.
Most fake flowers have wired stems, which means you can bend them into natural curves, vary the heights, and spread blooms out so they’re not all sitting at the same level. This single step makes an enormous difference, and yet hardly anyone does it.
As a rule of thumb, flower stems should be about one and a half to two times the height of the vessel they’re displayed in. If stems are too long, either bend the ends or trim them with wire cutters. If you’re using a clear vase, cutting looks better than cramming bent wire into the bottom.
Work In Odd Numbers
There’s a design principle florists swear by that applies equally to fresh and artificial arrangements: using odd numbers of flowers creates a more visually pleasing and organic look because odd numbers offer a sense of asymmetry, which is key to mimicking the natural appearance of real blooms.
Groups of three, five, or seven stems will always look more natural than neat, even pairs. As you shape your arrangement, intentionally create an overall shape that is perfectly imbalanced with a bit of whimsy, rather than something symmetrical and overly structured.
Start With Greenery
Professional florists don’t begin with statement blooms. They start with greenery because it does the hard work of making everything else look good. Layer leafy stems first, crossing them loosely inside your vase so they form a kind of grid. This creates the structure that holds everything else up.
Once you’ve built that framework, your main flowers can slot into the gaps without looking like they’ve been jammed into position. The greenery also fills visual holes that would otherwise make the arrangement look sparse.
Mix Real & Fake
This is the trick that professionals use more than any other. Adding a few live stems, such as fragrant roses or sprigs of eucalyptus, among your fake ones creates a combined effect where the real smell and lifelike textures make the entire arrangement unquestionable.
Real greenery, blooming branches, curly twigs, or even a few fresh flowers alongside artificials help the whole thing feel fresh. Eucalyptus is particularly good for this since it lasts far longer than most cut flowers, looks suitably wild, and adds scent to an otherwise odourless display.
Choose Your Vase Carefully
While some faux flowers have realistic stems, the stem is usually the first thing to give away the fact that flowers are artificial. Hiding stems in an opaque vase or vintage container is one of the best ways to make your arrangement convincing.
If you do want to use a clear glass vase, there’s a trick: add a bit of water. It’s a simple thing, but it makes flowers look much more believable. Just seal the end of each stem with a dot of clear nail polish first, so the wire inside doesn’t react with the water and rust.
Unlike fresh flowers, artificial stems need maintenance of a different kind. Dust, direct sunlight, and humidity are the enemy of realistic-looking fakes. Over time, dust settles on petals and makes them look dull.
Use a hairdryer on a low cool setting to blow off dust, or gently wipe flowers with a microfiber cloth. For a deeper clean, a light mist of diluted white vinegar works well, wiped away with a soft cloth and left to air dry.
Keep arrangements out of direct sunlight where possible. Faux blooms will fade over time, especially cheaper ones, and there’s no bringing that colour back once it’s gone.
The Bottom Line
The gap between obviously fake and genuinely convincing is smaller than you might think. It comes down to buying decent quality in the first place, taking five minutes to shape and fluff stems when they arrive, and styling them with the same care you’d give fresh flowers.
Done right, even your most critical guests won’t notice the difference. And unlike a £40 farmers’ market bouquet of roses, these will still look good come February.
Recognised as a Michelin Key Hotel for the second consecutive year and recipient of rapturous reviews in glossy travel magazines like Condé Nast, The Yard makes a compelling case for being Bath’s best hotel.
Formerly the Kings Arms, an 18th-century coaching inn that served as the main route between Bristol and Bath, the building provides a genuine sense of place that many larger modern hotels simply can’t replicate.
Today’s incarnation manages to honour its heritage whilst delivering a thoroughly modern stay. In a city that’s adept at balancing aesthetic grandeur with a surprisingly forward-thinking hospitality scene, that’s exactly what you want from your hotel stay.
Location
The Yard sits on Monmouth Place, just along from Monmouth Street – a stretch of road between expansive Victoria Park, the city’s largest green space, and the city centre’s Kingsmead Square.
The location is genuinely superb – you’re close enough to everything that matters, yet far enough from the tourist throngs to feel like you’ve discovered something special. The Royal Crescent is minutes away on foot while Bath’s main attractions, including the Roman Baths, Bath Abbey, and the elegant Georgian crescents are all within an easy ten-minute stroll.
You can wander to the Thermae Bath Spa for an afternoon soak, browse the independent shops along Milsom Street, or explore the charming backstreets without ever needing transport beyond your two feet. In summer, Victoria Park is worth exploring properly – pack a picnic from one of Bath’s delis (the sandwiches from Green Street Butchers are superb) and spend a lazy afternoon on the grass.
It should be noted that if you do intend to drive, parking (which is just across the street) remains limited but bookable in advance. Charlotte Street Parking sits about five minutes away on foot if the hotel’s spaces are full. It’s worth noting too that most bedrooms face the street, which can mean a touch of noise during the summer months with windows open.
Gentle warnings dispensed with, perhaps the best thing about the hotel’s location is that The Yard sits conveniently opposite The Scallop Shell, our favourite restaurant in Bath.
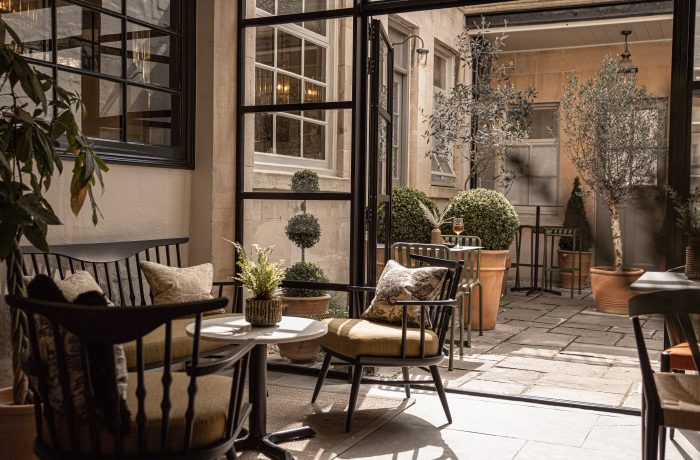
Calm, relaxed, with a real sense of escape, despite the fact you’re on the peripheries of Bath city centre.
The Yard gets it right in a way that’s surprisingly hard to pull off. It’s quietly confident and everything feels thoughtfully designed rather than styled to within an inch of its life. Lewis & Wood fabrics and flamboyant, floral wallcoverings from Gloucestershire add personality to each room, whilst brass lanterns in the courtyard cast intimate shadows come evening. You’ll want to spend time here beyond just sleeping – in the courtyard with a coffee, or settling in for a stiff evening drink before heading out to dinner.
The listed building exudes a refined chicness. Owners Esther Newman and Ed Haskins, who left careers in PR and property in London to realise their vision here, have ensured character remains at the heart of everything. You can tell they’ve stayed in their fair share of hotels. Everything from the lighting to the furniture and thoughtful little touches – from the umbrellas available to borrow to those impossibly fluffy towels everyone raves about – has been carefully considered. Even the mini-bar feels personal, stocked with Cotswold Brew Co beers alongside locally sourced provisions.
The Rooms
The hotel’s fifteen bedrooms surround a central courtyard, the undisputed focal point of the property. Hence the name, and all that. Spread across four floors with no lift, no two rooms share the same design, with restored historic features giving each its own personality. High sash windows frame Bath’s rooftops, whilst large stone fireplaces anchor several rooms with period gravitas.
The homey, Georgian aesthetics are handled beautifully, with muted, soothing colour palettes that fit Bath’s architectural heritage succinctly without slipping into pastiche, punctuated by the occasional bold botanical print. The warm cosy colours in each room undoubtedly contribute to a good nights sleep.
There are five bedroom categories ranging from Cosy King to Deluxe King. If you’re sensitive to street noise, Room 3 is worth requesting – it’s the only Cosy King facing the quieter courtyard. Several of the rooms have air conditioning – helpful in the summer months if you want to keep cool while keeping any noise out too.
Room 15, tucked away at the top of the hotel, offers a sense of seclusion. Meanwhile, Room 8 deserves special mention for its private roof terrace, perfect for a morning coffee or an evening glass of wine under a clear Bath sky. Speaking of baths (gotta stop doing that,) all the deluxe rooms come with a freestanding tub.
Some rooms feature striking toile or floral wallpapers, others showcase pastel-painted wood panelling, whilst several retain their original fireplaces with period mantels. You’ll find floral-forward fabrics from local designers in one room, black and white gingham cushions adding a country touch in another. Statement lighting varies too, from elegant glass chandeliers to brass wall sconces. It all adds up to a sense of individuality, a welcome contrast to a clutch of identikit chain hotels just down the road.
Rooms have all the modern hotel must-haves, including gorgeous waterfall showers, Netflix, a fully stocked mini-bar with drinks and snacks, and even complimentary fresh milk delivered in glass bottles from a local farm. Each room also features a Roberts Radio (perfect for a gentle wake-up) and a Nespresso machine, with staff happy to bring additional pods on request.
The rainfall showers are gorgeous (despite Bath’s hard water) and Bramley organic toiletries, made in the British countryside using only natural ingredients, feel perfectly suited to this Somerset hotel.
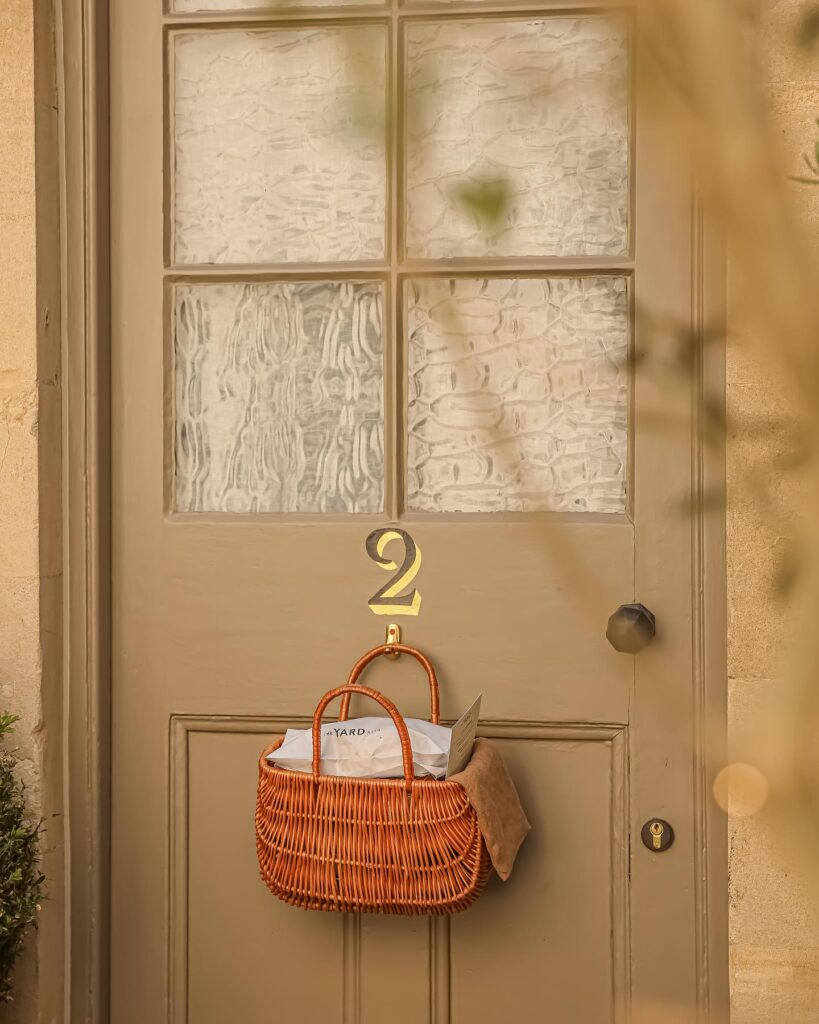
With no restaurant, The Yard operates more as a bed-and-breakfast-type inn, focusing instead on what it does brilliantly: providing excellent drinks and a memorable first meal of the day.
For an extra £8, each morning at 8am sharp you can enjoy The Yard’s signature breakfast hamper. It arrives outside your room, hanging on the doorknob so as not to disturb your slumber. The beautiful wicker hamper contains all sorts of goodies – just-baked croissants from Hobbs House Bakery, freshly squeezed orange juice, a Kilner jar layered with yoghurt, granola and fruit compote, plus jam. It’s a picnic-style breakfast that sets you up for the day, making a leisurely start to your morning feel essential rather than indulgent.
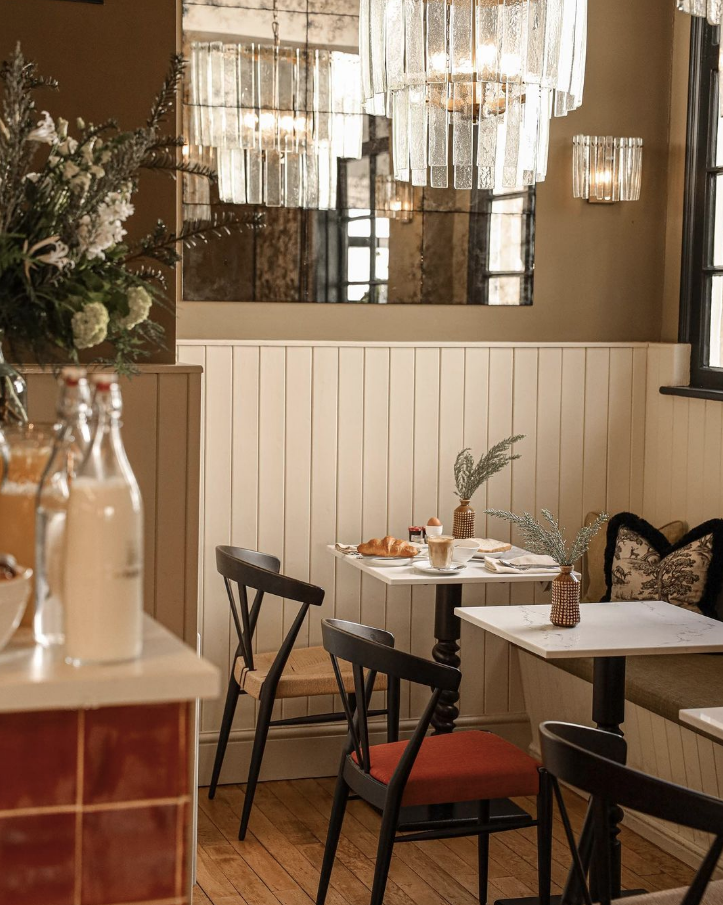
Should you prefer a more substantial breakfast, upgrade to the continental grazing option served in the cafe, which spills onto the lovely courtyard furnished with curved Wendell pieces (arguably the new bistro furniture of our time).
For a proper cooked breakfast, the nearest option is Sydney’s, which serves from 8am to 11am. Whilst their Full English holds its own, it’s the crisp fried bubble and squeak with Mr Banable’s gammon and a fried egg that really delivers. If you’re staying for another night, then go for a hearty and historic breakfast at Sally Lunn’s. The French toast, which sees a Sally Lunn bun dipped in cinnamon eggs and topped with dry cured smoked bacon, will set you up for a day of sightseeing.
Come late afternoon, The Yard is all about the aperitivo. The courtyard catches the light just right during these golden hours, transforming into an appealing spot for drinks. What’s particularly nice is that it’s open to passers-by as well as guests, creating a neighbourhood feel that many hotel bars lack – though the wine bar closes to visitors at 10pm, so if you’re staying, you’ve got the place to yourselves for evening nightcaps.
The seasonal cocktail menu leans decidedly British, befitting a Somerset hotel in its prime. Try the Spiced Crumble, which combines vodka, rhubarb, lemon, apple and cinnamon in a dexterous way, each ingredient discernible. Paired with the soft English cheeseboard featuring Bath Soft and Wyfe of Bath, it makes for a rather lovely evening.
There really isn’t a bad time to visit Bath, though The Yard is at its most cosy in winter, offering the ideal escape from the madness of the Christmas Market. Sit here and sip mulled wine whilst eating a mince pie or two to really get into the spirit.
The wine list remains short but thoughtfully curated: three whites, three reds, three bottles of fizz and a rosé. With the most affordable white starting at £26, it’s remarkably good value, in this city, in this economy. Friday evenings bring the popular ‘Fizz’ nights, where you can get two glasses of Gremillet Brut Champagne for the price of one (£13.50 per glass ordinarily).
For a nightcap, may we suggest having a hot chocolate here, which comes from Clifton Coffee in Bristol. Come winter, why not spike it with a shot of bourbon and enjoy it in front of the hotel’s roaring fire? There’s something incredibly relaxing about this hotel. It’s cosy and elegant, small but perfectly formed.
The Bottom Line
One final thought: we can’t help feeling the hotel has missed a trick not installing a freestanding bath in the courtyard. Having a bath in the yard, at The Yard, in Bath? This thing writes itself. That said, Room 8 does have that freestanding tub overlooking the city’s picture-perfect rooftops – that will have to do, we guess.
Venture beyond the obvious, though, and the UK reveals a different character entirely. These are places where you can park up with nothing but sheep for neighbours, where stars blaze undimmed by streetlights, and where the only sound breaking the silence is wind across open moorland. Here’s where to point your wheels when you’re craving something genuinely off the beaten track.
Kielder Forest & Dark Sky Park, Northumberland
Tucked away near the Scottish border, Kielder is England’s largest forest and home to Europe’s biggest man-made lake. More significantly for those seeking true remoteness, it sits within a designated International Dark Sky Park covering nearly 580 square miles, making it one of the finest stargazing locations in the country.
Several small touring sites operate on the edge of Ravenshill Forest, with views stretching across the North Tyne Valley. Days unfold slowly here: forest trails for walking and mountain biking, red squirrels darting between ancient pines, and ospreys circling the reservoir.
Beyond the natural attractions, Kielder has developed into an unexpected open-air art gallery. Scattered throughout the forest and around the lakeside are striking contemporary sculptures and architectural installations. These artworks provide intriguing stopping points along walking and cycling routes, giving visitors a chance to rest, contemplate the landscape, and discover something entirely unexpected in such a remote setting.
The Campaign for the Protection of Rural England has rated Kielder’s skies as the darkest in England. Come evening, the lack of light pollution means you can often see the Milky Way with the naked eye, and Kielder Observatory runs regular stargazing events.
If Kielder represents wild natural beauty, Dungeness offers something altogether stranger. Often called Britain’s only desert due to its stark shingle expanse and low rainfall, this headland on the Kent coast has an almost post-apocalyptic quality.
Abandoned fishing boats lie scattered across the landscape, quirky wooden houses dot the horizon, and the looming silhouette of the nuclear power station adds an otherworldly backdrop. Yet for all its bleakness, Dungeness teems with life.
The RSPB nature reserve attracts birdwatchers from across the country, Derek Jarman’s famous driftwood garden at Prospect Cottage has become a pilgrimage site for art lovers, and the Grade II-listed Old Lighthouse offers panoramic views across Romney Marsh. Several motorhome-friendly sites operate nearby on Romney Marsh, making it an ideal stop en route to the Channel ports.
Elan Valley, Mid Wales
Often dubbed the ‘Welsh Lake District’, the Elan Valley offers dramatic Victorian dam architecture, winding reservoirs, and forested landscapes that rival anything in Snowdonia, without the crowds. The 45,000-acre estate includes a series of stone-built dams that supplied water to industrial Birmingham from the late 1800s.
Touring sites near the valley entrance provide direct access to the estate. From here, you can drive around all four reservoirs, following routes that twist along cliffs dropping to dark water below. The roads demand respect in larger motorhomes, but the rewards are spectacular waterfalls, red kites wheeling overhead, and miles of walking paths where you might not see another soul for hours.
The valley achieved International Dark Sky Park status in 2015, becoming the first privately-owned but publicly accessible park in the world to do so. Stargazing sites at Claerwen Dam offer some of the darkest skies in Wales.
Isle of Mull, Scottish Inner Hebrides
The Isle of Skye dominates Scottish island tourism, which is precisely why Mull deserves your attention. This Inner Hebridean island offers equally dramatic landscapes, Tobermory’s colourful harbour, wild beaches, and regular sightings of otters, eagles, and whales, all without Skye’s summer crowds and overflowing car parks.
Take your motorhome over on the CalMac ferry from Oban and you’ll find single-track roads winding through Scottish landscapes that feel genuinely remote. Several campsites cater for touring vehicles, some offering pitches next to stunning white sandy beaches.
Calgary Bay permits overnight stays in the car park for a small fee, offering the chance to wake to one of Scotland’s most beautiful beaches. From Mull, day trips to the sacred island of Iona or boat trips to Staffa with its extraordinary volcanic rock formations add further dimension.
How a county dominated by sparkling lakes and waterways remains one of the least populated in Northern Ireland is something of a mystery. The Fermanagh Lakelands centre on Upper and Lower Lough Erne, connected by the River Erne and stretching over 80km through gentle countryside.
The area also makes an excellent stopover en route to the Giant’s Causeway or the Wild Atlantic Way.
North Pembrokeshire Coast, Wales
Southern Pembrokeshire draws the crowds to Tenby and Saundersfoot, but venture north and the coast takes on a wilder character. Around St Davids, Britain’s smallest city, the landscape falls within a National Park that extends along rugged cliffs to secluded coves accessible only on foot. The cathedral city itself rewards exploration, with independent shops and cafes clustered around the ancient stone streets.
Smaller campsites dot the 186-mile coastal path, many on working farms where you can pitch up with nothing but sheep and seabirds for company. The dark sky conditions make this stretch excellent for stargazing, and aurora sightings have been captured from sites along the coast in recent years.
Suffolk Heritage Coast
Much of the Suffolk coastline falls within an Area of Outstanding Natural Beauty, yet it remains remarkably undeveloped compared to Devon and Cornwall. The string of small towns, including Aldeburgh, Southwold, Dunwich, and Thorpeness, each has its own distinct character, connected by quiet lanes winding through heathland and marshes.
Aldeburgh offers fresh fish direct from the boats, Southwold has its famous pier and Adnams Brewery, and Thorpeness retains the eccentric charm of its early 1900s origins.
Several touring parks occupy cliff-top positions with direct beach access and RSPB Minsmere nearby. This coast changes rapidly: erosion has claimed whole villages over the centuries, and Dunwich Museum tells the story of a once-flourishing port now largely beneath the sea.
Llŷn Peninsula, North Wales
Stretching west from Snowdonia like an arm reaching into the Irish Sea, the Llŷn Peninsula has been described as the Cornwall of 50 years ago. The designation as an Area of Outstanding Natural Beauty has helped protect its character, with rugged cliffs giving way to golden beaches that rival anything in the Mediterranean on a good day.
Porth Iago offers pitches overlooking what many consider North Wales’s most beautiful beach, a secluded sandy cove with clear waters ideal for swimming and kayaking. The path down is steep but manageable.
Nearby, Porthor (Whistling Sands) earns its name from the squeak the sand makes underfoot, whilst the Ty Coch Inn at Porthdinllaen, accessible only on foot across the beach, ranks among the world’s best beach bars.
Practical Considerations
Remote locations require preparation. Many of these destinations have limited mobile signal, narrow approach roads that challenge larger vehicles, and facilities that may be seasonal or basic.
Check access routes before setting out, particularly if you’re driving anything over six metres, and ensure you’re self-sufficient with water, power, and waste disposal where facilities are minimal. The right motorhome insurance can help protect your vehicle when venturing into more remote corners of the country.
Wild camping with motorhomes isn’t legally permitted in England, Wales, or Northern Ireland without landowner permission. Scotland’s famous right to roam applies to those on foot, by bike, or by boat, but doesn’t extend to motorised vehicles.
Designated overnight parking spots are becoming more common, and apps like Park4Night and CamperContact can help locate legitimate stopping places. Spring and autumn typically offer the best balance of weather and solitude.
The Bottom Line
The UK’s most rewarding motorhome destinations aren’t necessarily the most famous. These corners demand a little more effort to reach, a little more planning to stay comfortably, and a willingness to embrace simplicity over convenience.
In return, they offer something increasingly rare: genuine peace, star-filled skies, and landscapes that feel truly your own.
You’ve found the ring and chosen the moment. Now comes the question that keeps proposal planners awake at night: how do you capture this once-in-a-lifetime scene without your partner spotting a photographer in the bushes, or the whole thing feeling like a staged photo opportunity rather than an intimate declaration?
It’s a genuine dilemma. Most couples want something tangible to remember the nervous tremor in your voice and the look on their face. But the presence of a camera threatens to transform what should be raw and unrehearsed into something performative. Proposals occupy a strange space between private moment and public milestone, and getting that balance right requires thought. With careful planning, though, you can have it both ways.
Choose Your Location With Photography In Mind
The location you choose usually reflects something meaningful about your relationship, but sentimental value doesn’t guarantee good photographs. When scouting your spot, think like a photographer. Is there somewhere nearby where a camera operator could position themselves without being conspicuous? A café terrace with a clear sightline, a footpath at a higher elevation, even a parked car? The more natural hiding spots available, the easier the whole operation becomes.
Lighting matters enormously. The famous ‘golden hour’ just before sunset produces warm, flattering light, but it also creates pressure: you have roughly forty minutes of optimal conditions, which means your proposal needs to happen on schedule. If a timetabled romantic gesture makes you uncomfortable, consider a location that works in varied lighting rather than one that depends on a specific window.
Background clutter is worth thinking about too. A beautiful beach at sunrise is one thing; that same beach at midday with parasols and someone’s children building a sandcastle directly behind you is quite another. Visit your chosen spot at the same time of day you’re planning to propose and observe who else is likely to be there.
Professional Photographer Or Trusted Friend?
A professional brings experience, proper equipment, and the ability to anticipate moments before they happen. They’ve done this before and know how to remain invisible. The drawback is cost: expect anywhere from £200 to over £1,000 depending on location and photographer.
A trusted friend with a decent smartphone is the budget alternative, and modern phone cameras are genuinely capable. The iPhone 15 Pro, for instance, shoots in ProRAW format with computational photography that would have required professional equipment a decade ago. The risk is twofold: they may struggle to remain inconspicuous, and they might get so caught up watching the moment that they forget to actually take photos. A professional’s greatest asset is their detachment.
There’s a middle ground worth considering: hire a professional for post-proposal portraits and rely on a friend for the moment itself. You get the candid surprise documented, plus beautifully lit celebration shots from someone who knows what they’re doing.
The Art Of Staying Hidden
If you’re having someone photograph the actual proposal, concealment is critical. Distance is your friend. Your photographer may need a long lens in the 70-200mm range, allowing them to shoot from thirty metres away while still capturing facial expressions. This does require a clear sightline, so factor that into your planning.
In busy urban locations, the photographer might hide in plain sight. Tourists with cameras are so common that one more person pointing a lens won’t register. This works best if they look the part: dressed casually, perhaps pretending to photograph architecture, rather than crouching behind a bin in all black.
More secluded spots require creativity: a hillside position, arriving early, or using a vehicle as a mobile hide. Some couples have even coordinated with restaurants to have the photographer pose as staff. Have an explicit conversation about concealment strategies with your photographer; they’ll have ideas you haven’t considered.
Timing, Signals & The Ring Reveal
Even a well-hidden photographer needs to know when to start shooting. Proposals don’t always unfold the way you imagine; sometimes you lose your nerve and delay, or the perfect moment presents itself earlier than expected. Your photographer needs a cue.
The simplest approach is a physical signal: touching your ear, adjusting your collar, scratching the back of your head. Something subtle enough that your partner won’t notice, but distinctive enough that the photographer can’t miss it. Agree on this in advance and practice a few times so it looks natural.
Discuss contingency plans too. What happens if it rains? What if your partner spots the photographer? Having backup options reduces the chance of the day being derailed by circumstances beyond your control.
Once you have revealed the engagement ring, the dynamic shifts. Brief your photographer to keep shooting through this phase. The raw emotion of the thirty seconds immediately after a ‘yes’ is often more photogenic than the proposal itself: faces animated, body language unguarded, neither of you thinking about how you look. At some point you’ll transition to posed portraits, and this is when the photographer can emerge from hiding and introduce themselves properly.
Keep The Focus On What Actually Matters
There’s a danger in all this planning. The more you obsess over camera angles and signal gestures, the further you drift from the point: asking someone to marry you. A proposal is not a photo shoot. The photos exist to document something meaningful, not to be the meaning themselves.
The best advice is to do all your planning in advance, then forget about it on the day. Brief your photographer thoroughly, scout the location, agree on signals, and then put it out of your mind. Once you’re in the moment, your only job is to be present. Look at your partner. Say what you actually mean. Let the camera worry about itself. The photos will either turn out beautifully or they won’t. Either way, you’ll still be engaged.
The Bottom Line
Capturing a proposal without spoiling the surprise is entirely achievable with forethought. Choose a location that offers both meaning and practical photographic opportunities; decide whether you want a professional or a trusted friend behind the lens; plan concealment and timing carefully; and then, when the moment arrives, let it all go and focus on the person in front of you.
The camera is there to bear witness, not to direct the scene. Get that balance right, and you’ll have images worth treasuring for a lifetime.
Each year, almost 250’000 weddings go ahead in the UK. We start with this statistic in order to help you gain a little clarity on the question you’re about to pop; there are likely more than a quarter of a million folk in the country planning to join you on one knee this year, and not all of them are going to get it right! So, don’t sweat the small stuff.
That said, there is an enormous amount of pressure that comes with organising the perfect proposal. It involves meticulous planning and organisation to ensure you make it the most memorable moment for you and your partner.
While choosing the ideal location for a proposal is a major determining factor in the success of the day, before you can even start to make those plans you must choose the perfect engagement ring.
The ‘perfect’ ring is, of course, a subjective thing, but there are a few elements that are pretty universal. To help you get to grips with a few key considerations, here are 8 things to consider when choosing the perfect engagement ring.
Your Partner’s Style
One of the most important aspects when choosing an engagement ring, but also one so often overlooked, your partner’s unique sense of style and specific taste in jewellery should be considered carefully when buying them their engagement ring.
When people look for engagement rings, one might assume that it needs to be the flashiest piece of jewellery with the biggest diamond, but this isn’t always the case. Instead, your partner may well have a very distinctive preference for an engagement ring, and rather than simply make a stab in the dark about what that might be, you should instead endeavour to find out, regardless of whether it’s traditional or not to do so.
While a proposal should be a surprise, the idea of engagement shouldn’t be. You should absolutely have in-depth discussions with your partner about engagement and marriage before you pop the question, and part of this discussion should include the style of the engagement ring they’d prefer. After all, the intention is for them to wear the ring for life, so it’s important to ensure they actually like it!
Perhaps ask your partner to give you a rough idea of the sort of style and shape they would like, ensuring no hiccups occur and crimes against fashion are committed, all in the name of a ‘surprise’.
Though diamonds are a classic choice for engagement rings, they have become less popular in recent years as more couples look to sustainable and earth-friendly alternatives, where lab-grown diamonds have become a popular choice. If you’ve got your heart set on a diamond ring, these lab-grown or synthetic varieties offer an excellent option.
Should you be going for a traditional diamond, it’s absolutely essential that you ensure your diamond is KPCS certified. The Kimberley Process (KP) and their Kimberley Process Certification Scheme (KPCS) is an international certification scheme that regulates trade in rough diamonds. The scheme intends to ‘’unites administrations, civil societies, and industry in reducing the flow of conflict diamonds – ‘rough diamonds used to finance wars against governments’ – around the world’’.
The organisation are doing fantastic work in making sure the diamond trade is as ethical as possible, and incredibly, today, a whopping 99.8% of the global production of diamonds is covered by KP members. Should you see KPCS on your shipment or purchase, you can rest assured that the rough diamond you’re buying was mined, sorted and shipped in a ‘conflict free’ way.
You should also make sure the band is made from ethically sourced metals, checking that your ring provider is certified by Fairtrade.
Becoming Fairtrade certified and meeting Fairtrade Standards for gold helps miners formalise and improve their mining and business practices. Fairtrade Standards are met on working conditions, health and safety, handling chemicals, women’s rights, child labour and protection of the environment.
Heirlooms
Alternatively, you could make an even more ethical purchase by not making a purchase at all.
This is another aspect you should consider when trying to choose the perfect engagement ring for your partner. Not everyone has or wants a family heirloom as their engagement ring, but it could be something that works for you and your partner.
Not only do heirloom rings hold incredible sentimental value, but they are a good way to save money and reduce your carbon footprint, too. Whether it is an heirloom from your side of the family or theirs, passing a ring down through generations can make your engagement and wedding that extra bit special.
Having said this, there are some downsides to choosing a family heirloom as an engagement ring. Firstly, you need to be aware of the issues it may cause within the family through you having the heirloom over other members of the family. It could potentially create an unnecessary divide which is the last thing you want at a wedding.
Another thing to take into account is if the heirloom comes from your family, your partner may not feel as if the ring is truly their own. It could be perceived as a temporary gift as opposed to an engagement ring that has been personally selected for them. Again, this is why it is important to have conversations about engagement with your partner beforehand, so you are clear of their wishes. Honesty is always the best policy, hey?
Know The 4C’s
Colour, cut, clarity and carat are the 4C’s you need to be aware of if you are looking for a diamond engagement ring. The 4C’s are considered to be the global standard of measuring the quality of a diamond and it is a helpful thing to know when you are trying to choose the perfect ring for your partner.
Starting off with colour, a diamond that has less colour is rarer and more precious than one with a deeper colour.
The cut of a diamond really transforms a ring, and many consider it to be the most important component. How the diamond is cut will change the way the diamond reflects white, so a beautifully cut diamond will give off more of that all-important sparkle.
Diamonds are formed through an intense underground process of immense heat and pressure. Due to this, many diamonds contain imperfections or ‘blemishes’ that can interfere with light reflection, commonly referred to as the diamond’s ‘sparkle.’ The clarity of a diamond refers to these blemishes and jewellers can determine a diamond’s quality by studying these imperfections. The highest diamond on the clarity scale would be one that is considered flawless, with no blemishes or inclusions.
The last of the 4C’s is carat, which might be the element shoppers are most familiar with. The carat of a diamond is determined not by its size, but by its weight. So, if you are seeking a diamond ring on the more luxurious end of the scale for your partner, be sure to look for one with the highest carat weight, instead of going for the diamond that simply looks the biggest.
Know Their Size
Perhaps one of the most important steps in choosing the right engagement ring, but one that people often get wrong, is the size.
A proposal is meant to be your once-in-a-lifetime opportunity to pledge your love and dedication to your partner, and the last thing you want is for it to be ruined by the ring slipping off their finger, or, even worse, not getting it on in the first place. A proposal requires organisation, so make sure when you are planning to make that purchase, you have previously made note of your partner’s ring size.
As mentioned previously, you should have had a conversation with your partner prior to the proposal, which is one way to find out their ring size. You can measure ring size at home quite easily by wrapping a piece of string around the finger, making a note of the measurements, and then using an online guide to tell you what the measurements are equal to in ring size.
However, if you don’t want your partner knowing you are in the process of buying an engagement ring there are more subtle ways to find out ring size. If they already wear rings, you could borrow one of them and trace the inner circle onto paper and then get your measurement that way. Alternatively, you could enlist one of their close friends to subtly get the information for you.
As a general rule (which you shouldn’t rely on, of course), the average ring size for a woman is around 6 to 6.5, but can range anywhere from 3 to 9.
Consider Lifestyle
When choosing the perfect engagement ring, it’s essential to consider your partner’s lifestyle and daily activities. This practical consideration is often overlooked but can make a significant difference in how comfortable and appropriate the ring will be for everyday wear.
If your partner has an active lifestyle or works with their hands frequently – perhaps they’re a healthcare professional, fitness instructor, artist, or craftsperson – you’ll want to choose a design that won’t snag, scratch, or interfere with their daily activities. Lower profile settings that keep the gemstone closer to the finger are generally more practical for active individuals.
For those who use their hands extensively at work, more durable metals like platinum or palladium might be better choices than softer options like gold. Similarly, some gemstone cuts and settings are more secure and less likely to be damaged during physical activities than others.
Remember that an engagement ring is meant to be worn daily for years to come, so choosing something that fits seamlessly into your partner’s lifestyle will ensure they can wear it comfortably and proudly without having to constantly remove it for practical reasons.
Some partners may even prefer a simpler band for everyday wear with the option to wear their more elaborate engagement ring for special occasions. Having these conversations beforehand can help you choose a ring that truly complements their life rather than complicates it.
Have A Budget
Before you begin your search for the perfect engagement ring, you need to set aside a budget to work with. While engagement rings can cost a lot of money, you shouldn’t break the bank just to buy the flashiest one you see.
You may hear some people say that an engagement ring should cost the same amount as three months’ worth of wages, but that is not a realistic expectation for everyone. It is an outdated tradition dating back to the 1930s, and is thankfully less observed now.
Instead, create a budget that works for you, and only spend an amount that is appropriate for you. Because of this, we’re not even going to mention the average cost of one in 2025; you do you, and shop only within your means.
Knowing what your partner likes and having a basic understanding of engagement jewellery means you can start to gauge price points. After this, you can start to create a budget that will be inclusive of your partner’s wishes and one that is considerate of your monthly income.
Consider Ring Insurance
Once you’ve invested time, thought, and money into choosing the perfect engagement ring, it’s crucial to protect that investment with proper insurance coverage.
Engagement ring insurance is specifically designed to cover loss, theft, or damage to your ring – incidents that your standard home contents insurance may not fully cover or may come with high excesses. Given that engagement rings are often worn daily and travel everywhere with their owner, they’re particularly vulnerable to these risks.
When shopping for ring insurance, you’ll typically find two main options: adding the ring to your existing home insurance policy as a specified item, or taking out a standalone jewellery insurance policy. Standalone policies often provide more comprehensive coverage, including worldwide protection and coverage for mysterious disappearance (when you simply can’t account for where the ring has gone).
The cost of insurance is generally quite reasonable, typically ranging from 1-2% of the ring’s value annually. So, for a £2,000 ring, you might pay around £20-40 per year for peace of mind.
Before purchasing insurance, make sure you have the ring professionally valued and keep all documentation, receipts, and photographs in a safe place. Many insurers will require a recent valuation certificate, particularly for rings valued over a certain amount.
Whilst nobody wants to think about something going wrong with their precious engagement ring, having proper insurance means you can wear it with confidence, knowing you’re protected should the unexpected happen.
And after all that effort, in planning and researching, we do hope they say ‘yes’!
Most British gardens get abandoned somewhere around October. The furniture goes into storage, the cushions come inside, and the space you spent all summer enjoying becomes little more than a view from the kitchen window. But with some thoughtful additions, that neglected patch can earn its keep through the colder months too.
The trick isn’t to fight the seasons but to work with them. A garden that functions in winter needs shelter, warmth and a reason to step outside even when the temperature drops and daylight disappears by late afternoon. Here’s how to make that happen.
Start With Shelter
Covered Structures & Garden Rooms
Year-round use starts with protection from the elements.Insulated garden rooms are the most effective solution if budget allows. Whether used as a home office, reading room or simply somewhere to sit with a coffee on a grey morning, these structures extend your living space without requiring planning permission in most cases. Modern options come with double glazing, proper insulation and heating as standard, making them comfortable even in January.
If a full garden room feels like overkill, a pergola with a retractable roof or adjustable louvres offers flexibility. You get shade and shelter when needed, open sky when the weather behaves. Sliding panels or canvas walls can add privacy and block wind without making you feel boxed in. Even a simple canopy over a seating area extends its usability by weeks at either end of the season.
Materials That Last
Choosing the right materials matters more than you might think. Timber-framed canopies bring warmth and soften modern settings. Aluminium frames and polycarbonate roofing handle rain and temperature swings without warping or staining. Green roofs offer insulation and help manage rainwater, though they require a bit more commitment.
The goal is shelter that feels deliberate rather than bolted on as an afterthought. Something that belongs in the space, not something you tolerate because it keeps the rain off.
Add Warmth
Heating Options
Outdoor heating transforms how often you actually use your garden in winter. The right choice depends on how you want the space to work.
Fire pits create a natural gathering point and add atmosphere on cold evenings. There’s something about an open flame that makes sitting outside in December feel intentional rather than eccentric. Freestanding patio heaters offer flexibility and can be repositioned as needed. Built-in systems like under-patio heating keep things seamless but require more upfront investment.
Positioning matters. Place heat sources near seating and away from draughts. A heater in the wrong spot wastes energy and leaves you cold.
Insulation & Weatherproofing
If you have a garden room or covered structure, insulation makes the difference between a space you use and one you avoid. Look for thermally efficient walls and roofs, ideally with SIPs or similar construction. On the floor, composite decking or treated timber handles moisture and wear far better than standard options.
Soft furnishings help too. Outdoor rugs, thick curtains and weather-resistant cushions add comfort and retain warmth. Draught-proofing doors and windows with proper seals or thermal blinds makes a noticeable difference when temperatures drop. These small details are often what separates a garden room you retreat to from one that gathers dust until spring.
Get The Lighting Right
Once the clocks go back, your garden disappears by 4pm unless you light it properly. This is non-negotiable for winter use. Solar path lights offer function without wiring, though their effectiveness drops when daylight hours shorten. Low-voltage spotlights can pick out key features or define the edges of a seating area. Statement pieces like pendant bulbs over a table or lanterns hung from branches add atmosphere and make the space feel considered.
Warmer light temperatures tend to feel more inviting, particularly against timber or textiles. A well-lit garden isn’t just prettier after dark. It’s safer, more usable and more likely to draw you outside when every instinct says stay in.
Use Zoning To Your Advantage
Even a modest garden benefits from intentional zoning. Separating areas by use gives the space structure and makes it easier to maintain through the messier months.
A sheltered corner with seating becomes your default spot for morning coffee. A covered dining area means you can eat outside even when the forecast is uncertain. Raised beds or planters can act as soft boundaries between zones without blocking light or sightlines.
Built-in benches with storage underneath keep cushions, throws and garden games tucked away but accessible. The less friction there is to using the space, the more often you will.
Keep It Green
A garden that looks dead from November to March isn’t one you’ll want to spend time in. Planting with the seasons in mind keeps things interesting even in the depths of winter.
Evergreens provide structure and colour when everything else has died back. Winter-appropriate planting means there’s always something worth looking at, whether that’s the bright stems of dogwood, the texture of ornamental grasses or the unexpected colour of winter-flowering shrubs. Come spring, bulbs and perennials fill in the gaps.
Biophilic design principles suggest that simply being around greenery improves mood and reduces stress — something worth remembering when January drags. Native species attract pollinators and require less maintenance than exotics. Climbing plants soften hard edges and add privacy without eating into floor space.
The Bottom Line
A garden that works only in summer is a garden that sits empty for half the year. With decent shelter, a heat source and proper lighting, yours can become a genuine extension of your living space rather than something you admire through glass while the rain batters down. The investment doesn’t need to be enormous.
Start with the basics, add layers as budget allows, and you’ll find yourself outside far more often than you expected — even when the weather gives you every reason to stay indoors.
You have probably seen it happen, even if you couldn’t quite put your finger on what was wrong. A business catches your eye on Instagram with a beautifully curated feed, so you click through to their website and find yourself staring at something that looks like it was last updated during the coalition government. Then their email lands in your inbox and it belongs to a third company entirely. The effect is unsettling, and the message comes through clearly: something here is not quite right.
This kind of visual incoherence is common among smaller businesses that have built their presence piecemeal, adding a website here, a social account there, an email list when someone told them they needed one. Building a visual brand that actually works means creating a system robust enough to hold together wherever your audience encounters you.
Start With Your Core Elements
Before thinking about specific platforms, establish the foundational elements that will remain constant: your colour palette, your typography, and your graphic style.
Colour carries more emotional weight than most people credit it with. Earthy tones evoke sustainability and calm, which is why you see them in wellness branding, while bright, saturated hues signal energy and creativity. Whatever direction feels right, limit yourself to three to five primary colours plus one or two accent shades, and treat those hex codes as non-negotiable.
Typography matters just as much. A serif headline paired with a clean sans-serif body font creates polish and establishment. Bold sans-serifs throughout suggest confidence and modernity. Pick no more than two typefaces and define exactly where each gets used. When someone can recognise your content before reading a word, your brand identity has become truly established.
Create A Simple Style Guide
You do not need a 50-page brand bible. A single page style guide covering your colours, fonts, logo usage, and photography style will do. The point is having a reference that keeps things consistent whether you are designing something yourself, briefing a freelancer, or bringing someone new into your business.
Include your logo variants and when to use each: full colour for light backgrounds, reversed for dark, simplified for small applications like favicons. Including examples of what not to do, like a stretched logo or clashing colour combination, makes the rules concrete.
Adapt Without Losing Consistency
Different platforms make different demands. Instagram rewards bold, scroll-stopping visuals. Your website needs to balance aesthetics with usability. Email has constraints around image loading and mobile rendering. The trick is distinguishing between what stays fixed and what can adapt.
The experts over at Pomp and Circumstance PR suggest that maintaining a consistent visual identity helps build trust across these diverse channels. Adapting content to fit specific platform requirements ensures that the brand remains relevant to different audience segments. This balanced approach prevents the messaging from becoming stagnant while preserving its core values.
Your colours, typefaces, and core graphic elements should remain constant, but how you apply them can shift. A carousel post might use more white space than a homepage hero. An email header can be simpler than your website navigation. As long as the foundations stay consistent, the overall perception remains cohesive.
Build Templates That Scale
Creating every piece of content from scratch is exhausting and almost guarantees inconsistency. Templates solve both problems by giving you reusable formats for each platform: Instagram layouts, story templates, email headers, website content blocks. The best templates accommodate different content without requiring design decisions every time.
This is where unlimited graphic design services prove their worth. Rather than piecing together visuals yourself or waiting on freelancers, you can request a complete template library built to your specifications and have everything ready within days. Once that infrastructure exists, product launches, campaigns, and announcements can all follow the same visual logic.
Audit What You Already Have
Before building new assets, take stock of what exists. Pull up your website, scroll through your social feeds, and open your recent emails. Do they look like they belong to the same business? Note where things diverge: perhaps your Instagram has evolved while your email templates reflect an earlier iteration, or your website photography has a different mood from your social content. This audit reveals where your attention is most needed and lets you prioritise rather than trying to fix everything at once.
Think Beyond Digital
Your brand does not stop at the screen. If you have physical touchpoints like packaging, business cards, or signage, these need to follow the same visual system. Many smaller businesses invest in a strong digital presence but then ship products in generic packaging that bears no relationship to their online identity. Every touchpoint is an opportunity to boost brand awareness, but only if it reinforces rather than undermines what you have established.
Make It Easy To Stay On Brand
Consistency breaks down when staying on brand requires effort. If someone has to hunt for the right logo file or guess at the correct hex code, mistakes happen. Set up systems that make the right choice the easy choice: a shared folder with approved assets, a Notion page with your style guide, brand colours saved in your design tools. For Instagram, planning tools like Later or UNUM let you preview your grid before posting.
Here’s the thing; a visual brand that works across every touchpoint is not about rigid rules or design perfection. It is about creating enough structure that your audience recognises you wherever they find you, while leaving room to adapt to different platforms. Define your core elements, document them clearly, build templates that scale, and make it easy for everyone to stay on brand. The businesses that get this right build trust faster, stand out in crowded feeds, and turn browsers into loyal customers.
We’ve all been there. December has slipped away faster than anticipated, Christmas Eve is looming, and you’ve just realised you still haven’t found something for your sister-in-law – or worse, your mother. Panic ensues. The thought of showing up to Christmas dinner empty-handed is simply out of the question, but what can you do with such little time?
Fear not, for the art of last-minute gift-giving is a skill that can be honed with a dash of creativity, a sprinkle of personalisation, and a good measure of sincerity. Here’s how you can transform a potential gifting faux pas into a moment of genuine warmth and thoughtfulness this Christmas.
Embrace The Personal Touch
The essence of a thoughtful gift is not found in its price tag or its grandiosity, but in its relevance to the recipient. Think about what makes the person special to you. Do they have a favourite author, a preferred cuisine, or a hobby they cherish? Even at the eleventh hour, a quick trip to the local bookstore for a novel by their beloved writer, or a visit to a Christmas market for some artisanal treats, can save the day.
If you’re truly pressed for time, consider a digital gift. An e-book, an online course, or a subscription to a service that aligns with their interests can be purchased and delivered in mere moments, all without leaving your desk – ideal when the high street is heaving with fellow last-minute shoppers.
Craft A Heartfelt Note
Never underestimate the power of words. A beautifully written Christmas card or a heartfelt note can often mean more than the gift itself. Take a moment to express your feelings, share a favourite memory from the year gone by, or write a few lines about what you’re looking forward to in the year ahead. This personal expression of affection and appreciation will likely be cherished for years to come, long after the physical gift has been used or forgotten.
Experience Over Material
When time is of the essence, gifting an experience can be a swift yet impactful choice. A voucher for a spa day, tickets to a pantomime or show, or a reservation at a fine dining restaurant for the new year can all be arranged swiftly online. These gifts not only provide immediate delight but also promise future enjoyment and the creation of new memories – something to look forward to once the festive season winds down.
The Lifesaver: Same-Day Courier Services
In a pinch, same-day courier services are a last-minute gifter’s dream. A swift online booking can have your chosen token – from a fragrant bouquet to the latest tech gadget – delivered directly to the recipient’s door within the same day. It’s a seamless way to add a touch of urgency and personalisation to your gift, showing that you’ve gone the extra mile, even at the last moment. Just ensure you select a reputable courier for timely and safe delivery, and be mindful that slots book up quickly in the run-up to Christmas Day.
Make It An I.O.U. With Style
Sometimes, the best gift you can give is the promise of a future treat. If you’re truly out of time, craft an I.O.U. that promises an upcoming adventure or item. The key here is to be specific and sincere – promise a dinner at their favourite restaurant in January, a weekend getaway once the new year settles, or a shopping trip to pick out something they’ve had their eye on in the sales. Present this I.O.U. with the same flair as you would a physical gift, perhaps tucked inside a Christmas cracker or ornament, and make sure to follow through on your promise promptly.
Presentation Is Key
A gift wrapped with care can elevate even the simplest of presents. Use high-quality wrapping paper, ribbons, and perhaps a sprig of fresh greenery – holly, eucalyptus, or pine – or a handcrafted tag to add a touch of festive elegance. The effort you put into the presentation can speak volumes about your regard for the person, making even a last-minute gift seem premeditated.
The Last Resort: The Curated Christmas Hamper
If all else fails, a hamper can be your saving grace. A quick dash to the local market or deli can yield a selection of fine cheeses, chocolates, mince pies, mulled wine spices, or other seasonal delicacies. Arrange them in a basket with some cellophane and a bow, and you have a gift that looks as though it took weeks to plan.
You can even theoretically pull this off when sending gifts to loved ones living far away. As GBO, who offer a convenient way to send gift baskets to Switzerland, tell us it’s always a good idea to personalise the hamper with a handwritten note or a small keepsake. For instance, you could include a small jar of homemade jam, a sachet of their favourite tea, or a photo of a cherished memory together. These personal touches can transform a simple hamper into a heartfelt and memorable gift.
Last-Minute Gift Ideas & Suggestions
When time is not on your side, but you still want to convey thoughtfulness, here are a few specific last-minute gift ideas that can save the day:
For the Book Lover
Personalised Bookmark: Dash into a local craft shop and pick up a leather bookmark that you can personalise with the recipient’s initials or a short message.
Audiobook Subscription: A subscription to an audiobook service like Audible can be purchased in minutes and offers access to a world of literature – perfect for those long winter evenings.
For the Food Enthusiast
Specialty Cooking Ingredients: A selection of exotic spices, infused oils, or luxury chocolates from a nearby deli can be a gourmet’s delight.
Cooking Class Voucher: Many cooking schools offer vouchers for classes that can be bought online and printed instantly – a wonderful way to kick off new year’s resolutions.
Restaurant Gift Card: A restaurant gift card for their favourite eatery – or somewhere they’ve been meaning to try – can be purchased online in minutes and gives them the freedom to choose when to enjoy it.
For the Music Aficionado
Concert Tickets: Check out last-minute ticket deals for local concerts, carol services, or performances that you can book online.
Vinyl or Playlist: If they’re a vinyl collector, a quick trip to a record store for a classic album works wonders. Alternatively, create a personalised playlist on a music streaming service featuring their favourite festive tracks.
For the Wellness Guru
Yoga or Meditation App Subscription: Wellness apps often offer gift subscriptions that can be arranged in a few clicks – a thoughtful way to help them unwind after the festive frenzy.
Organic Skincare Set: Health food stores often stock organic skincare products that can be beautifully packaged on the spot.
For the Artistic Soul
Art Supplies: A quality sketchbook, a set of professional-grade pencils or paints from an art store can inspire their next creation.
Gallery Membership: Many galleries offer membership that can be purchased online, providing a year of cultural enrichment.
For the Fashion Forward
Accessory Magic: A chic scarf, a pair of cufflinks, or a statement piece of jewellery can often be found in department stores and accessorised with a stylish gift box.
Fashion Magazine Subscription: A subscription to a leading fashion magazine is a gift that keeps on giving, month after month.
Gadget Accessories: Think of portable chargers, stylish phone cases, or Bluetooth trackers, which are readily available in electronic stores.
Online Course in Technology: Gift a course from platforms like Udemy or Coursera that offers the latest in tech education.
For the Environmental Advocate
Plant a Tree in Their Name: Many organisations offer the service of planting a tree in someone’s name, which can be arranged online with a certificate to present – a gift that gives back long after Christmas.
Reusable Eco-Friendly Products: Items like a bamboo cutlery set, a stylish leather tote bag, or a solar-powered charger are thoughtful and planet-friendly.
For the Adventurer
National Park Pass: If they love the outdoors, a touring pass to national parks can be a wonderful gesture and can often be bought online.
Adventure Experience: Book a hot air balloon ride, a diving lesson, or a rock-climbing session to get their adrenaline pumping in the new year.
Incorporating any of these ideas can turn your last-minute gift into a thoughtful surprise that reflects the recipient’s personality and interests. The key is to pair the gift with a personal touch, whether it’s a note, a customised detail, or a creative presentation, to show that you truly care. Remember, it’s the thought and the story behind the gift that will make it memorable, not the time spent in acquiring it.
The Bottom Line
Last-minute Christmas gift-giving need not be a testament to forgetfulness or carelessness. With a touch of creativity, a bit of personalisation, and a healthy dose of festive cheer, you can turn a potential gifting blunder into a testament to your resourcefulness and affection. Remember, it’s not about the time you’ve spent finding the gift, but the thought that goes into it that truly counts.
Though the climate is changing, driving a car still represents a necessity for so many. But to minimise the environmental impact of driving, as well as saving money in the process, it’s important to adopt a fuel efficient approach when behind the wheel. This is all about practising good driving techniques to minimise the amount of fuel you use, leading to both environmental and financial benefits in the short and long term.
When taking to the road winter, cars become less fuel efficient as a result of the colder conditions. Due to a combination of factors, including warming up the engine’s oil in cold weather, and the use of window defrosters, heaters, seat heaters, lights, and windscreen wipers, winter fuel consumption is nearly always higher than in summer, with motorists paying the price.
While additional winter costs are unavoidable, there are ways to minimise the consequences. Here are our 7 ideal tips for fuel efficient driving this winter.
Don’t Leave Your Car In Idle
Rather than leaving your car to idle for several minutes before driving, it’s always best to drive off straight away once you’ve initiated the engine. Leaving your car to idle has no effect on the car’s performance, and while your vehicle is sitting in the driveway with its engine on, fuel is being wasted and air polluted.
Lots of drivers want to let the engine warm the car up to defrost ice on the windshield, however, it’s best to use a scraper and de-icer on the windshield to clear ice prior to getting in, and then to get on with your journey as soon as possible to make the best use of your fuel.
Drive Smoothly & Anticipate The Road
Aggressive driving habits are one of the biggest fuel wasters on the road. Harsh acceleration, heavy braking, and erratic speed changes can increase fuel consumption by up to 40%. Instead, aim for smooth, gradual acceleration and try to maintain a steady speed wherever possible. Anticipate traffic flow, traffic lights, and roundabouts well in advance so you can ease off the throttle early rather than braking sharply. On motorways, using cruise control can help maintain consistent speeds and improve efficiency.
By adopting a calmer, more measured driving style, you’ll not only save fuel but also reduce wear on your brakes and tyres. For drivers keen to understand and improve their habits behind the wheel, telematics insurance could offer a better fit, providing insights into driving patterns whilst potentially lowering premiums for safer, smoother drivers.
Avoid Short Trips
Try to get all your car journeys done in one longer trip, rather than heading out on lots of short journeys. As your car runs over the course of a drive, it heats up to its optimum temperature, and the fuel injector gradually reduces the amount of fuel being injected into the engine.
When driving short distances, the engine never reaches this optimum temperature. By linking your journeys together, you can keep the engine warmer and more fuel efficient, rather than making it start from cold every time. Where possible, consider whether a short errand could be completed on foot or by bike instead. Now there’s a thought.
Think about the electrics being used in your vehicle, and whether you need all of them on. During winter, cars use their lights more, have their heater fan running, have heated front and rear windows on to clear the frost, and might even have heated seating switched on.
All these electric systems are putting a strain on the battery, which is in turn making the engine work harder and burning more fuel – which is even more pertinent for electric cars, incidentally. Try putting on an extra layer or two before your drive and keeping the seat heating off, or de-frosting your windows before driving rather than having the engine do it for you.
Obviously, safety comes first – never compromise on visibility or essential lighting – but being mindful of unnecessary electrical drain can make a measurable difference over time.
Ensure Your Tyres Are Inflated
Make sure your tyres are properly inflated as deflated tyres will cause additional drag and slow your car down. This is extra important in winter as low air temperatures cool the tyres down and reduce their pressure further, the knock-on effect of which can negatively impact fuel efficiency. Under-inflated tyres increase rolling resistance, meaning your engine has to work harder to maintain speed.
Check your tyre pressure at least once a month and always before long journeys, referring to your vehicle handbook for the correct PSI. Keeping your tyres healthy is always a good idea, however, it’s even more crucial in winter when your car is facing wet and icy roads.
Reduce Excess Weight & Drag
It’s easy to let your car become a mobile storage unit, but every extra kilogram your vehicle carries requires more fuel to move. Clear out unnecessary items from your boot and back seats – golf clubs, tools, or that bag of old clothes destined for the charity shop can all add up. Similarly, external accessories like roof boxes, bike racks, and roof bars create aerodynamic drag, significantly reducing fuel efficiency, especially at higher speeds. If you’re not using them, take them off.
Even something as simple as driving with your windows down at motorway speeds can increase fuel consumption due to added wind resistance. Small changes to reduce weight and drag can lead to noticeable savings at the pump.
Get On Public Transport Or Carpool
It’s now irrefutable. The planet is burning and things need to drastically change. So instead of seeking a saving on your car travel, it might be prudent (well, not ‘might’, it definitely will be prudent) to stop using your car at all, and prioritise walking, cycling or public transport except in emergencies. Your bank balance will be healthier, and more importantly, so will you and the planet. There really is no reason not to.
If your heart really is set on car travel, then an alternative, more affordable (not to mention sustainable) way to travel could see you starting up a carpool system. If your work requires you to travel for a conference, for example, then organising a carpool which takes multiple team members to the same destination is a much more cost-effective way of travelling for all involved. Not only does carpooling cut fuel costs per person, but it also reduces the number of vehicles on the road, easing congestion and lowering overall emissions.